Steps to create a contract with the TSET (Tobacco Settlement Endowment Trust) Health Promotion Research Center mHealth Resource
...
| Expand | ||
|---|---|---|
| ||
|
| Expand | ||
|---|---|---|
| ||
|
Downloading the Insight App
...
Once a Gmail account has been created, follow the steps below to download Insight:
From the phone, Click on the Google Play Store app

In the “Search for app & games” search bar type: Insight mHealth Platform

Select Install > Insight will start downloading onto the phone
After Insight downloads, choose Open
If installing on an Android 12+ device, see below “Location Permission on Android 12“
Click Allow to all permissions
Allow Insight to make and manage phone calls?
Allow Insight to take pictures and record video?
Allow Insight to access this device’s location?
Allow Insight to access photos and media on your device?
Allow Insight to record audio?
Allow display over other apps. (see below)
When the prompt “Let app always run in the background?” appears, select Allow
There are 2 variations of “Display over other Apps“ which can be displayed on different Android devices. One set of Android devices will only display the slider for the Insight app to enable the permission. The other variation will display the list of all installed Android apps that have permission to Draw-Over. In that case, the user must scroll down to select the Insight app, and enable the Draw-Over permission. Examples of each are shown below.
 |  |
...
Location Permissions on Android 12
Android 12 had some additional Permissions functionality that affected the Insight app behavior and the integration of BlueTooth devices with the Insight app. In order for the Insight app to be able to connect to BlueTooth devices, the Locations permission must be set to “Precise“ or “Accurate“. Enabling the Permissions will be similar to the devices displayed here.
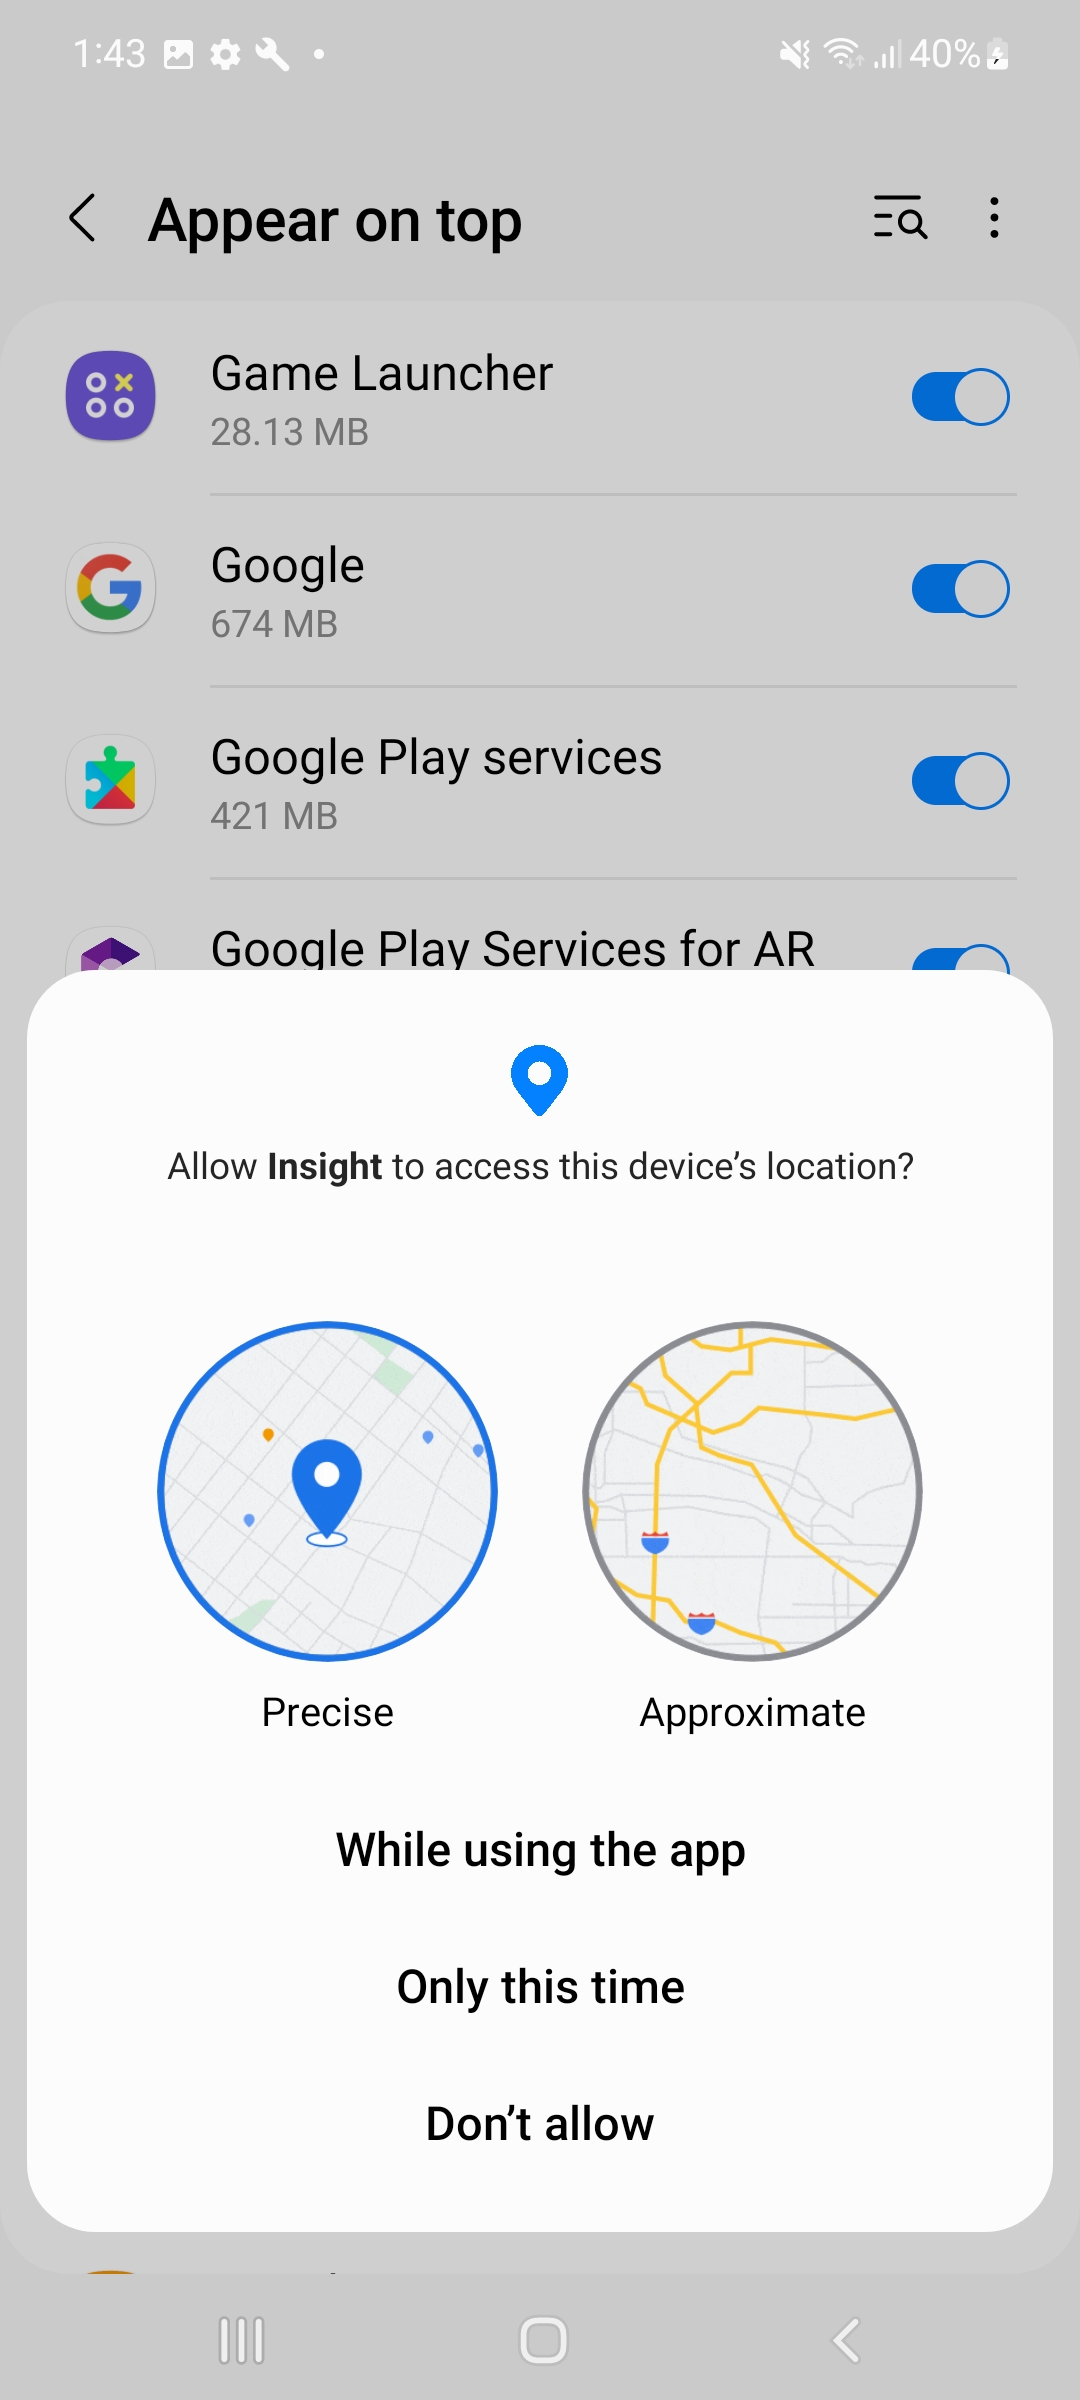 |
If the detailed Location Permission is not enabled when installing the Insight app or “Precise / Accurate“ Location is not enabled, the Android device will not be able to connect to BlueTooth devices.
CHANGING LOCATION PERMISSIONS
In order to revise “Precise or Approximate“ Permissions at a later time, the Location Services permissions must be accessed through Settings → Location → Locations Services. The pop-up display to select “Precise or Approximate“ will not be displayed again, even upon sequential re-install of the Insight application. Locations Services to enable BlueTooth connection using Location permissions are shown below.
 |  |
...
If you already have a Setup Code, follow the next steps. If not, go to the Creating and Setting Up a Participant section of this page.
Setting up Participant on the Insight App
In the Code field, enter the Setup Code > Select the Check button

Insight will configure the study > Once configuration is done, the participant is now set up on a phone
Creating and Setting Up a Participant
...
Method One: Participant Code
Status colour Green title Recommended
Go to the CMS login page “www.insightmhealth.com” and log in > Select Study
Click on the Participants tab (at the top of the CMS webpage) > Select Add New Participant button (at the top right corner)
Under the Info tab, enter a unique ID for the participant
From the Status drop down, select the Status of the participant: Active, Test, Completed, Archived
Select which Group the participant is in
Optional: Click PHI tab and enter protected health information (PHI must be enabled in Study Settings and enabled for a Role to enter or view participant’s PHI)
Click the Schedule tab
Select the Time Zone for the Participant.

The default value of Time Zone is the Time Zone of the machine being used to create the Participant.

Enter Wake and Sleep time for the Participant
Default Sleep Schedule times are preset: Wake time is 7 am while Sleep time is 10pm.
Optional: Changing Preferred time (Researcher decides if a Study will use this function)
Optional: Click the Settings tab to enter additional information
Settings are dependent on what is enabled for the Study
Once finished adding all required information, the Create Participant button will be enabled > Click the Create Participant button (at bottom center of CMS webpage)
The participant is created > Find and Select the Participants tab > Search for the unique ID of the participant > Click on the participant
Find the participants Setup Code (at the top center of the CMS webpage)
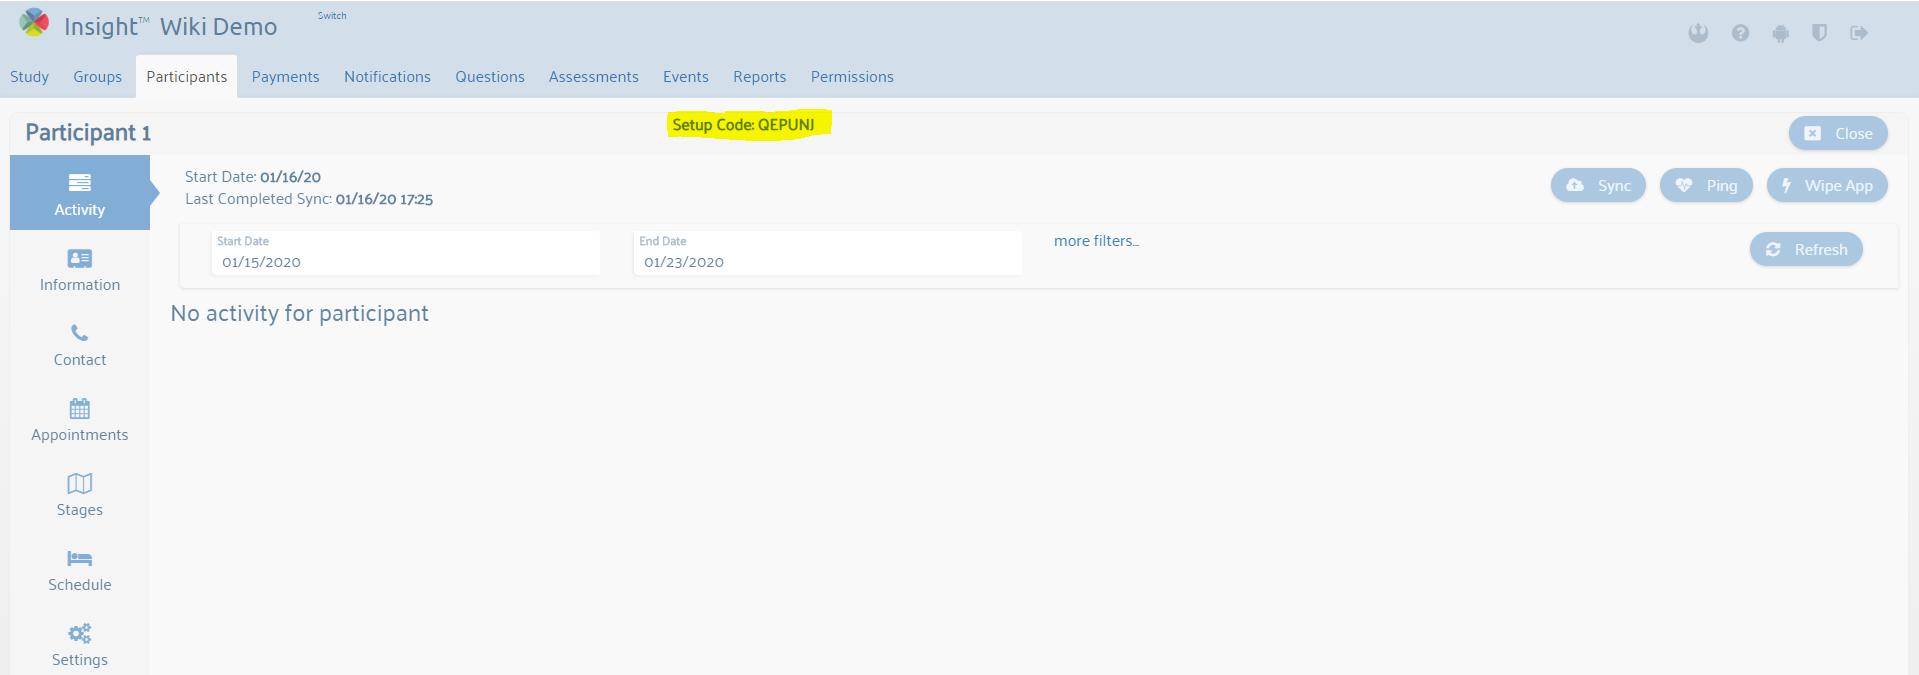
Make note of this Setup Code as it will be used to set the participant up on a phone.
This code is used once, but it can be reset one (1) time for extenuating circumstances.
At this point, Open Insight on the participants phone
In the Code field, enter the Setup Code from the CMS > Select the Check button
Insight will configure the study > Once configuration is done, the participant is now set up on a phone
Method Two: Group Code
Prior to setting up the participant on a phone, you will first need the Group Code from the CMS.
| Expand | ||
|---|---|---|
| ||
 See Steps 1 through 4 |
Finding the Group Code:
Go to the CMS login page “www.insightmhealth.com” and log in > Select Study
Find and Select the Groups tab (at the top of the CMS webpage)
Click Open
 for the group the participant is envisioned for
The Group Setup Code is below the Group Name
The Group Setup Code will be the same for every participant in a particular group.
Setting up a participant using Method Two (Group Code):
On the phone, open Insight
At the login screen, enter the Group Setup Code into the Code field > Select Check
Enter Wake and Sleep times for the week (Use the arrows on the top bar (
& ) to progress through the set up) 
Once done inputting all needed information, click Continue

The participant is in the CMS under the next available numeric ID
Open CMS Insight > Select the Participants tab (at the top of the CMS webpage) > Select the newly created participant
To change the participant to a preferred ID, open the Information tab (to the left)
Optional: Add demographics
Click Save
icon
| Note |
|---|
Confirm the Save |
...
| Note |
|---|
This option is used only when the researcher sets up the Insight application on the phone. Never give a participant your researcher login credentials. |
Open Insight
Click on Researcher Login (located below the blue Check button)

Enter login credentials: Username _____ , Password _____ > Select Log in button

Select the Study Name desired
Click Yes to confirm you selected the correct study

Click the ➕ sign at the top right corner
Choose the study Group > Enter a unique ID for the participant

Press the arrows (
& ) to the top right to navigate through the set up processEnter the Wake and Sleep times for the week (To progress through the days, use the arrows (
& ) at the top of the screen)Select Add Participant

Click Start Study
Phone up time and battery filter
...
If you have any questions, please submit a ticket through Service Desk and mHealth will address the issue there.
Open Insight
Swipe across the screen from far left to right > This will provide access to the “Staff Use Only” page
Select Login > Enter CMS login credentials (username;password)
A list of tabs will appear
Ignore all except “View Assessment Schedule” and “Test Assessments”
Clicking “View Assessment Schedule” will provide a list of all future scheduled assessments.
Select Test Assessments
Utilizing the “Test Assessments” option allows a team member to test all the study’s assessments consecutively.
Select the desired Event to test
The Event selected will appear as it does for a participant during the actual assessment; the phone will ring or vibrate (depending on the phones notification setting) and prompt the participant to take the assessment.
For the first (1st) round of testing on Insight, it is recommended to do the following:
Check to verify the stages are progressing as expected
This is important if stages are triggered off of calculated fields.
When going through assessments, look for the following technical items:
Questions are presented and worded as expected
Correct punctuation and spelling
Correct measure scale for answers
For example, if an answer choice is envisioned to scale from Strongly Agree to Strongly Disagree, verify it displays those choices instead of a typographical error like Strongly Agree to Strongly Agree.
Verify branching logic
Start with the simplest answers as you will test the assessment path with the least amount of branching
For instance, if a question states: “Did you take your medication today?” by answering “Yes” may lead the participant to the next question.
However, answering “No” may branch to another question(s) inquiring why the participant did not take their medication.
Start testing more complex branching logic individually
Test the branching logic by answering a question differently to produce different scenarios.
This allows the Tester to verify no questions are branching accidentally or incorrectly.
Confirm each group is receiving the correct Assessments and Events as assigned
If using Call Button(s), confirm the button is connecting to the correct person or place.
Testing using a “live” participant:
...
| Info |
|---|
During this phase, consider setting the duration of each stage = 1 day. This will allow you to test all Study stages quickly. |
Test the scheduling of assessments to confirm all are being prompted when expected
Assessment schedules are based on the assessment settings.
To view when current or future Assessments will be notified for your test participant, researchers are able to use the “Staff Use Only” page > then Select “View Assessment Schedule”
Swipe across the screen from far left to right to access the “Staff Use Only” page
Active participants will not have access to this feature; only Testers with CMS (Content Management System) login credentials.
Test having the phone launch Insight in different scenarios
When the Insight app is closed
When the Insight app is open
Doing an activity that is extensive, such as, watching a high resolution video
Check the data; confirm you are collecting accurate and all intended information
To access a study’s data, Go to the CMS login page “www.insightmhealth.com” and log in > Select Study > Click Reports (at the top of the CMS webpage) > Select the CVS or Excel button under EMA Data > You will receive an email from “donotreply-insight@insightmhealth.com” when the report is generated
4. Do Not Force Close the Insight App from the Recents Menu. Do Not Close All
...
| Expand | ||
|---|---|---|
| ||
|
| Expand | ||||||||||
|---|---|---|---|---|---|---|---|---|---|---|
| ||||||||||
2. After a category is chosen, start detailing the issue in the necessary fields.
|
...
The researcher will need to have a list of permissions associated with the role; although, permissions can be edited at any time.
Creating Role:
Go to the CMS login page “www.insightmhealth.com” and log in > Select Study
Select the Permissions tab (at the top of the webpage)
Select Group Rights > Click
Add New Role buttonNew Role will appear > Select Open
to display a hierarchy of permissions
Edit the “New Role” title by selecting the field and inputting a desired name.
Hierarchy of Permissions:
View: Role is able to view checked tabs
Edit: Role is able to make changes for a specific permission
Delete: Role is able to delete item(s) in a study
Admin: Role is able to view, edit, and delete the permission it is enabled for
A check mark indicates the permission is enabled.
From the example below, permission “Questions” is enabled on a View level; individuals assigned this role will be able to view but not edit or delete questions in the study.

Click Save
when enabling permissions is completed
Assigning Role (New User): Research member has not been added to the Study.
| Info |
|---|
A person envisioned for a Role must have CMS login credentials to be assigned said Role; if an individual has not been created in the CMS, please submit a ticket to Service Desk. |
Go to the CMS login page “www.insightmhealth.com” and log in > Select Study
Select the Permissions tab (at the top of the webpage) > Click Study Users
In the Search Username or Email field, input the individuals Insight CMS username > Select them from the search bar

Select the Role drop down > Click on the desired Role > Select
Add to Study 
If a Role is not created, follow “Creating Role” instructions before attempting to assign the role.
New User will appear at the bottom of the list with its associated Role
Assigning Role (Current User): Current research member switching to a different Role.
Go to the CMS login page “www.insightmhealth.com” and log in > Select Study
Select the Permissions tab (at the top of the webpage) > Click Study Users
Find the desired Research member from the Study User list
Find and Select the Role drop down > choose the envisioned Role
If a Role is not created, follow “Creating Role” instructions before attempting to assign the role.
Select Save
The User is assigned the new Role
Creating CMS (Content Management System) Credentials
...
| Note |
|---|
Institutional emails only; no personal emails accepted, such as, gmail, yahoo, hotmail. |
An email invitation is sent from the email address 'donotreply-insight@insightmhealth.com” with the heading ‘Insight App’ and subject line of ‘Confirm Email’ > Click on Link

2. A new window opens to the below screen > Input the desired username and password into the designated field
...
The Principal Investigator needs the individual’s CMS username to input into the Search bar.
Go to the CMS login page “www.insightmhealth.com” and log in > Select Study
Select the Permissions tab (at the top of the webpage) > Click Study Users
In the Search Username or Email field, input the individuals Insight CMS username > Select them from the search bar
Select the Role drop-down > Click on the desired Role > Select
Add to Study 
The newly added User will appear at the bottom of the Study Users list
Have the individual verify they were added to the correct Study with the accurate Role by logging into Insight.
...