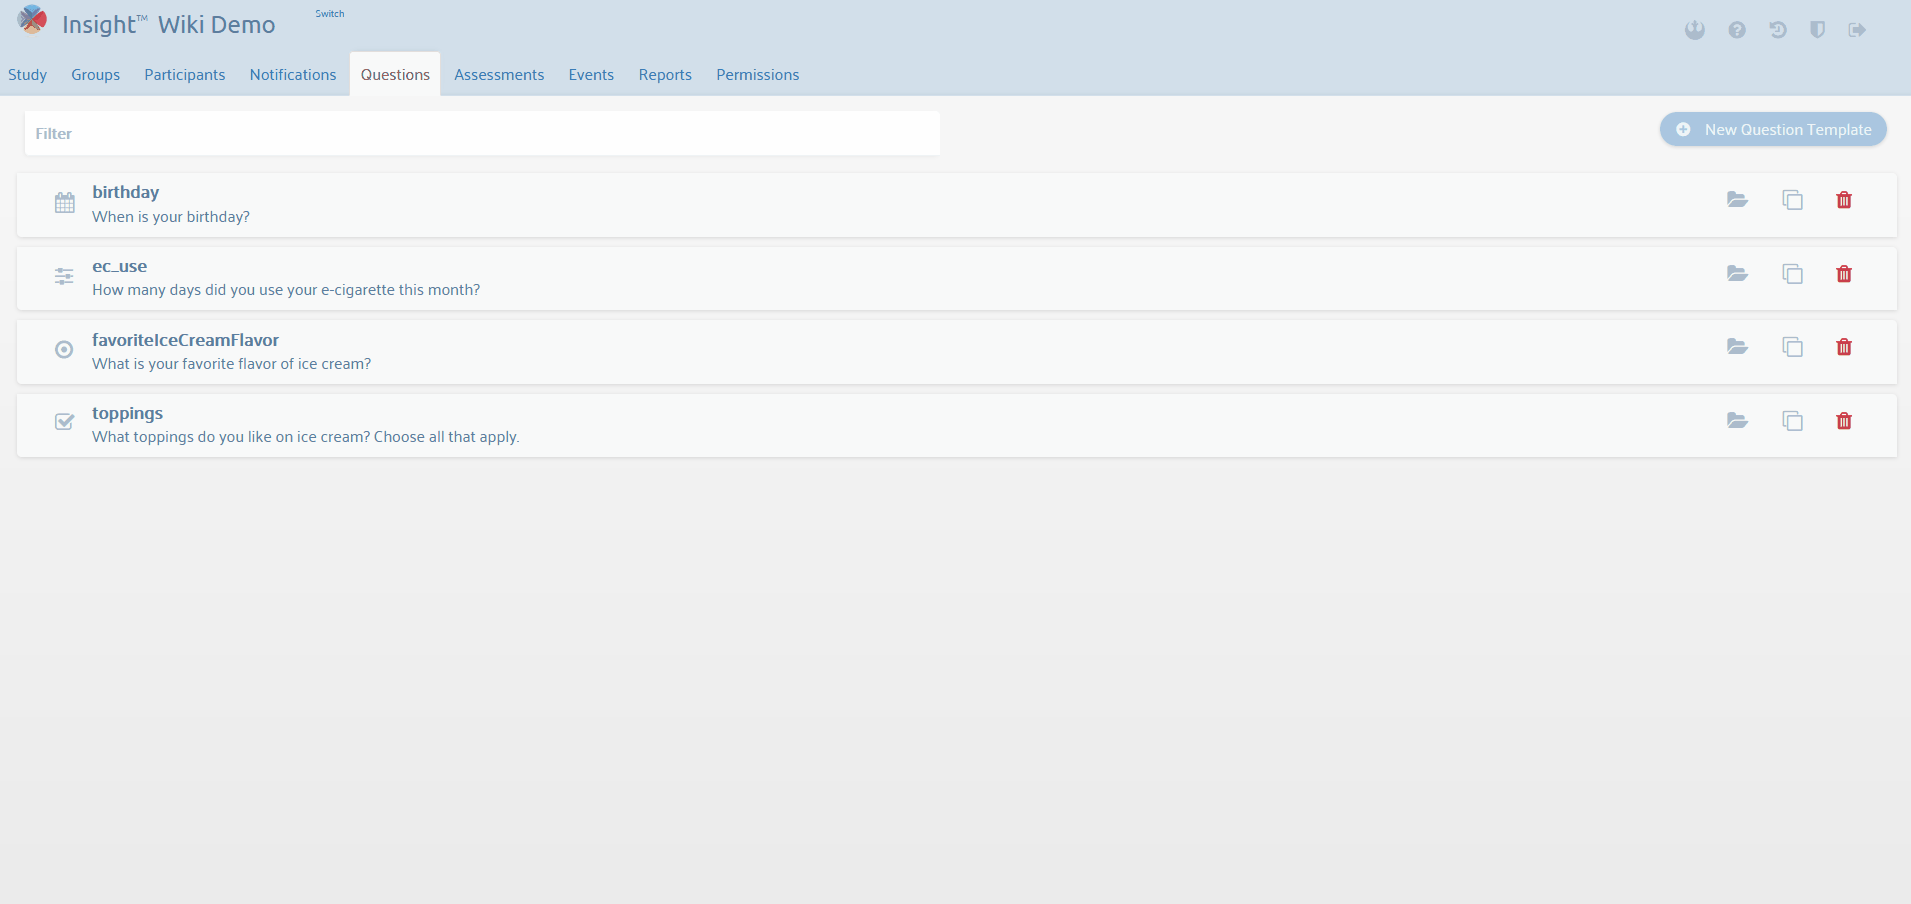
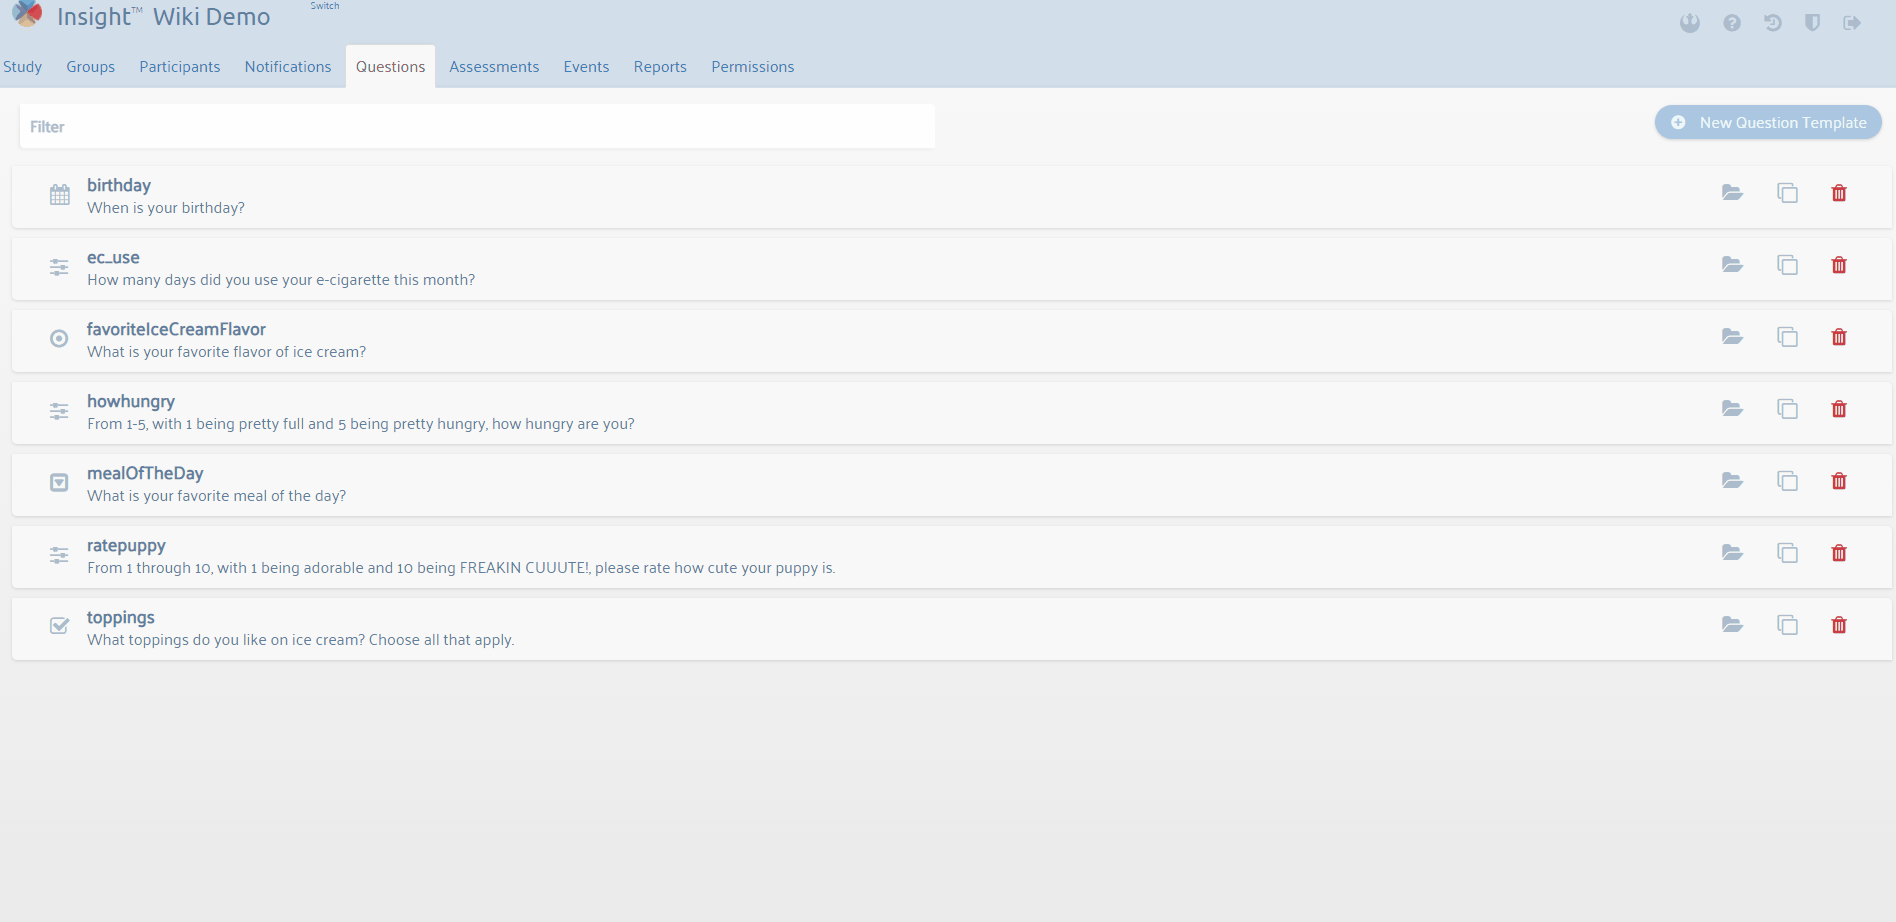
We recommend that you complete the following steps, in order, when creating your study:
...
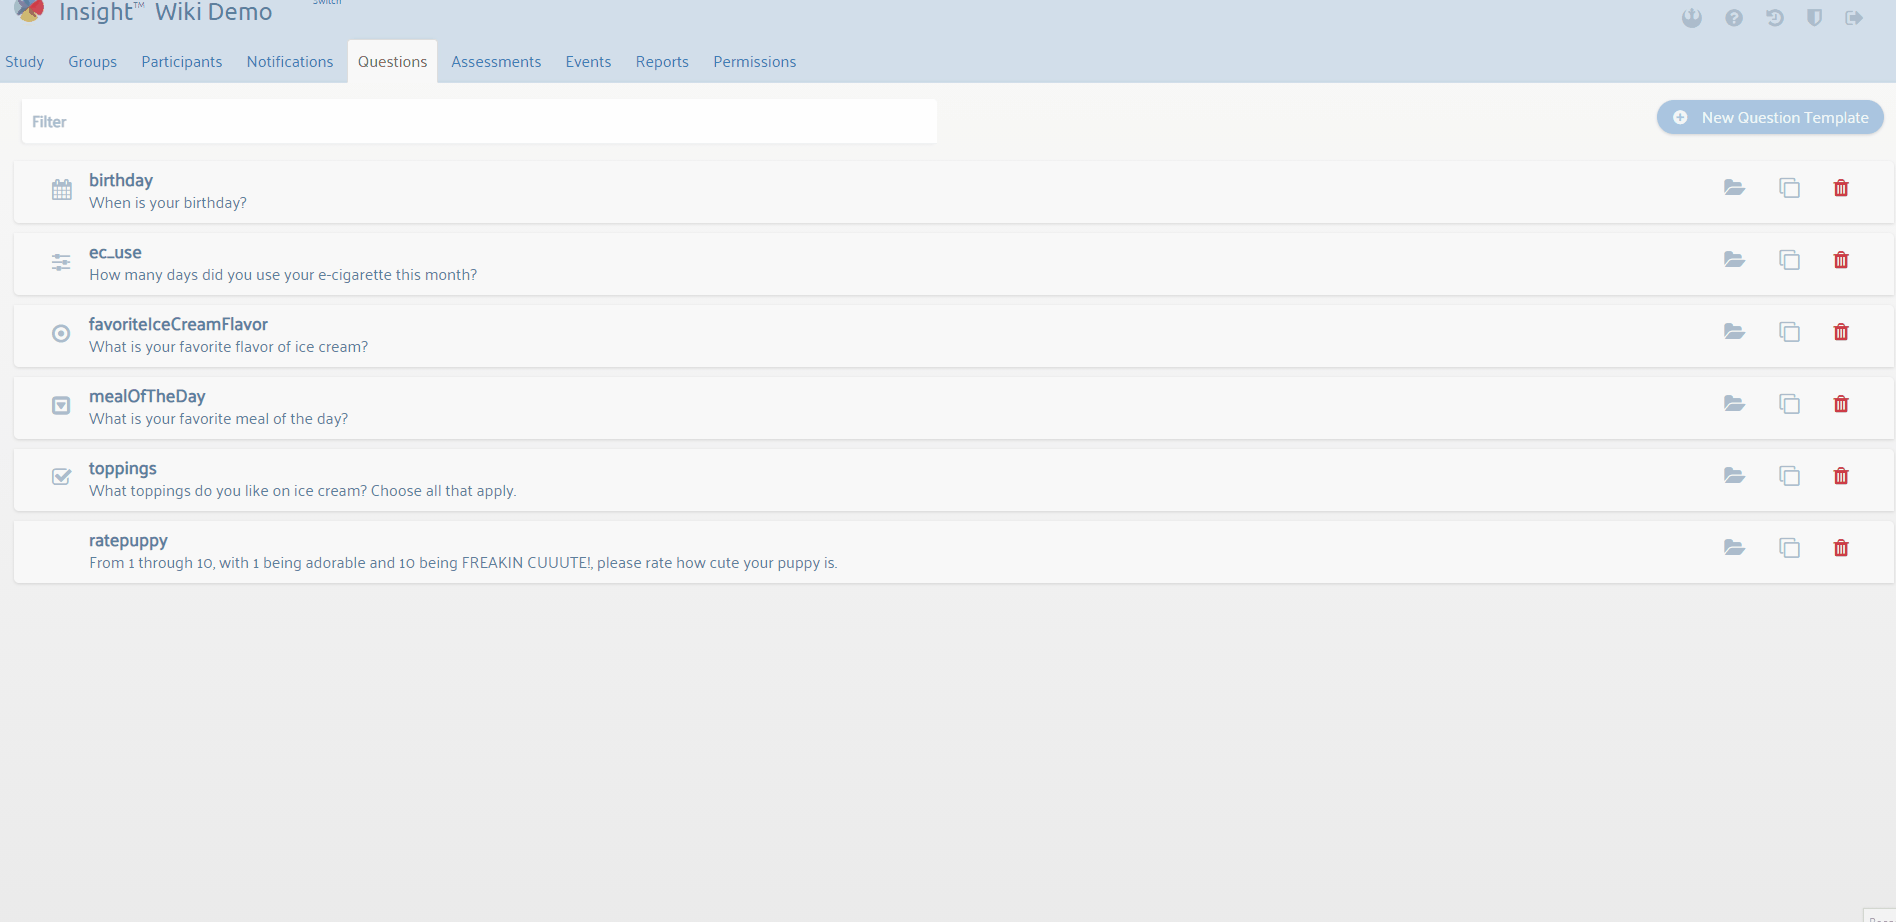
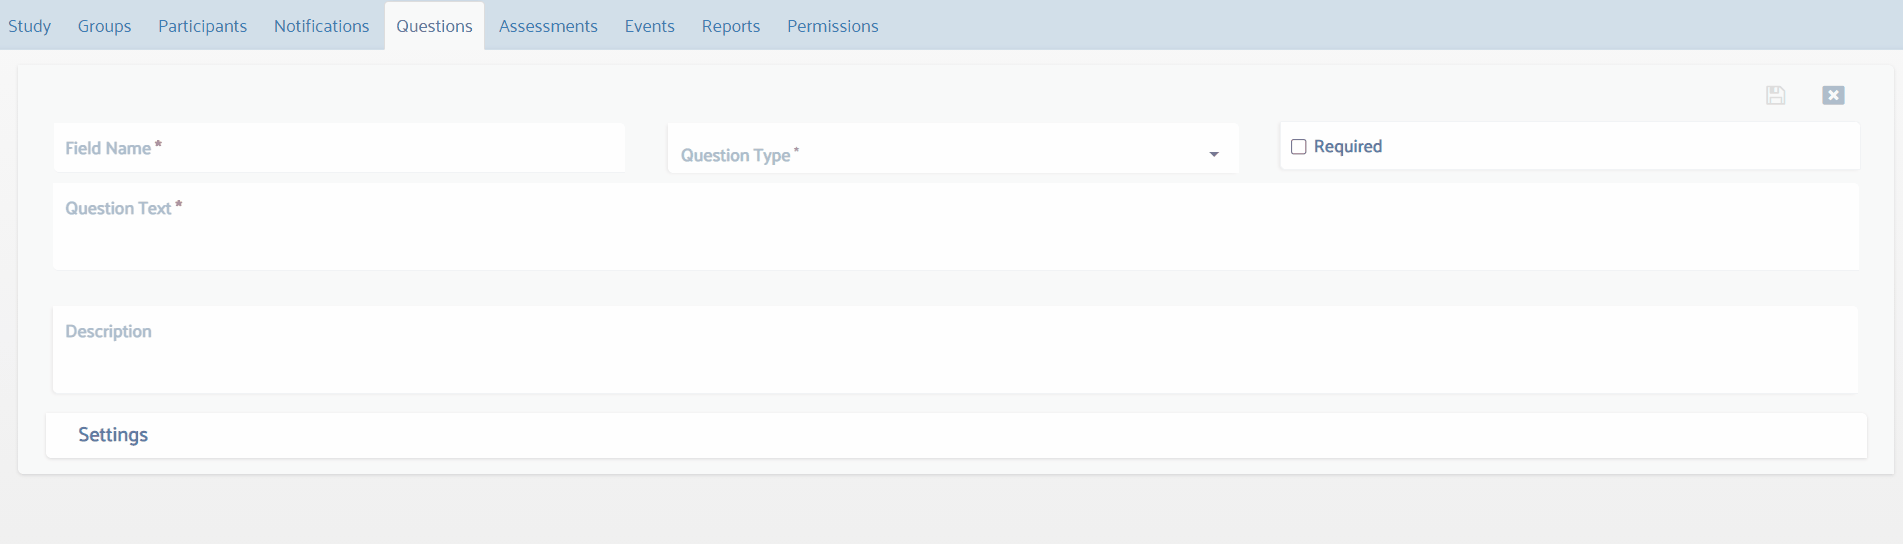
6. Type your Question Text. This text will appear on the smartphone screen during the assessment.
| Note |
|---|
Do not copy-paste Question Text from a source that generates its own formatting. It is a known behavior that copy-pasting from a source with its own formatting (such as MS Word or MS Outlook) may include the hidden formatting. |
7. Enter instructions on how to complete the question in the Description textbox (e.g., “Slide your finger from left to right to answer this question”). Use of this feature is optional.
...
| Expand |
|---|
|
 Continuous Slider - Participants slide their finger from left to right to choose a continuous response (e.g., 1-10 visual analog scale).
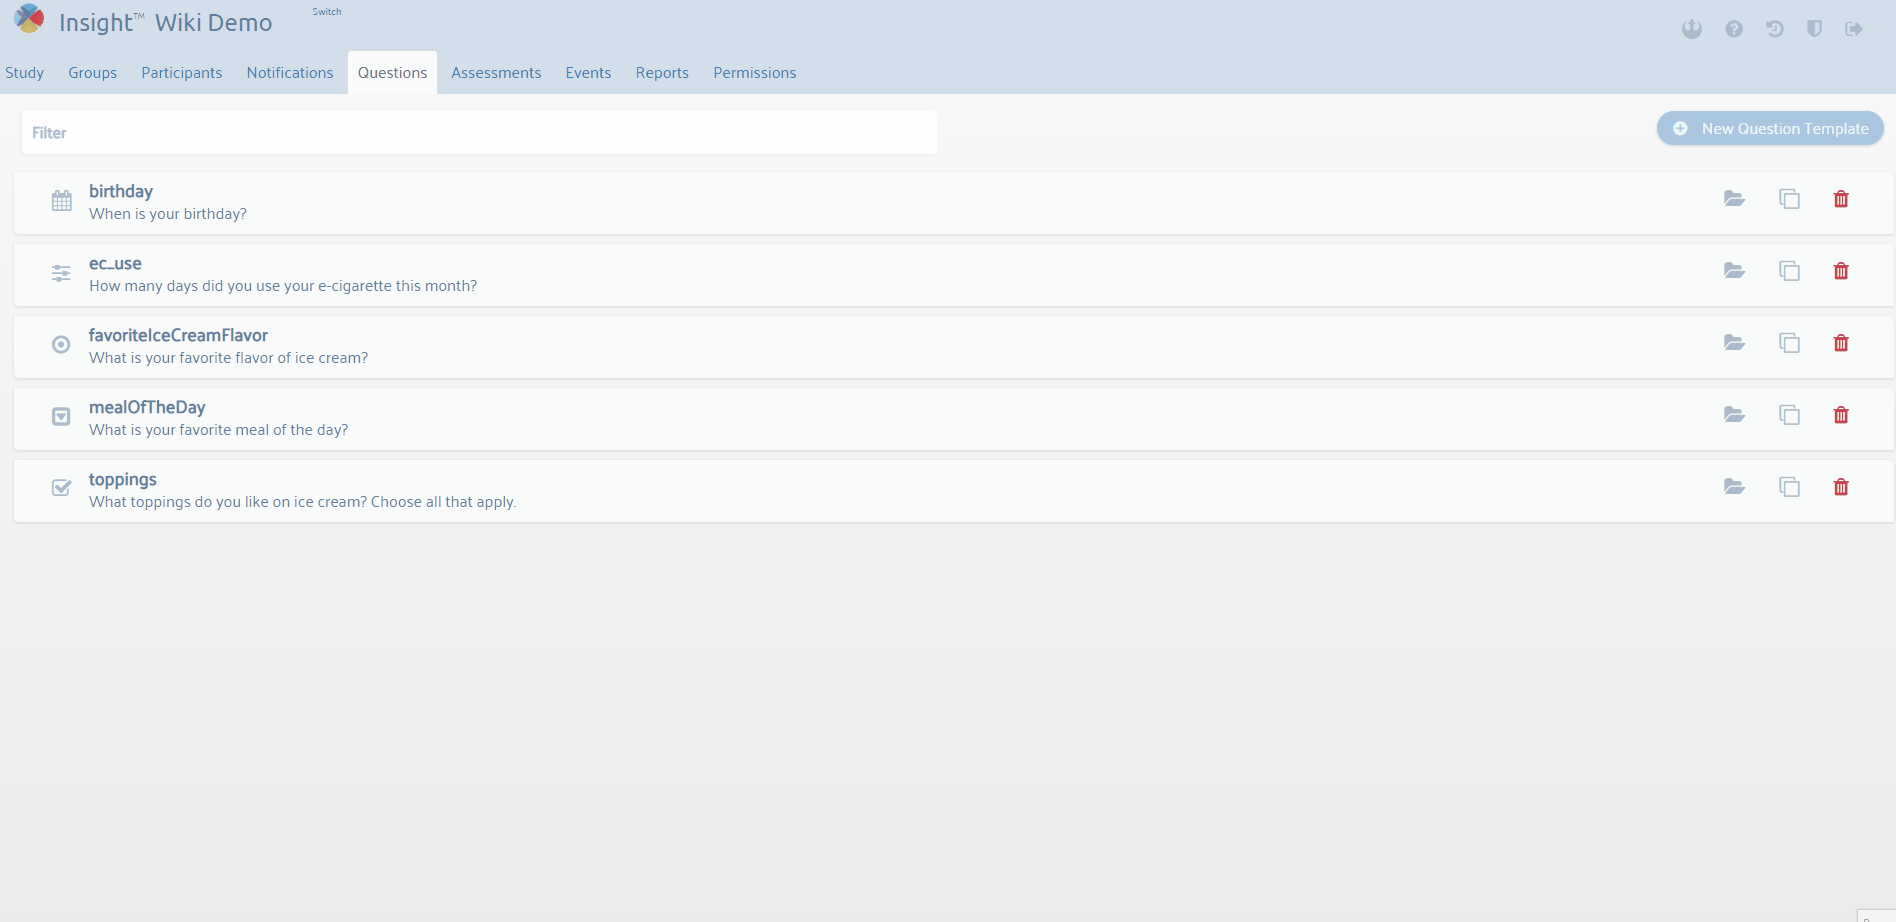 Date - Participant uses a calendar to choose a date.
 Dropdown - Participants click a box to select from a long list of potential answer responses.
 Payment Log - This item type is used to display the number or percentage of surveys completed, requires HTML file. More information can be found here.
 Radio - Response choices are shown in a list; only one answer can be chosen.
 Rich Text - A block of text that can be used to provide messages or instructions in the app; rich text allows additional formatting that is not available with the Text Only item type. For example, this item type allows you to embed URL links, underlining, highlighting, and bolding into messages.
| Note |
|---|
Do not copy-paste Question Text from a source that generates its own formatting. Rich-Text Question Text that is copy-pasted from a source with formatting provided (i.e. MS Word or MS Outlook) will include all of the hidden formatting. |
  Text Only - A block of text that can be used to provide messages or instructions in the app. 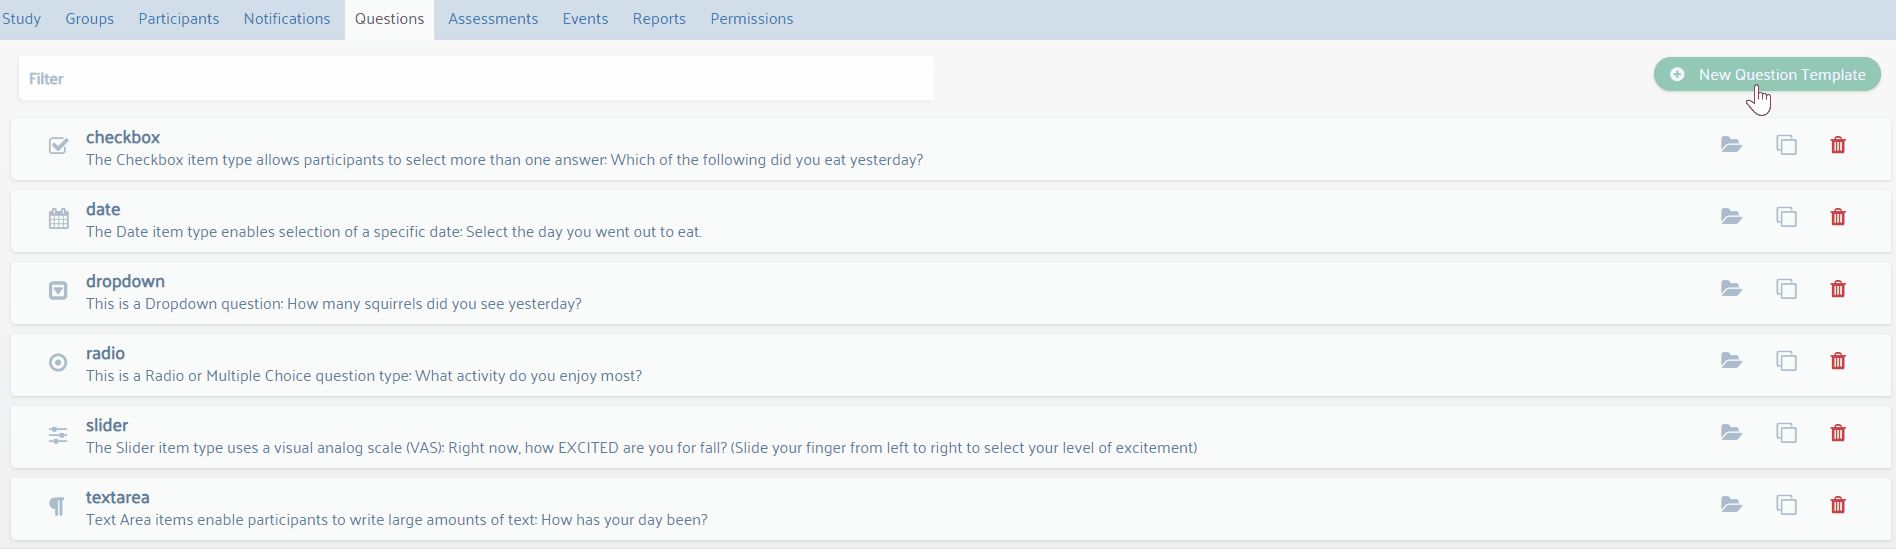 Time - Participant uses a clock to choose a time. 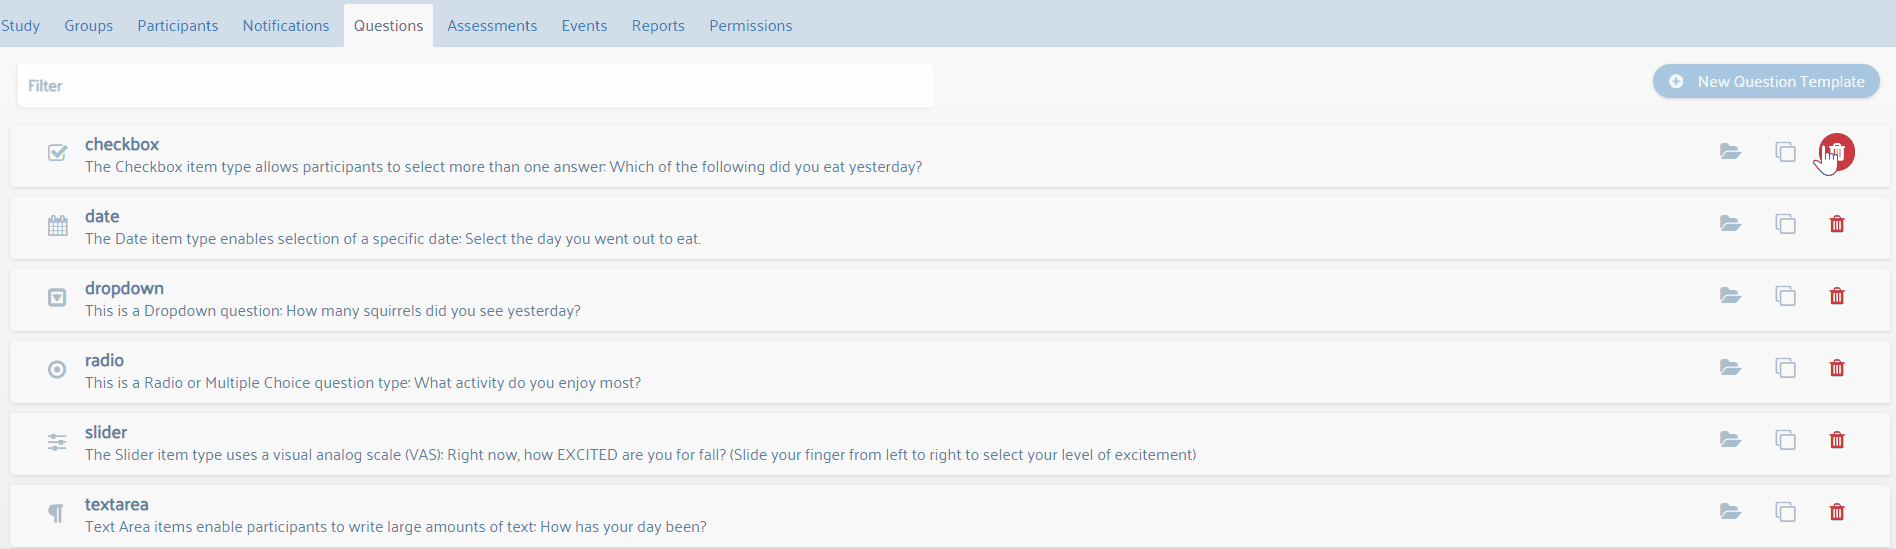 Timer - Participants see a configurable countdown timer. 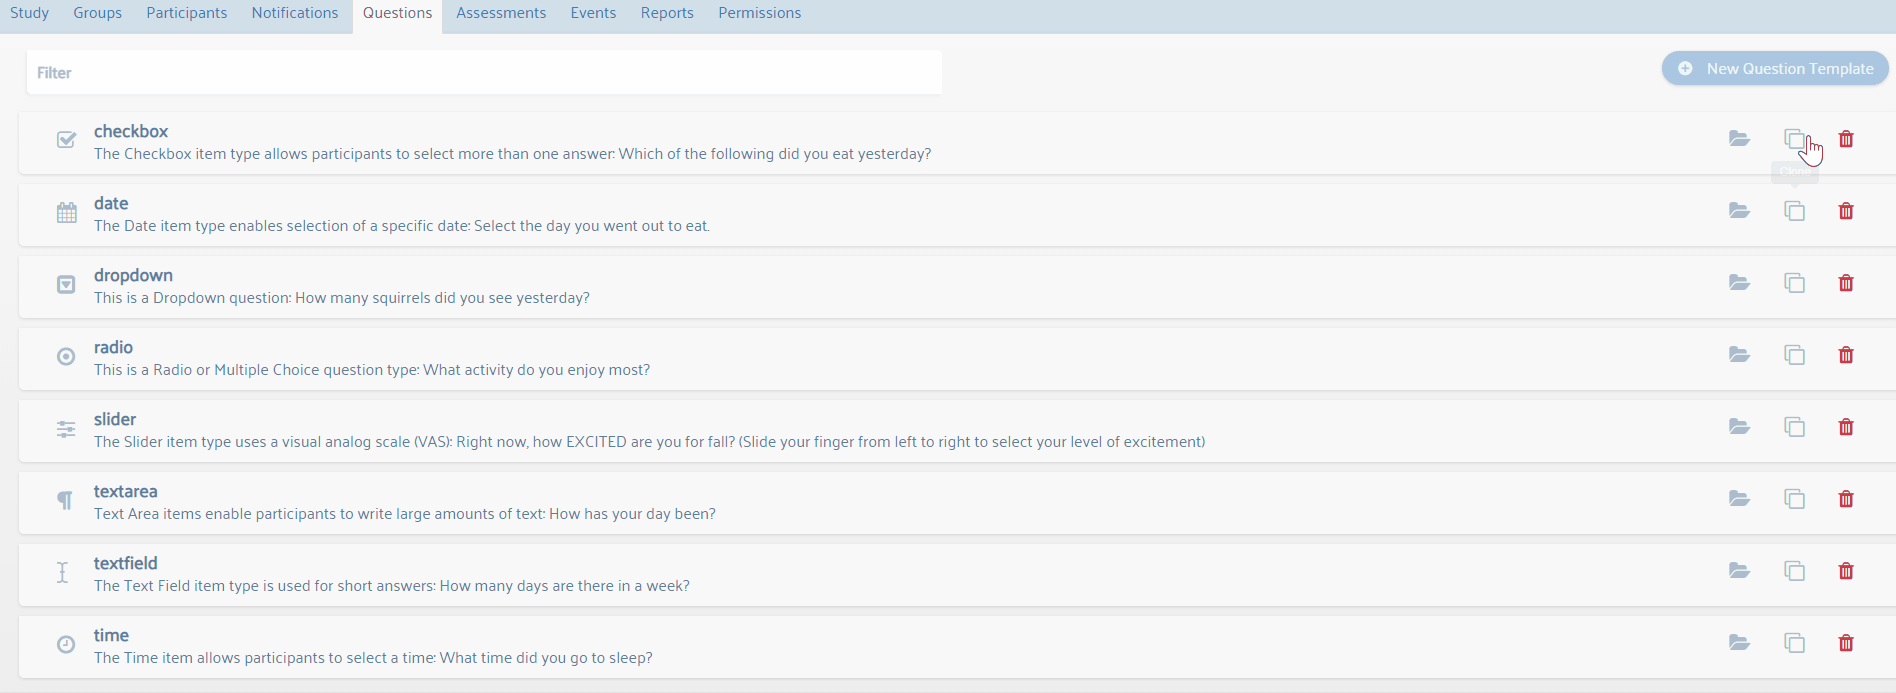
|
...
| Note |
|---|
We recommend that the first stage of any study be a “Start Study” Stage. The Start Study stage will standardize the study experience for all participants and will set the first day of your study for each participant. The Start Study stage should contain a Start Study assessment that includes the question: “Do you want to start the study now?” (Yes = 1; No = 0). The Formula stage change type should be used to move the participant to the first day of the study (type [start_study]==1 into the End Date Formula field). See video below to see an example for creating the Start Study stage. |
| Info |
|---|
You can ask baseline questions during the Start Study stage that can be used to drive question, message, and intervention content. For example, you can ask “What is your sex?” during the Start Study stage and use the answer to this question to select appropriate sex-based questions for the duration of your study – For women: “During the past week, how many days did you drink 4 or more alcohol containing beverages?”; for men: “During the past week, how many days did you drink 5 or more alcohol containing beverages?” To enable this feature, use the LAST command when creating the skip pattern for a question within an assessment. The participant’s answer to the question the last time it was answered will be used to inform the skip logic – see Formulas section to learn more. |
...
| Expand |
|---|
|
Under Schedule Type, select Random. Random events can be scheduled for specific days of the week (i.e., Weekly) or they can be scheduled for specific days of a stage (i.e., Stage Offset). Weekly – Click the Weekly button, then click the checkbox next to the day(s) you would like the assessment to be prompted. Stage Offset – Click the Stage Offset button, then enter the specific day you would like the assessment to be prompted. For example, if you created a 14 day stage, and you want this assessment to be prompted on day 7 of that 14 day stage, you would type 7 into the Day of the Stage text field.
Scheduling Features Assessments per Day – Type the number of assessments that should be randomly prompted per day in this text box. Each participant’s daily waking hours will be split into equal epochs and one random assessment will be prompted within each epoch. Time Buffer (minutes) – This setting prevents random assessments from occurring closer together than desired (e.g., it is technically possible for 2 random assessments to be just one minute apart). Type the minimum allowable number of minutes between the random assessments in this text box. Wake Time Offset – This setting prevents random assessments from being prompted too close to the participant’s wake time. Type the number of minutes after the participant’s wake time for the initial random assessment window to begin. See how Wake Times can be created here.
| Info |
|---|
When Fixed Events are scheduled 30 minutes after waking time, consider setting Wake Time Offset to 90 minutes - this will ensure that the first random assessment does not occur within 60 minutes of the morning fixed assessment. |
| Note |
|---|
Do not set ANY participants scheduled sleep time past 11:30 pm. Having a sleep time after 11:30 pm will interfere with the assessment schedule. |
Reschedule Assessments - There are two ways to reschedule prompted events (e.g., Fixed Events, Random Events): Snooze and Event Reschedule Settings. These features give participants another opportunity to complete assessments that may be prompted at inconvenient times. | Note |
|---|
Snooze and Event Reschedule Settings should never be combined/used for a single event. |
Snooze –This feature allows the participant to postpone prompted assessments for a specific amount of time. The researcher sets the duration of the snooze and the number of times the assessment can be snoozed. To access this feature, click “Reschedulable,” then click “Snooze.” Snooze Time: Enter the number of minutes you would like the event to be prompted after the snooze button is clicked. For example, if the participant snoozes the assessment, prompt the assessment again 15 minutes later. Snooze Limit: Enter the number of times the assessment can be snoozed by the participant.
| Info |
|---|
The snooze setting dos not guarantee that the participant will complete the assessment, but it allows the participant to push back the assessment to a potentially more convenient time. |
| Note |
|---|
Event scheduling problems may occur if long snoozes or high quantities of snoozes are allowed (e.g., assessment #1 time window should not be allowed to overlap with Assessment #2 time window). |
Event Reschedule Settings – This feature allows prompted assessments (e.g., Fixed or Random Assessments) to be automatically rescheduled if the participant does not start the assessment when it is prompted. This feature is similar to snooze, but it does not require the participant to do anything (i.e., click Snooze) in order for the assessment to be automatically rescheduled. To access this feature, click  in Settings. In the Setting Type dropdown menu, select “Event Reschedule Settings.” in Settings. In the Setting Type dropdown menu, select “Event Reschedule Settings.” Reschedule Attempts: Enter the number of times the assessment should be automatically rescheduled. Reschedule Minutes: Enter the desired delay (in minutes) between the initial prompt and rescheduled prompt. For example, if the participant does not respond to the first prompt, reschedule the prompt 15 minutes later.
| Info |
|---|
An [event alt ID #####] dismissed“ log will only appear in a Participants Activity tab when they have actively dismissed an assessment; this indicates the participant clicked “dismiss” when the assessment rang/vibrated. If the participant allows the assessment to ring, there will not be an [event alt ID #####] dismissed“ entry. Example of a dismissed assessment below: |
 | Info |
|---|
Clicking the “Notification Bar Reminder” will notify a participant of an assessment by displaying the message at the top of the phone screen. |
Event Resume -This feature allows Assessments in progress to be resumed at a later time. If the Participant closes the Insight app, accepts a phone call, or powers off their phone during an Assessment, they will be able to Resume the Assessment later. After the specified number of minutes have passed, the Event Resume feature will expire. To enable this feature, follow instructions below:
Select desired study > Click on the Events tab Find the Stage desired > Click the button to open Scroll down to Settings > Select to open 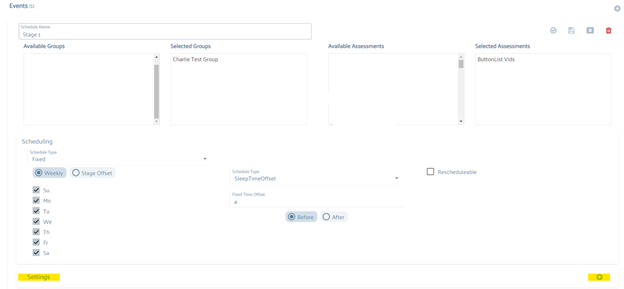 Click Setting Text  A dropdown will appear > Scroll until Event Resume is seen > Select it  Check the Allow Resume box > In the Resume Timeout Minutes field, input the desired minutes for an event to be resumed before it expires.  Resume Timeout Minutes - determines the number of minutes that an Event can be Resumed, starting with the timestamp when the Assessment is started. The homepage of the app will show a “Resume XXXXXX“ Assessment (where XXXXXX is the name of the incomplete Assessment) message for an available Assessment until the Resume Timeout Minutes have elapsed. For example, if an assessment is started at 9:00 AM and the Resume Timeout Minutes is set to 60 then the participant is able to resume the assessment until 10:00 AM.
Click Save on the Stage level 
| Info |
|---|
The CMS Activity tab shows a log whenever an Event is resumed by a participant. |
|
...
| Expand |
|---|
|
The GPS tracking event enables researchers to collect GPS coordinates regularly. This feature is also called Breadcrumb Trail GPS Tracking. | Info |
|---|
This feature requires PHI data collection approval by your governing IRB, and this feature should be enabled on the main study tab by clicking GPS Tracking in the CMS. |
Under schedule name, type the name for this event (e.g., GPS tracking), then assign this feature to particular study groups. Under Scheduling Type select “GPS Tracking.” Then in the Cadence in minutes textbox, type the frequency (in minutes) that GPS (i.e., latitude, longitude, accuracy) should be collected. |
Call Monitoring – Coming Soon.
Sensor Data – To learn information about sensor configuration, click here.
...
| Expand |
|---|
|
| Note |
|---|
Follow the Android Wear instructions in the order listed on this page. Doing any of these steps out of order may result in data being skewed or other set up errors! |
| Note |
|---|
To download the necessary apps from the Google Play Store and to continue to get updates, a participant must have a Google account (participant can use any email to sign up for a Google account). We recommend that participants use their own account. Do not delete the Google account. Insight (or any app) cannot update without a Google account active on the phone. |
| Info |
|---|
Note: Connect to Wi-Fi |
1. Download Wear OS from the Google Play Store
2. Connect Wear OS Watch to Phone
This section will require both the watch and the phone. | Status |
|---|
| colour | Purple |
|---|
| title | Wear os Setup |
|---|
|
Tap on the watch screen when it says Tap to begin  Select English (United States) as your language 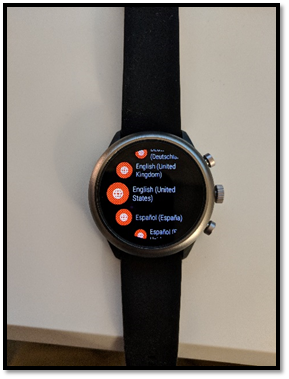 Press the check mark to agree to the Terms of Use 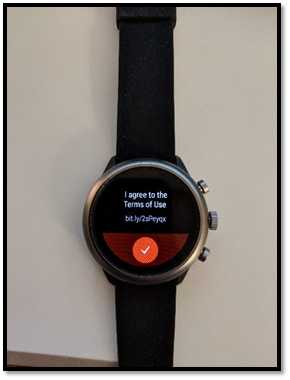 The watch will then prompt you to open the Wear OS app on your phone. Scroll down and you’ll see the watch name. Take note of the watch name as you’ll use this as a reference to it later during the phone setup. 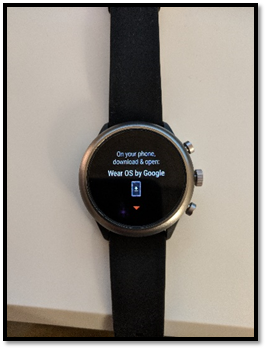 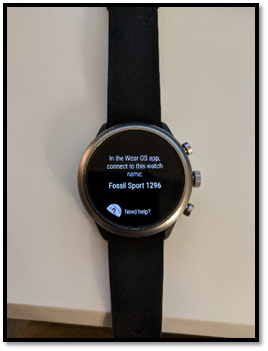
| Status |
|---|
| colour | Purple |
|---|
| title | phone setup |
|---|
|
Press Start Setup 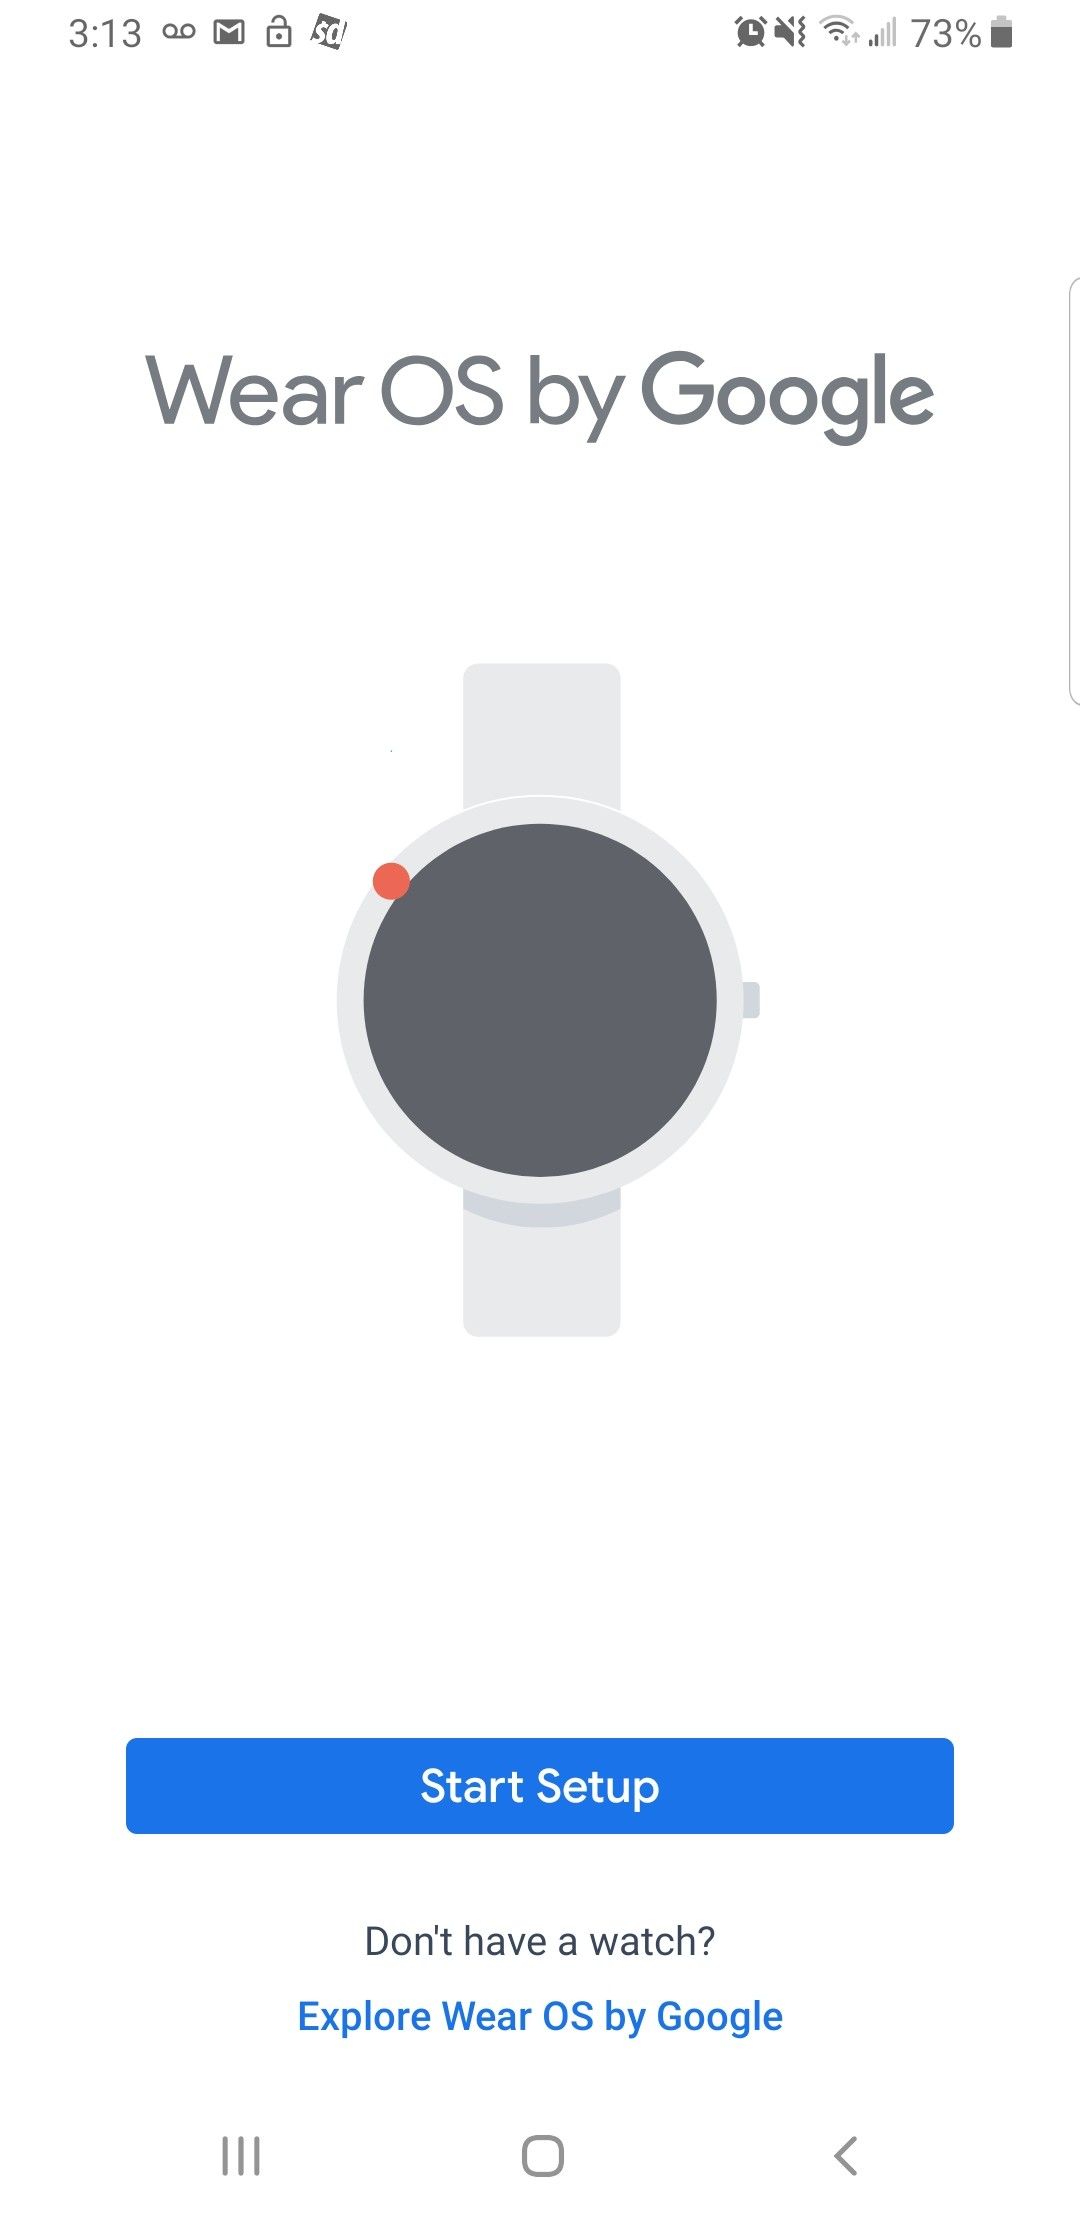 Press Agree for Terms of Service 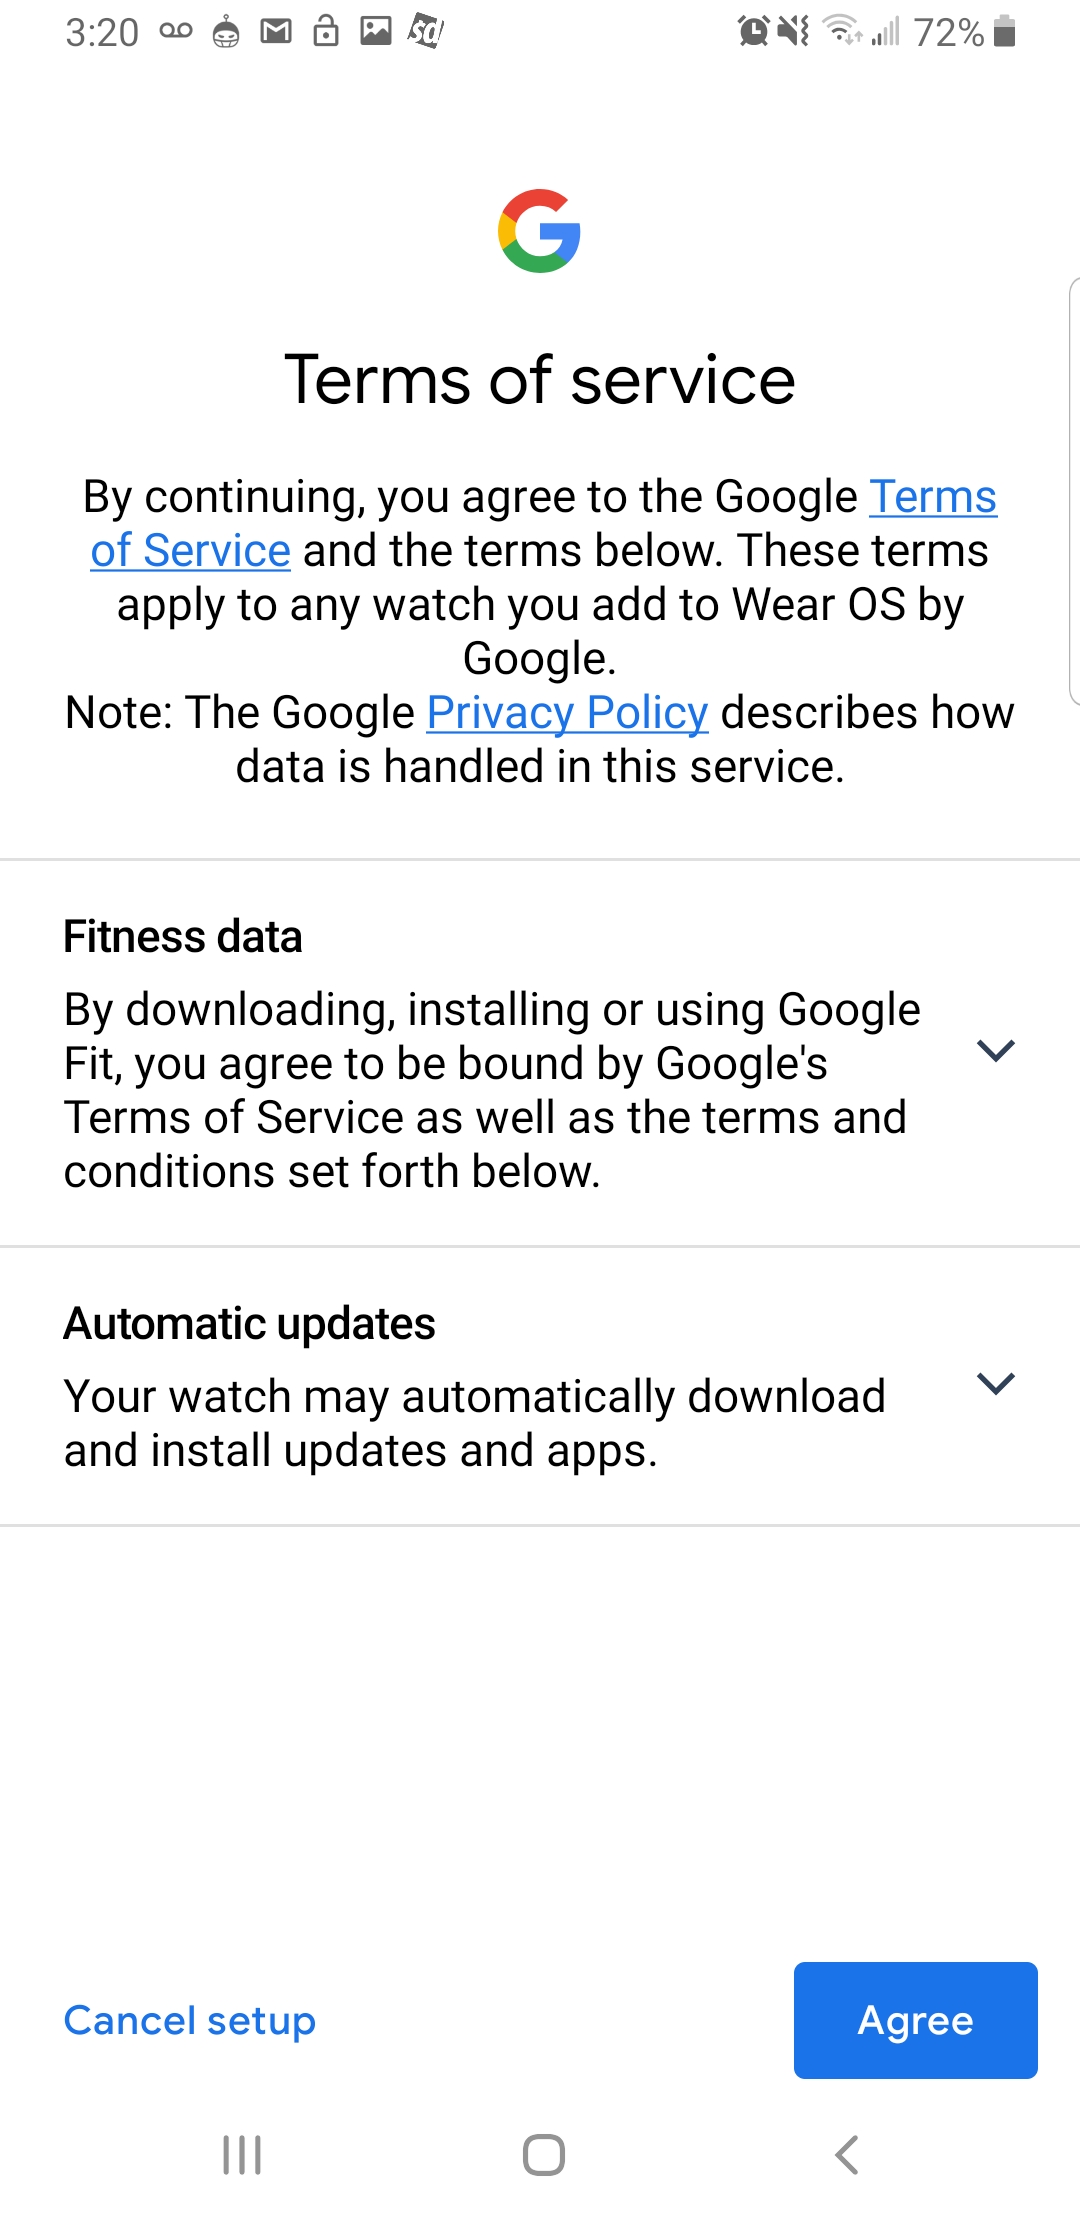 Press Agree for Make Wear OS better The phone will then attempt to link with your watch. Turn on Bluetooth if the phone prompts you to turn it on. 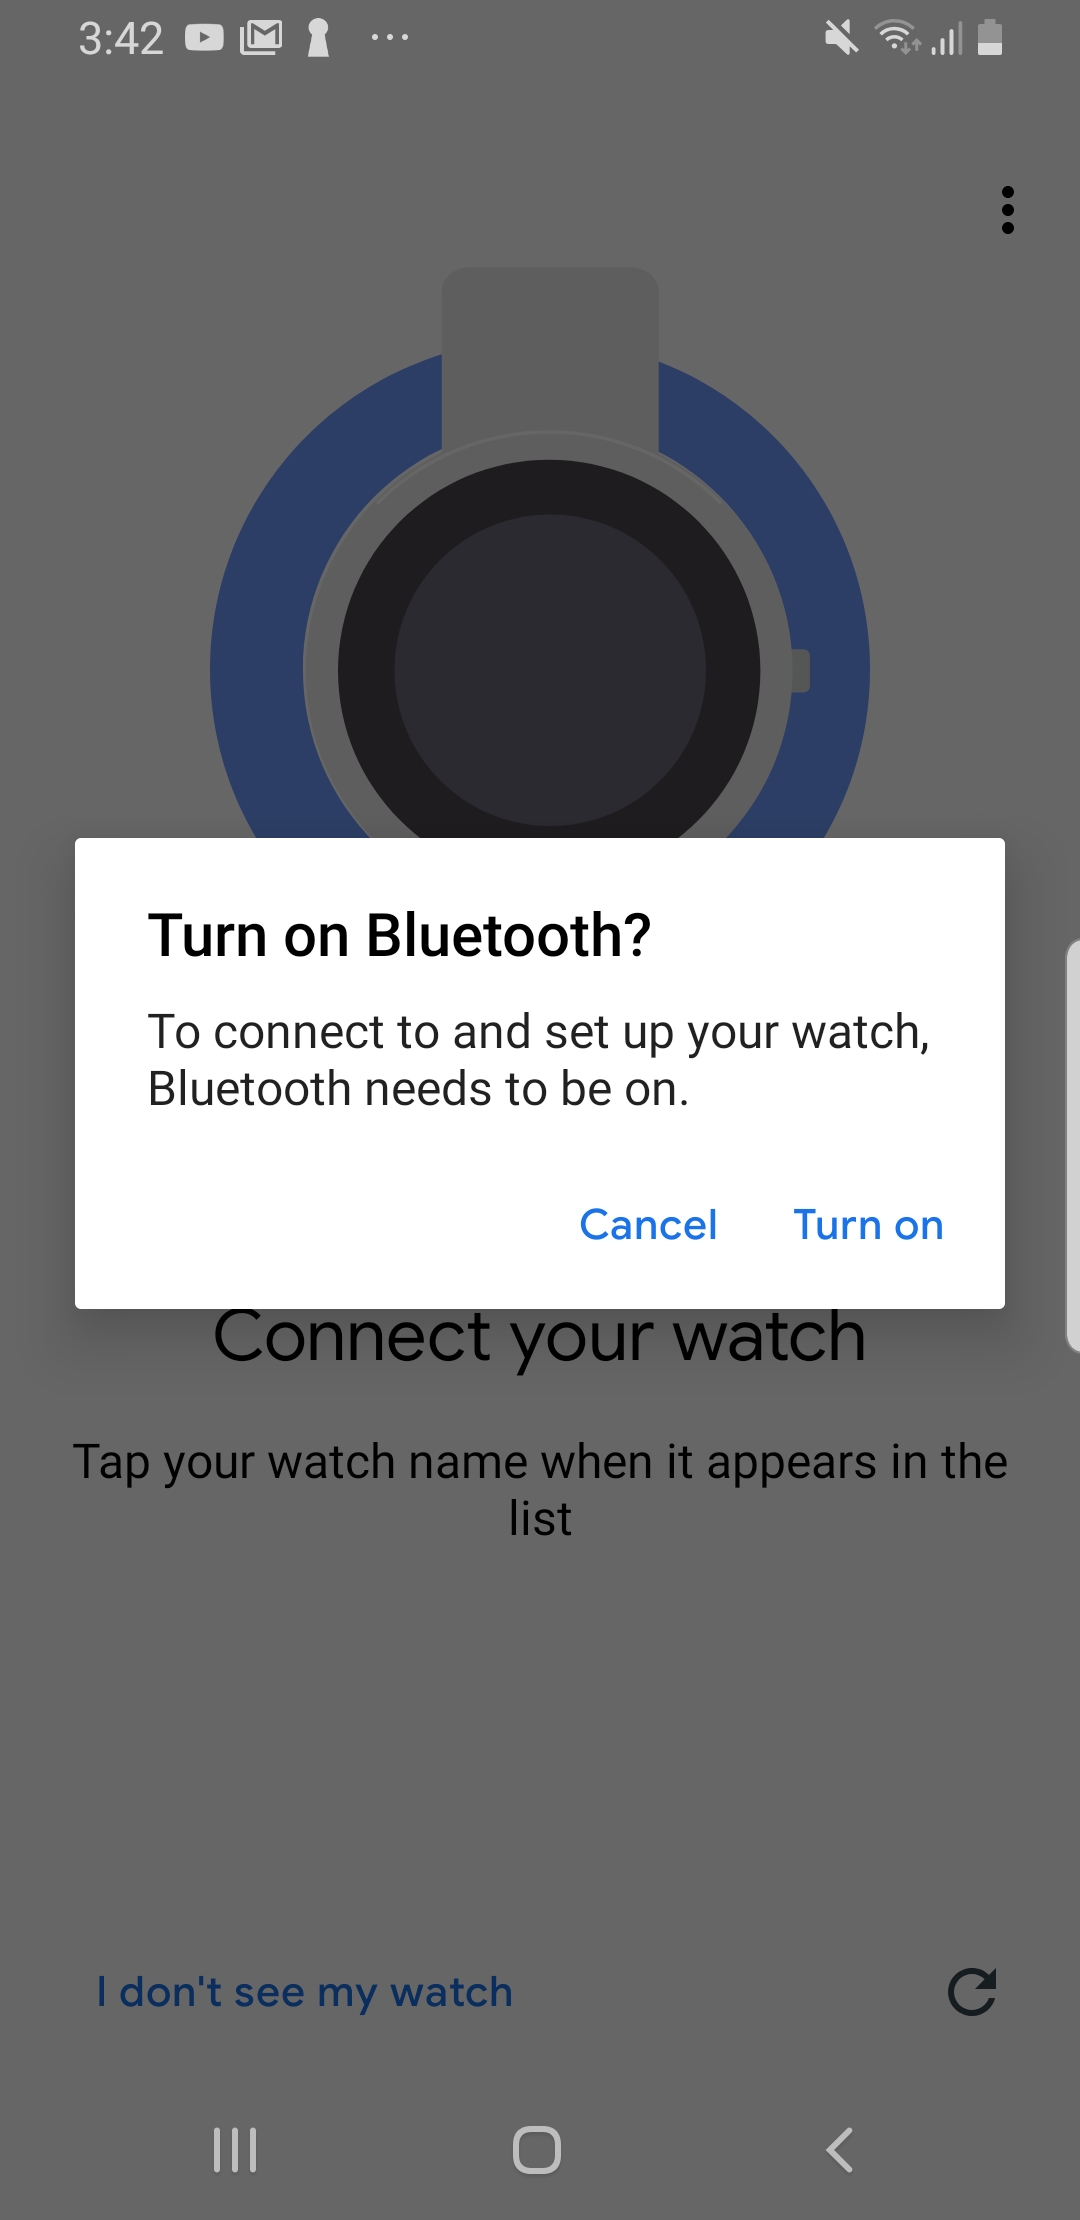
5. Match the watch name seen on the watch with the watch name on the phone and click on it. 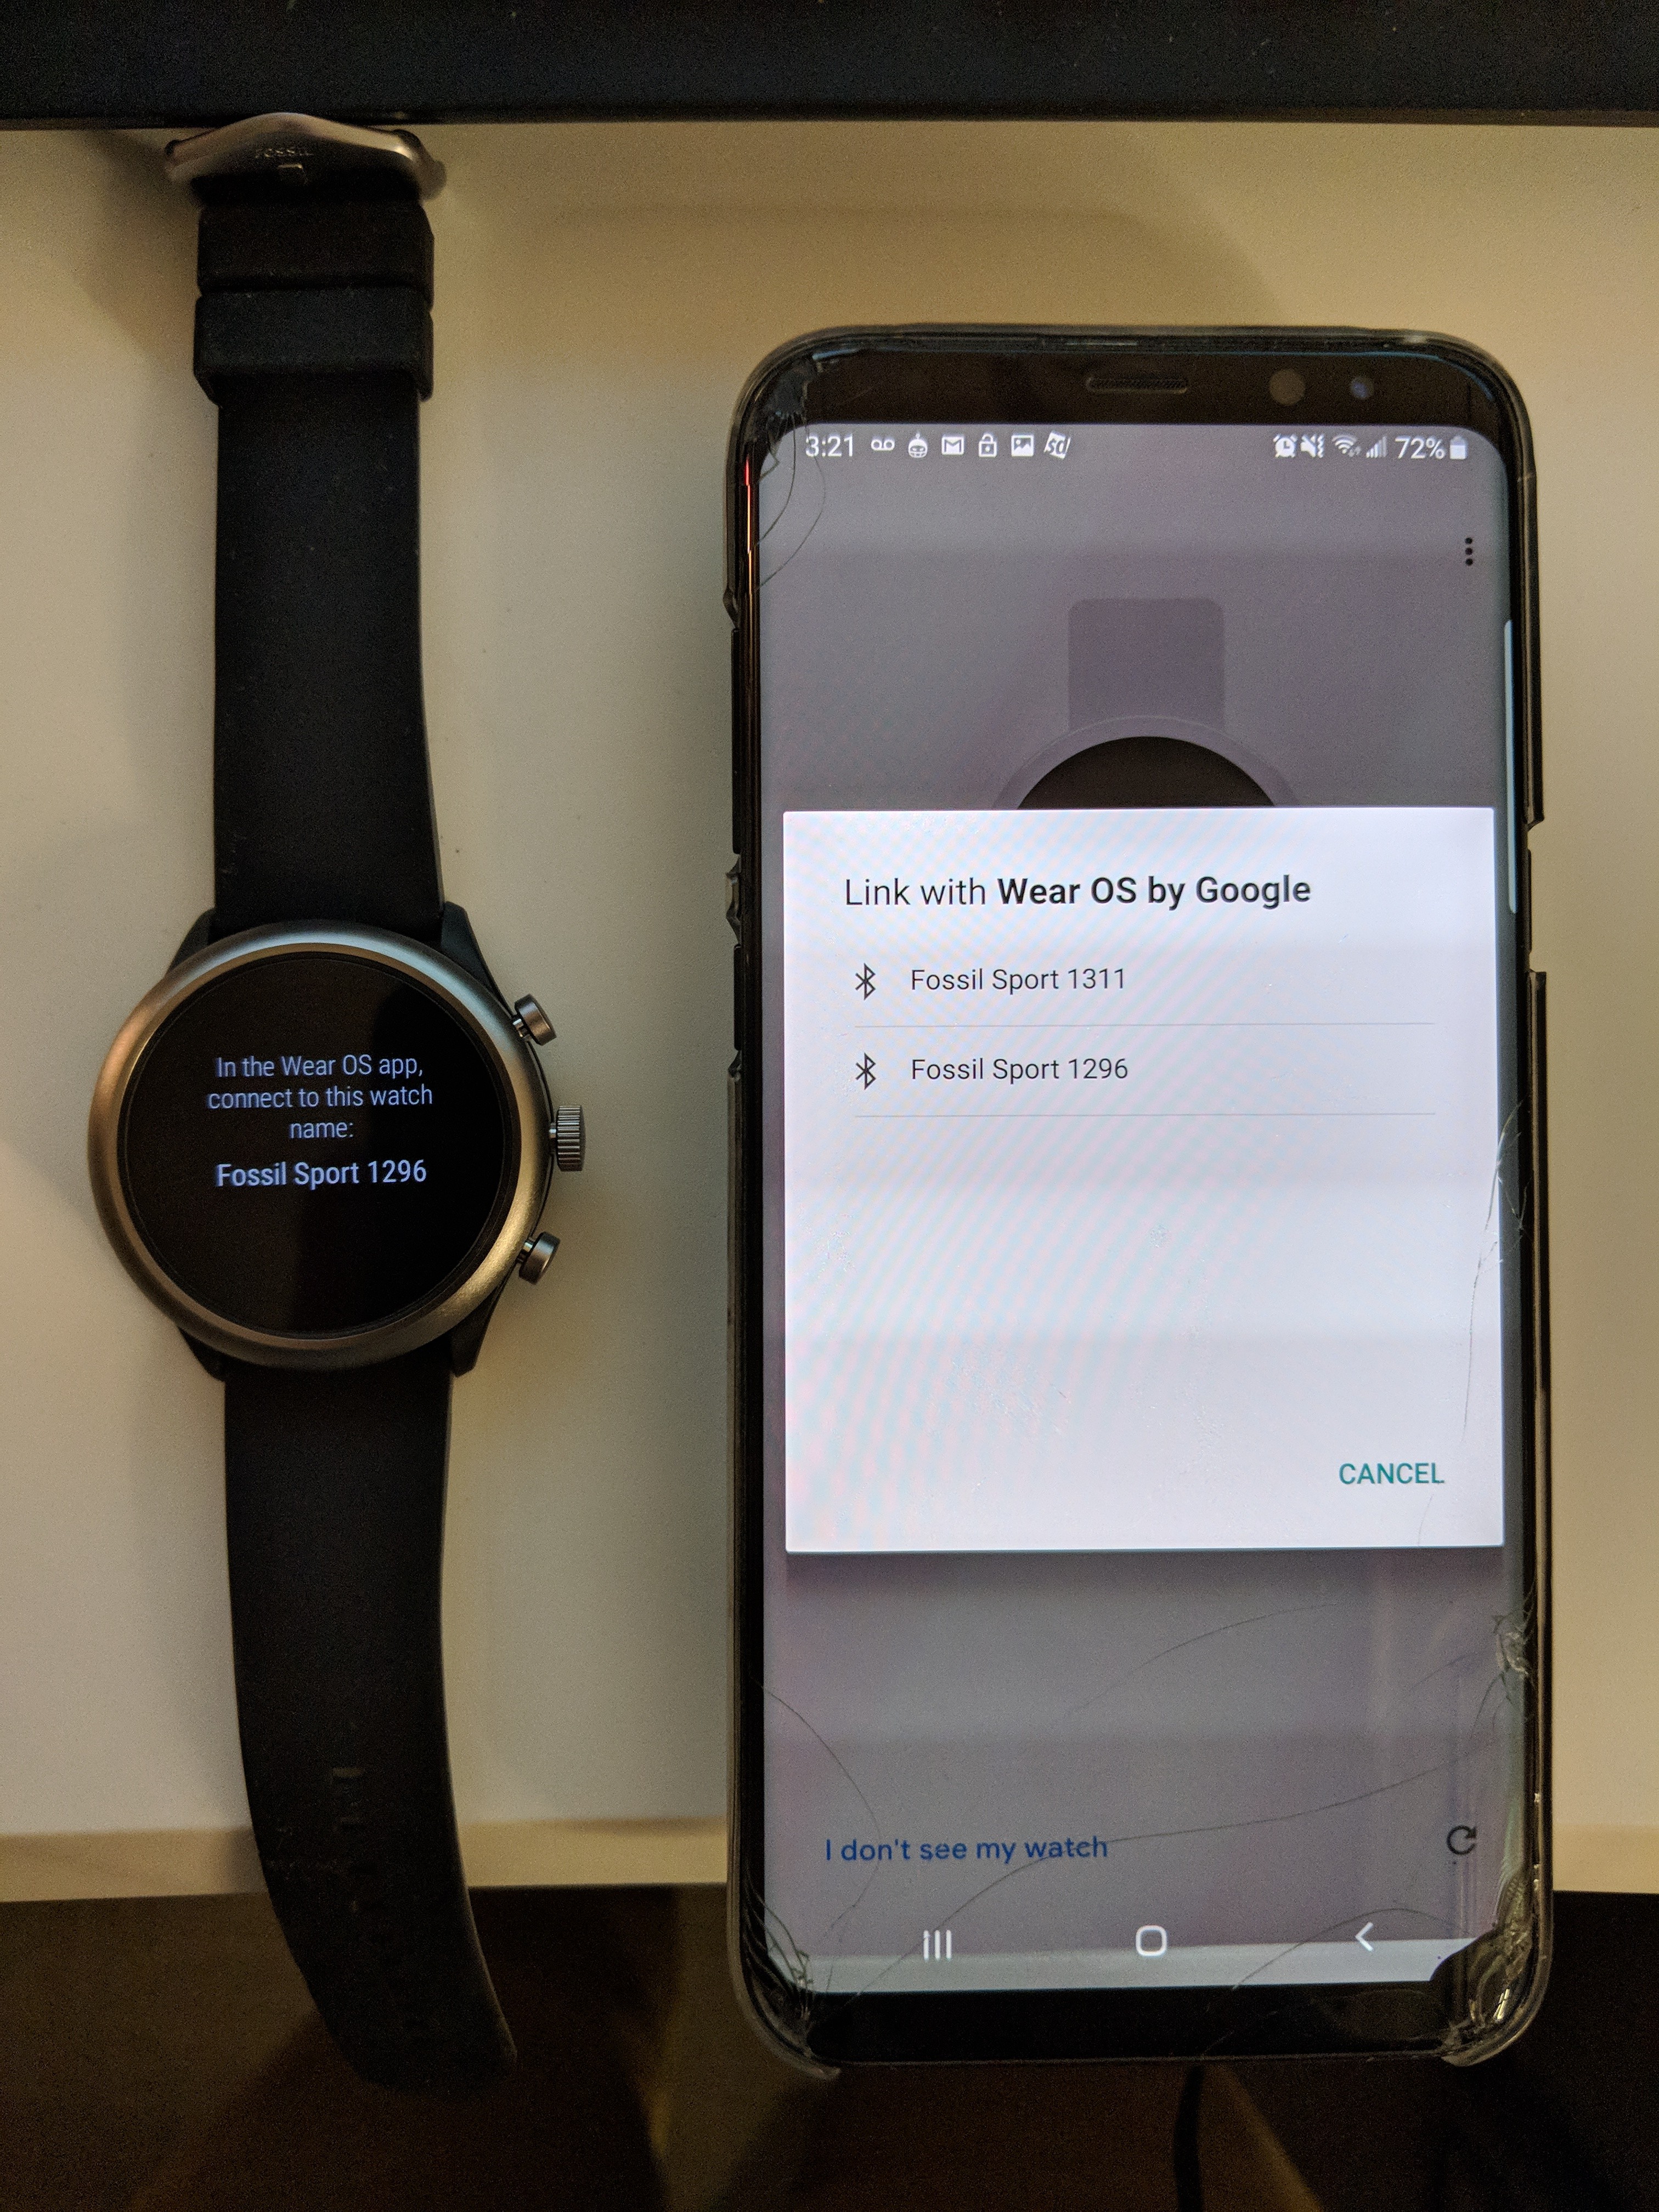 6. A pass key will appear on the watch. Make sure it matches the one on your phone and press OK to pair the phone with the watch. 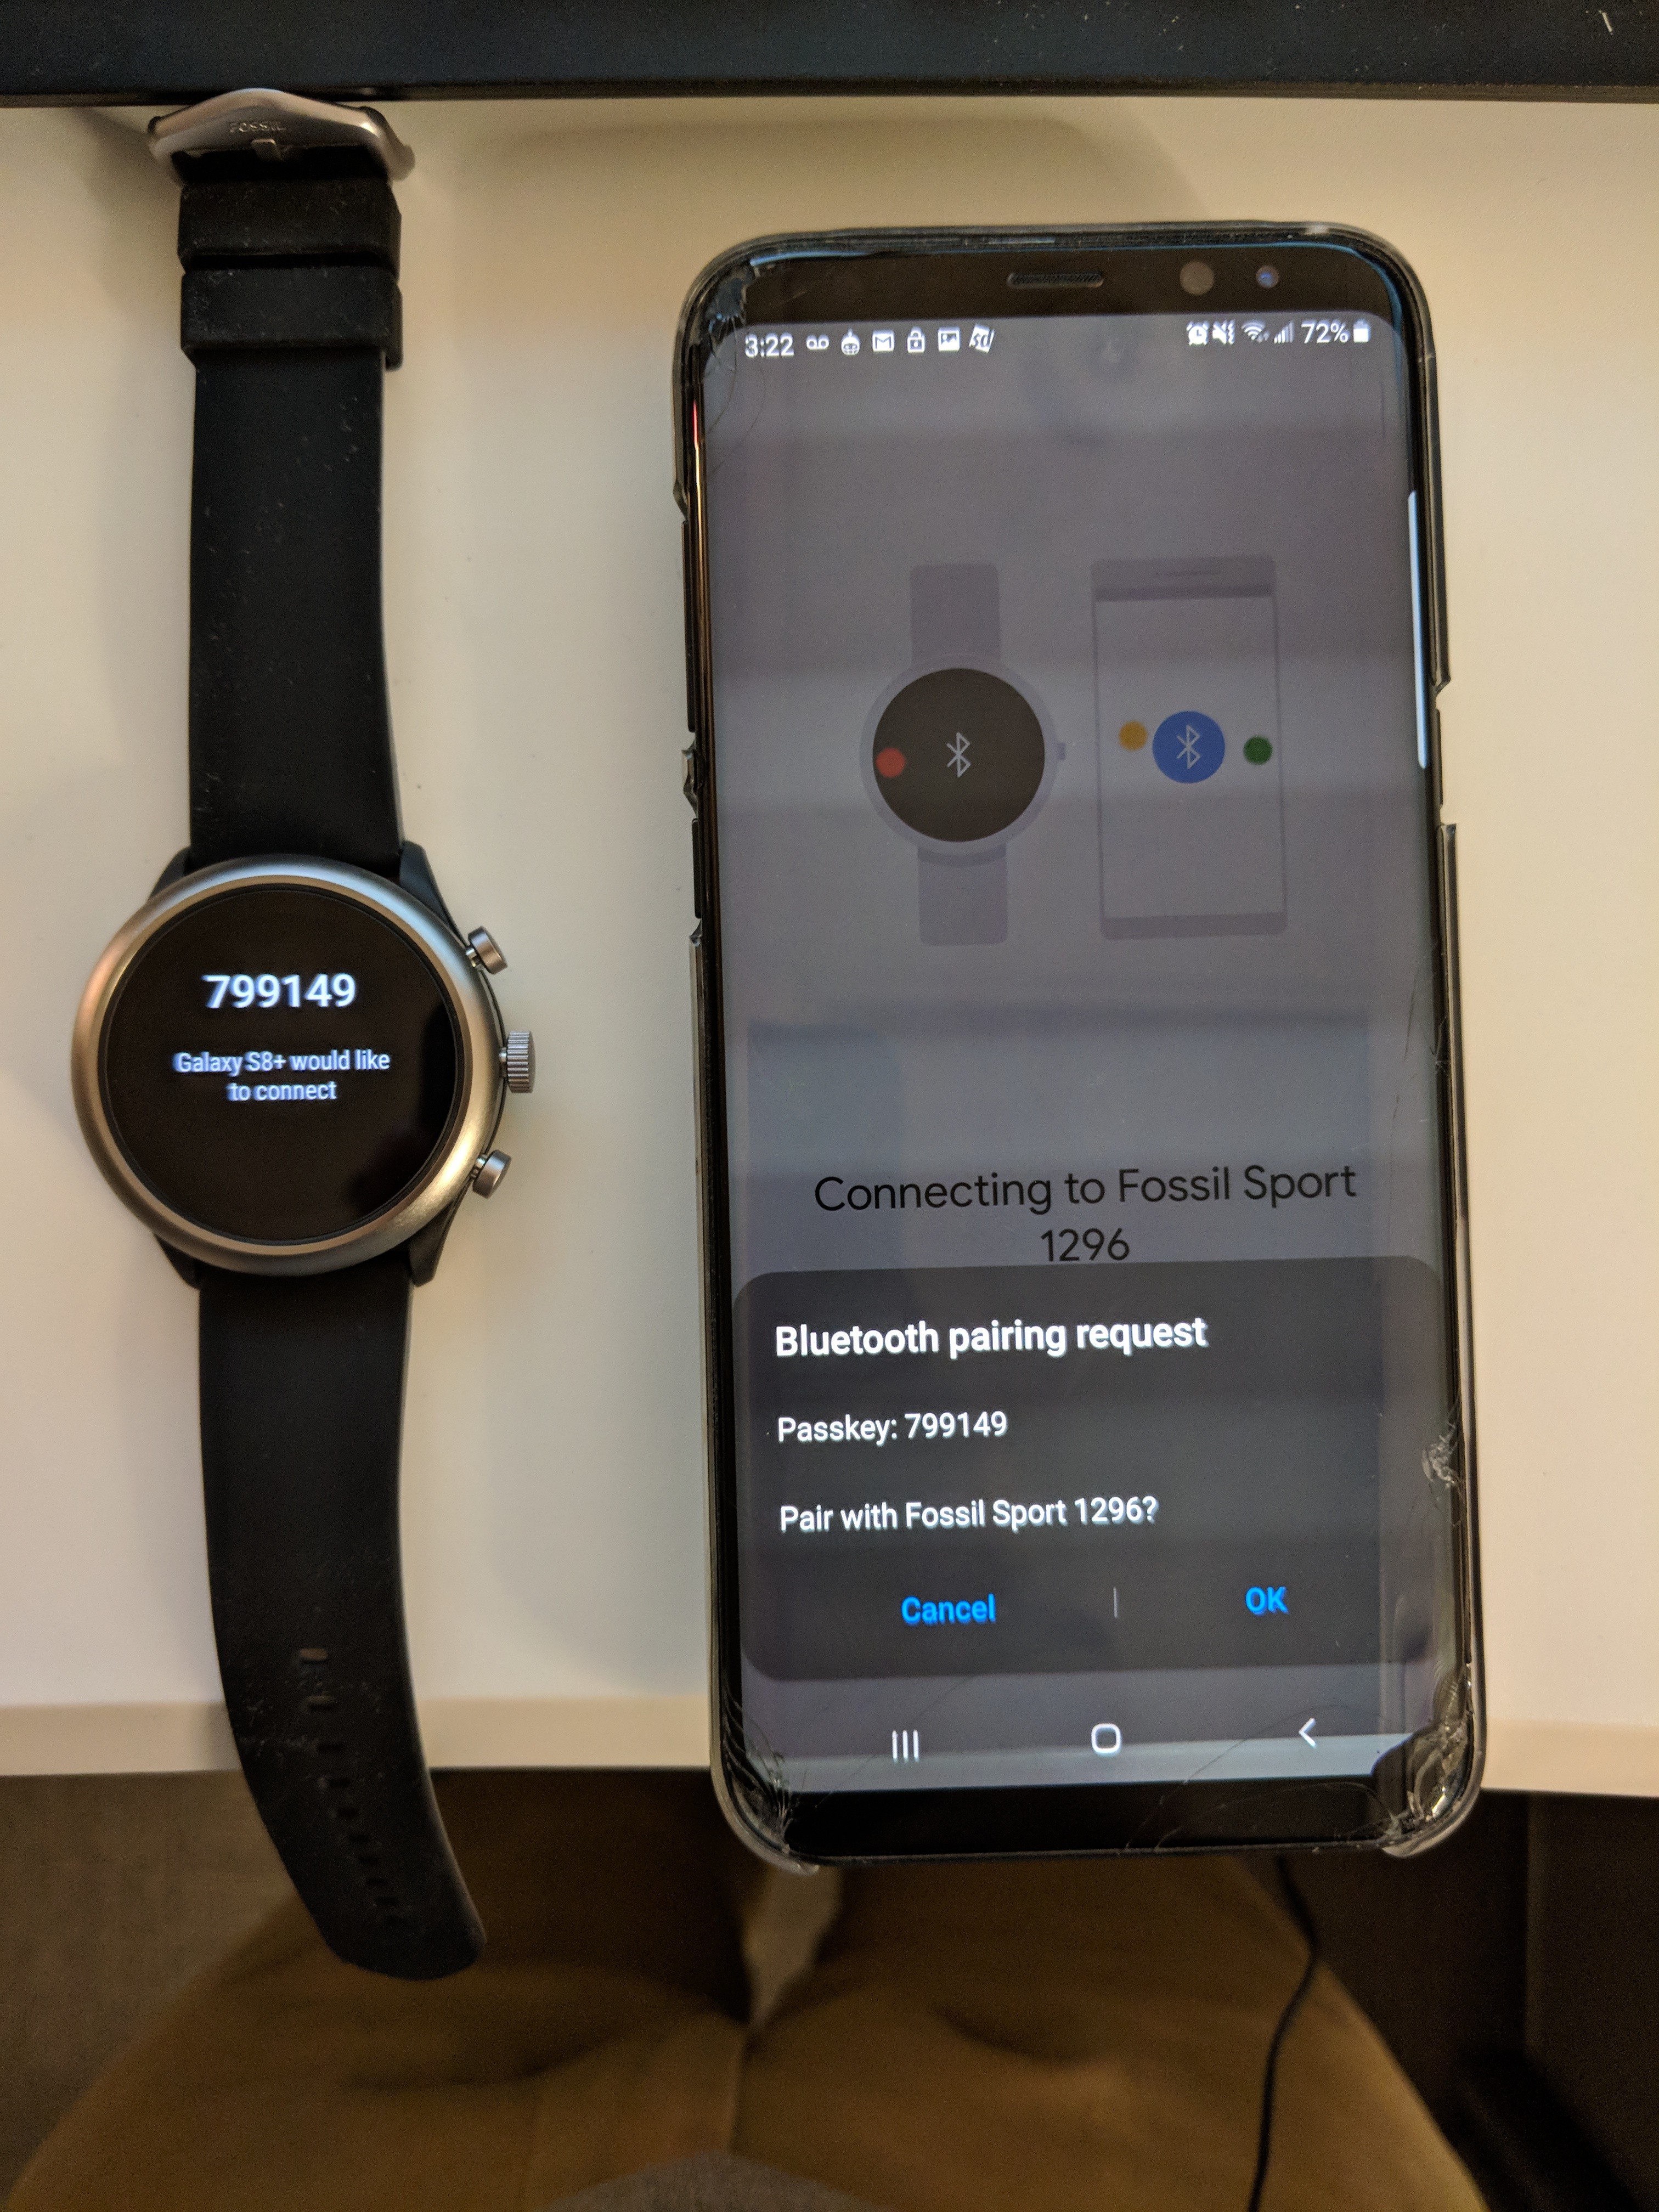 7. Under Choose which Google Accounts to copy to your watch, make sure the slider is on (slider will be blue if it’s set to on) next to the participant’s google account. Click on Next 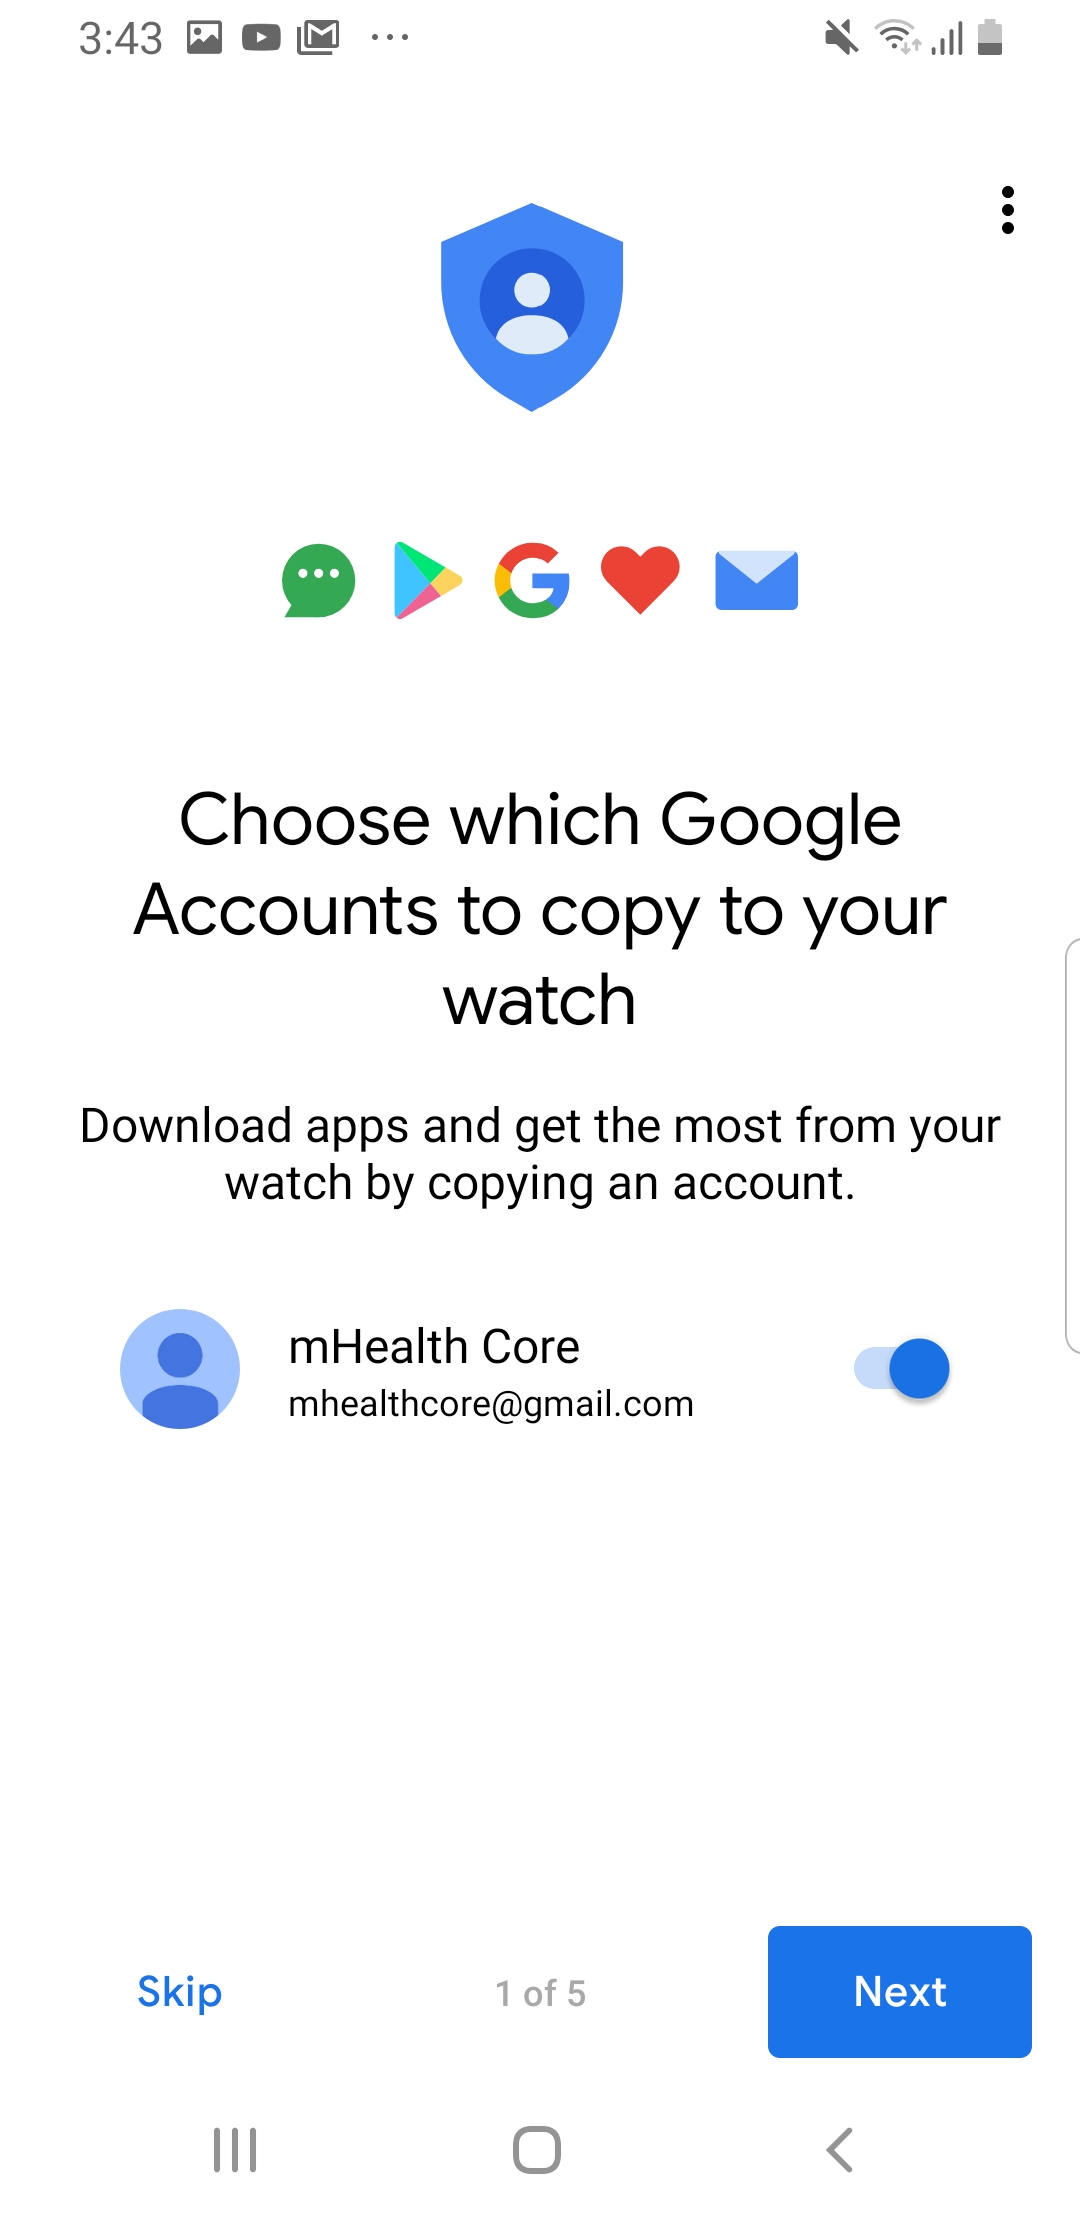 8. Press Copy to copy the google account to the watch 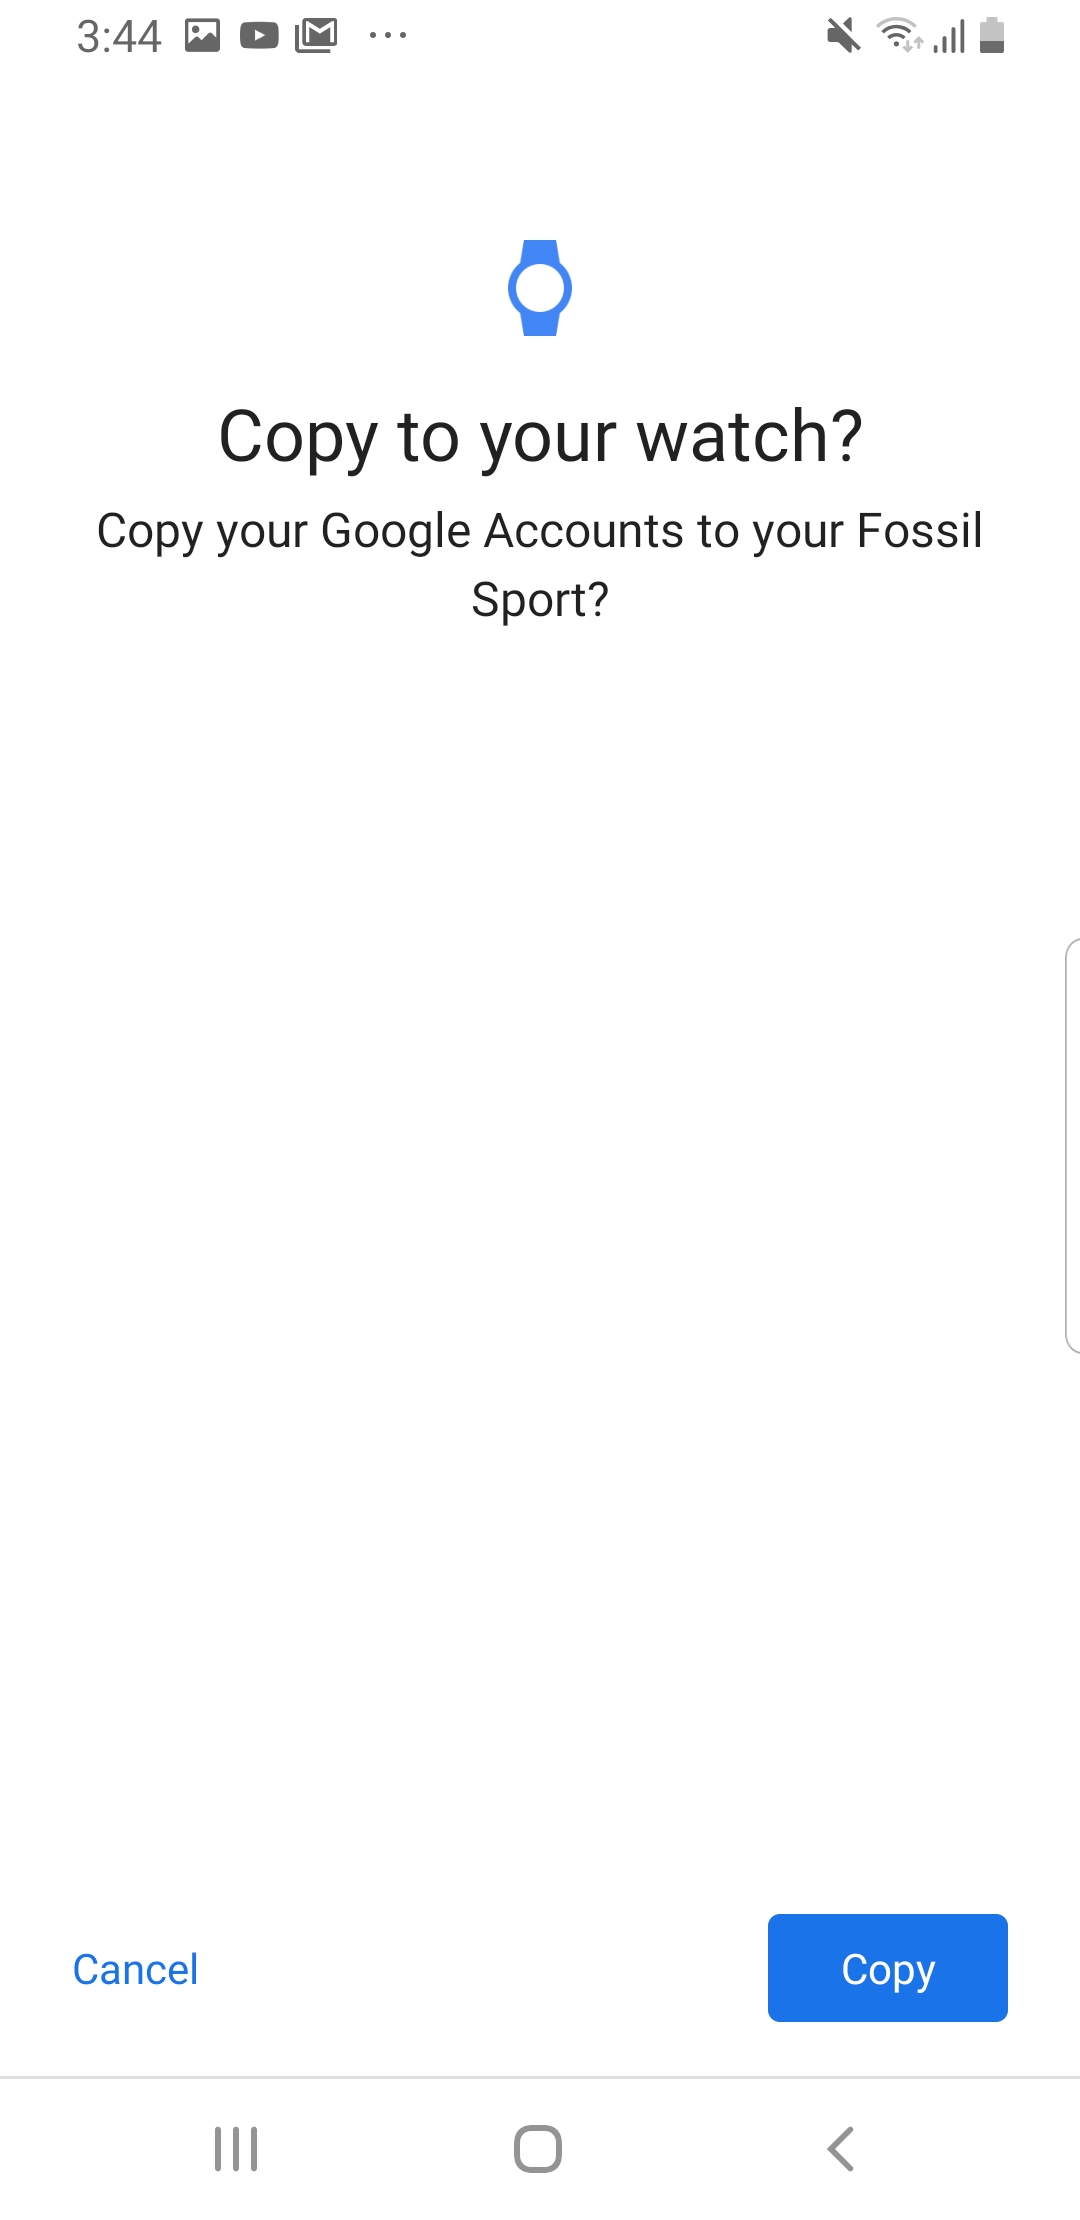 9. Under Stay connected to Wi-Fi, press Connect 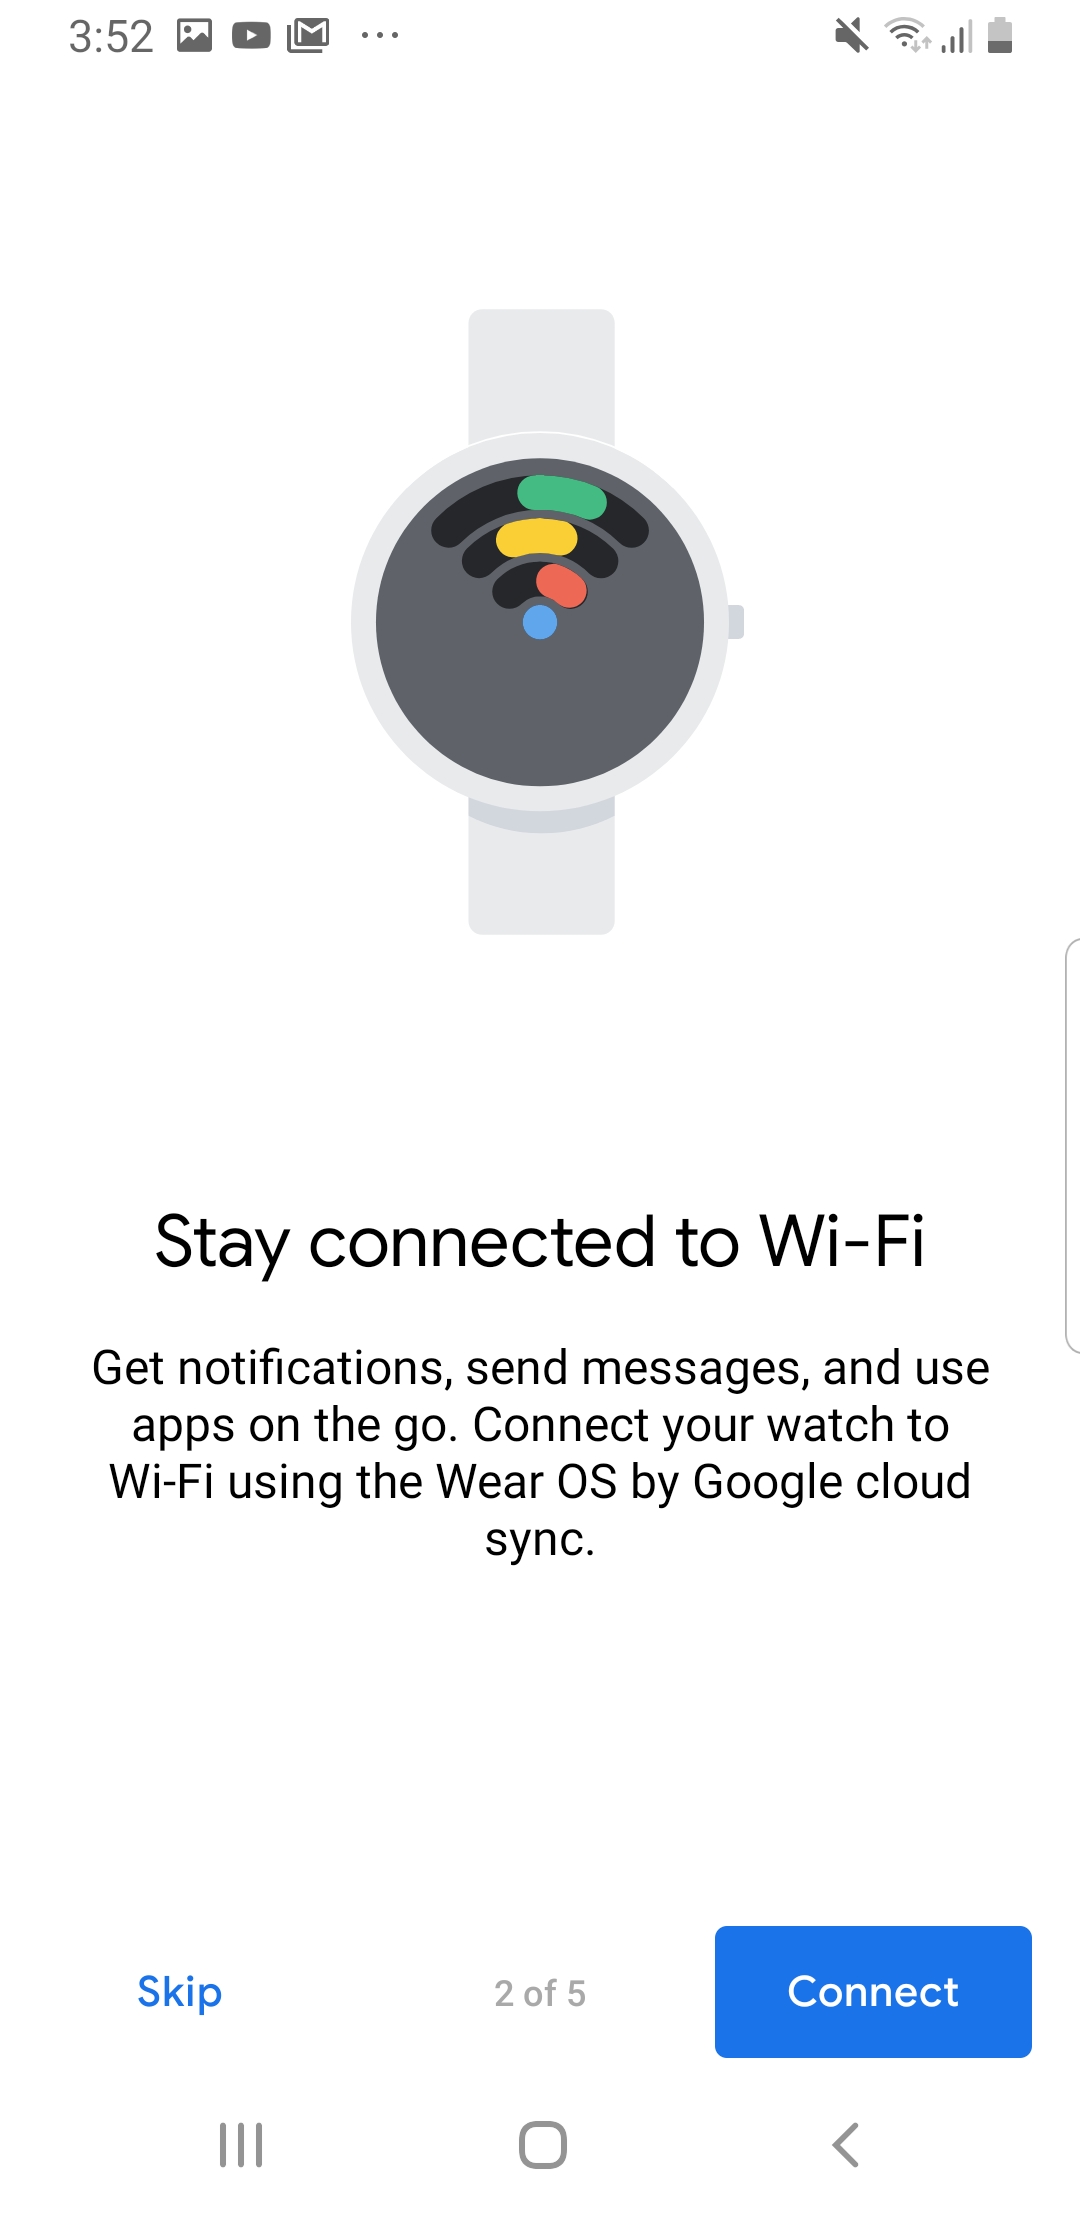 10. Press Next under Chat with your friends 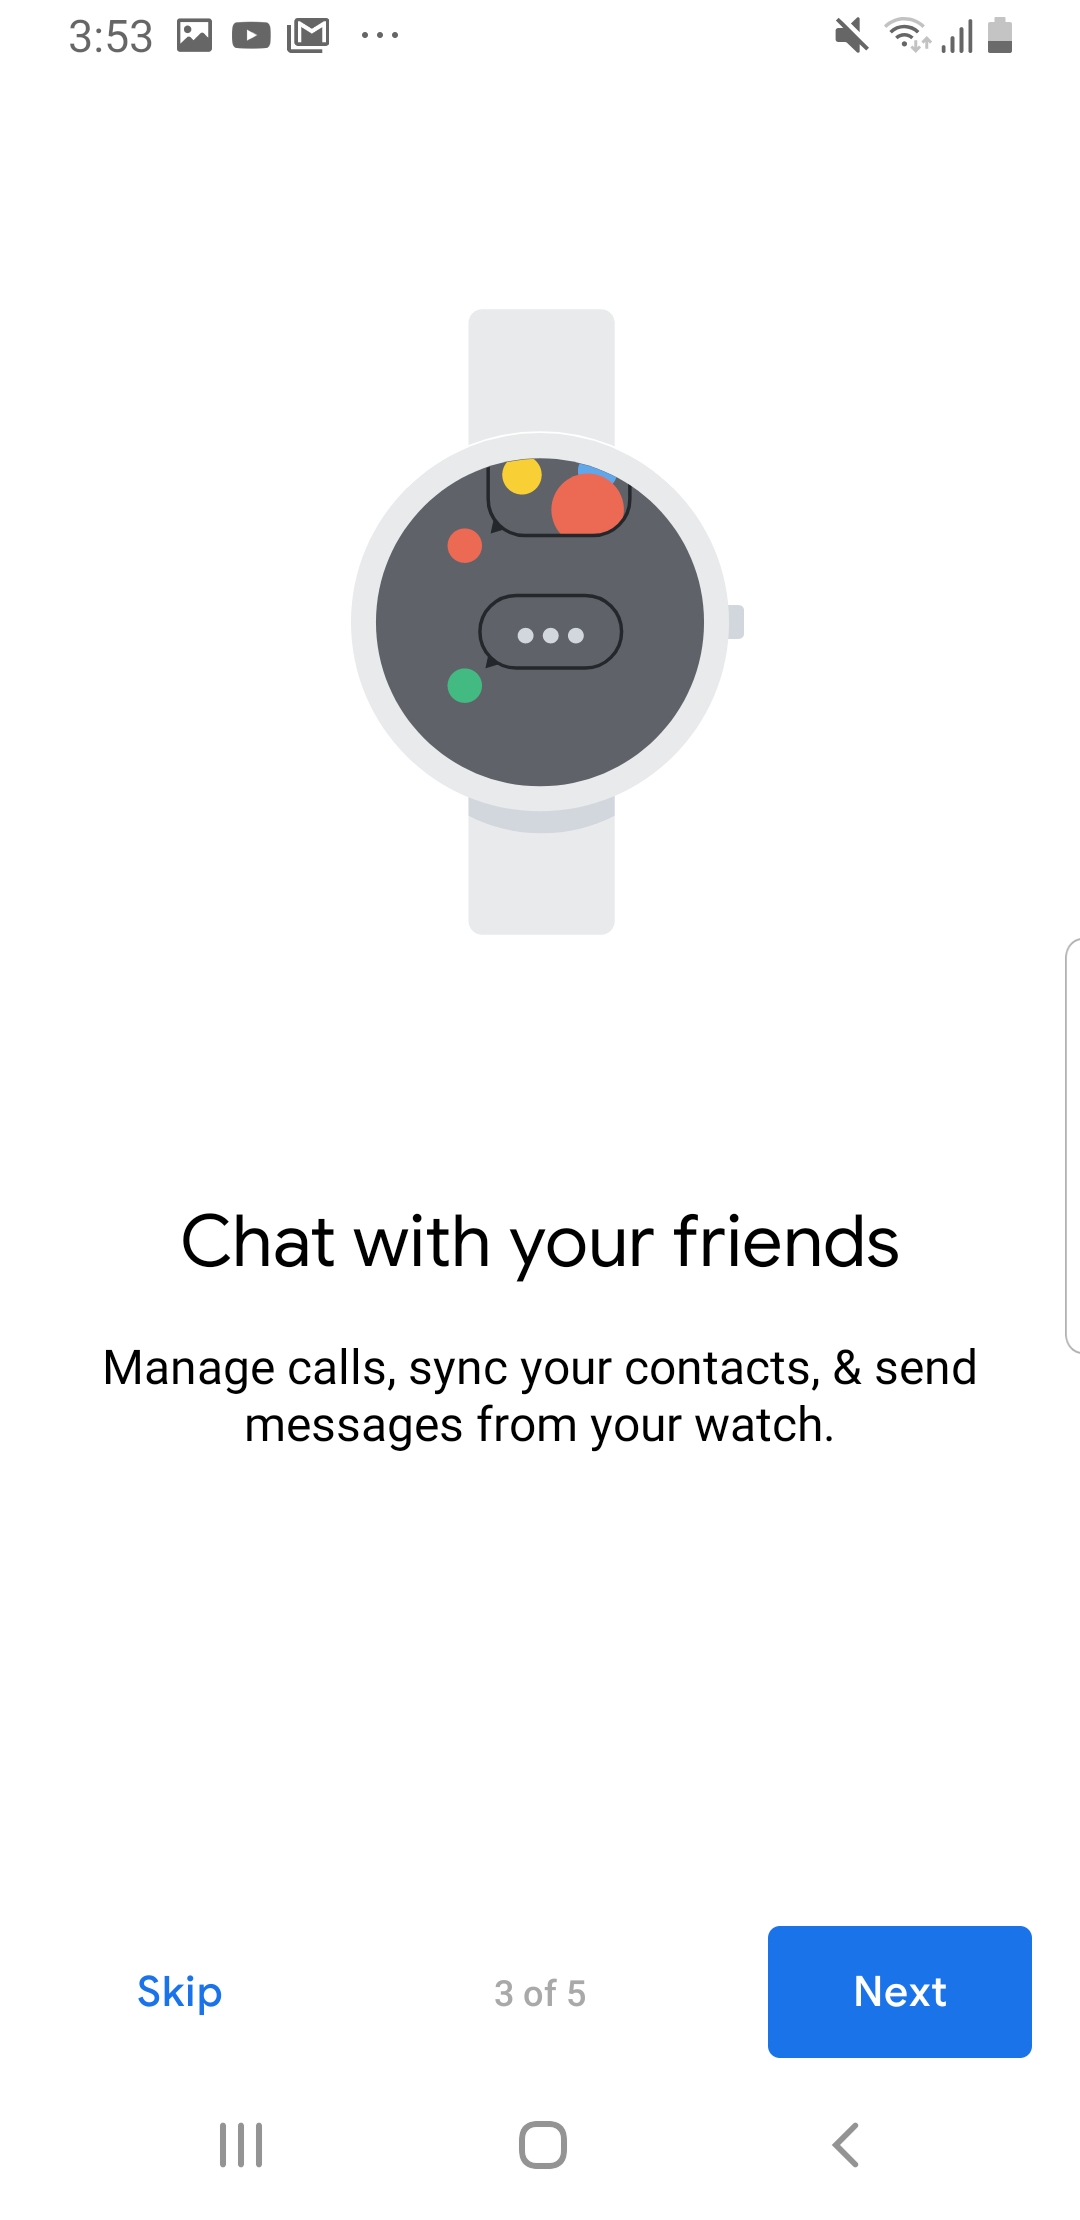 11. Press Allow for all 4 of the permissions. 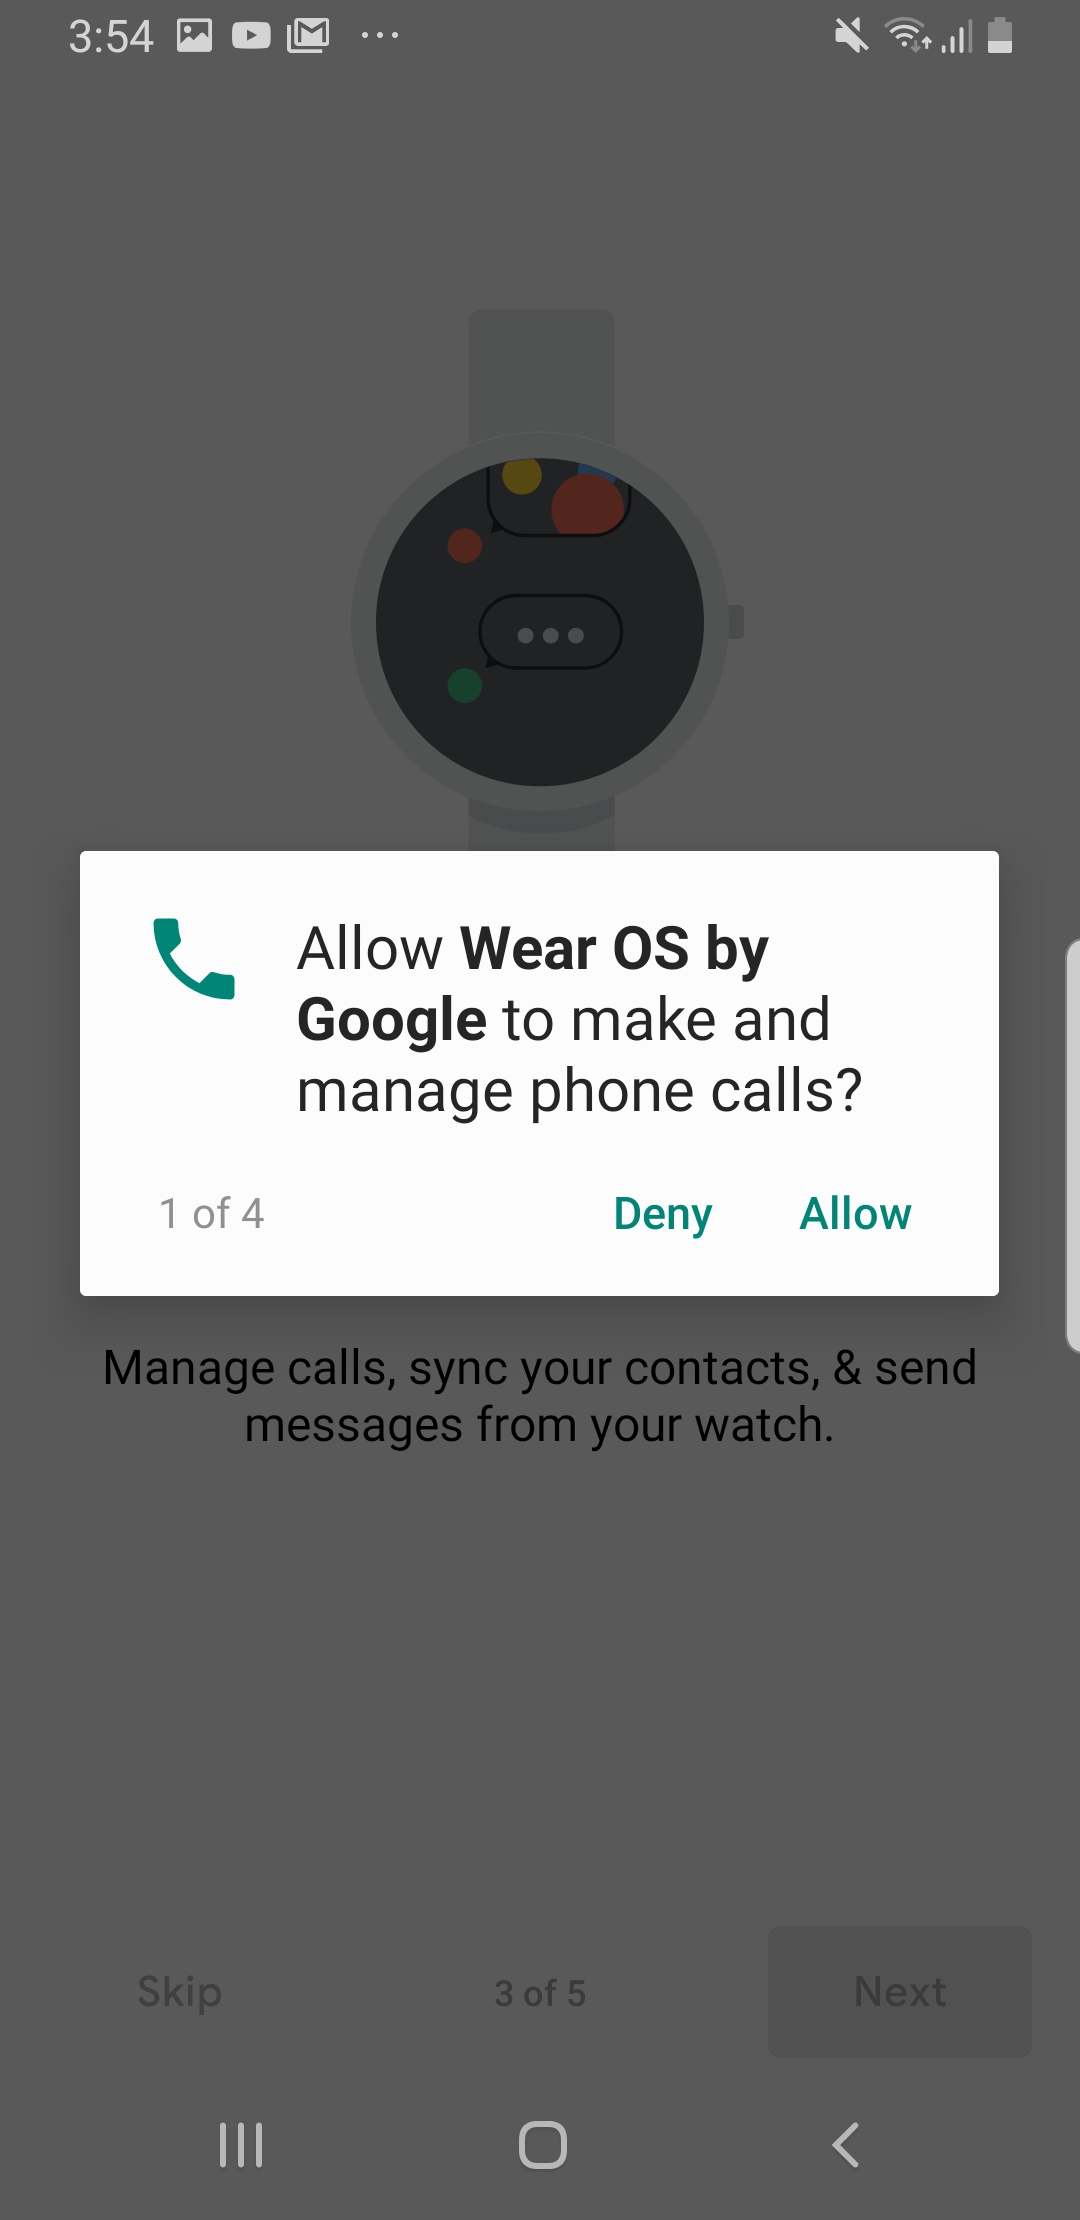 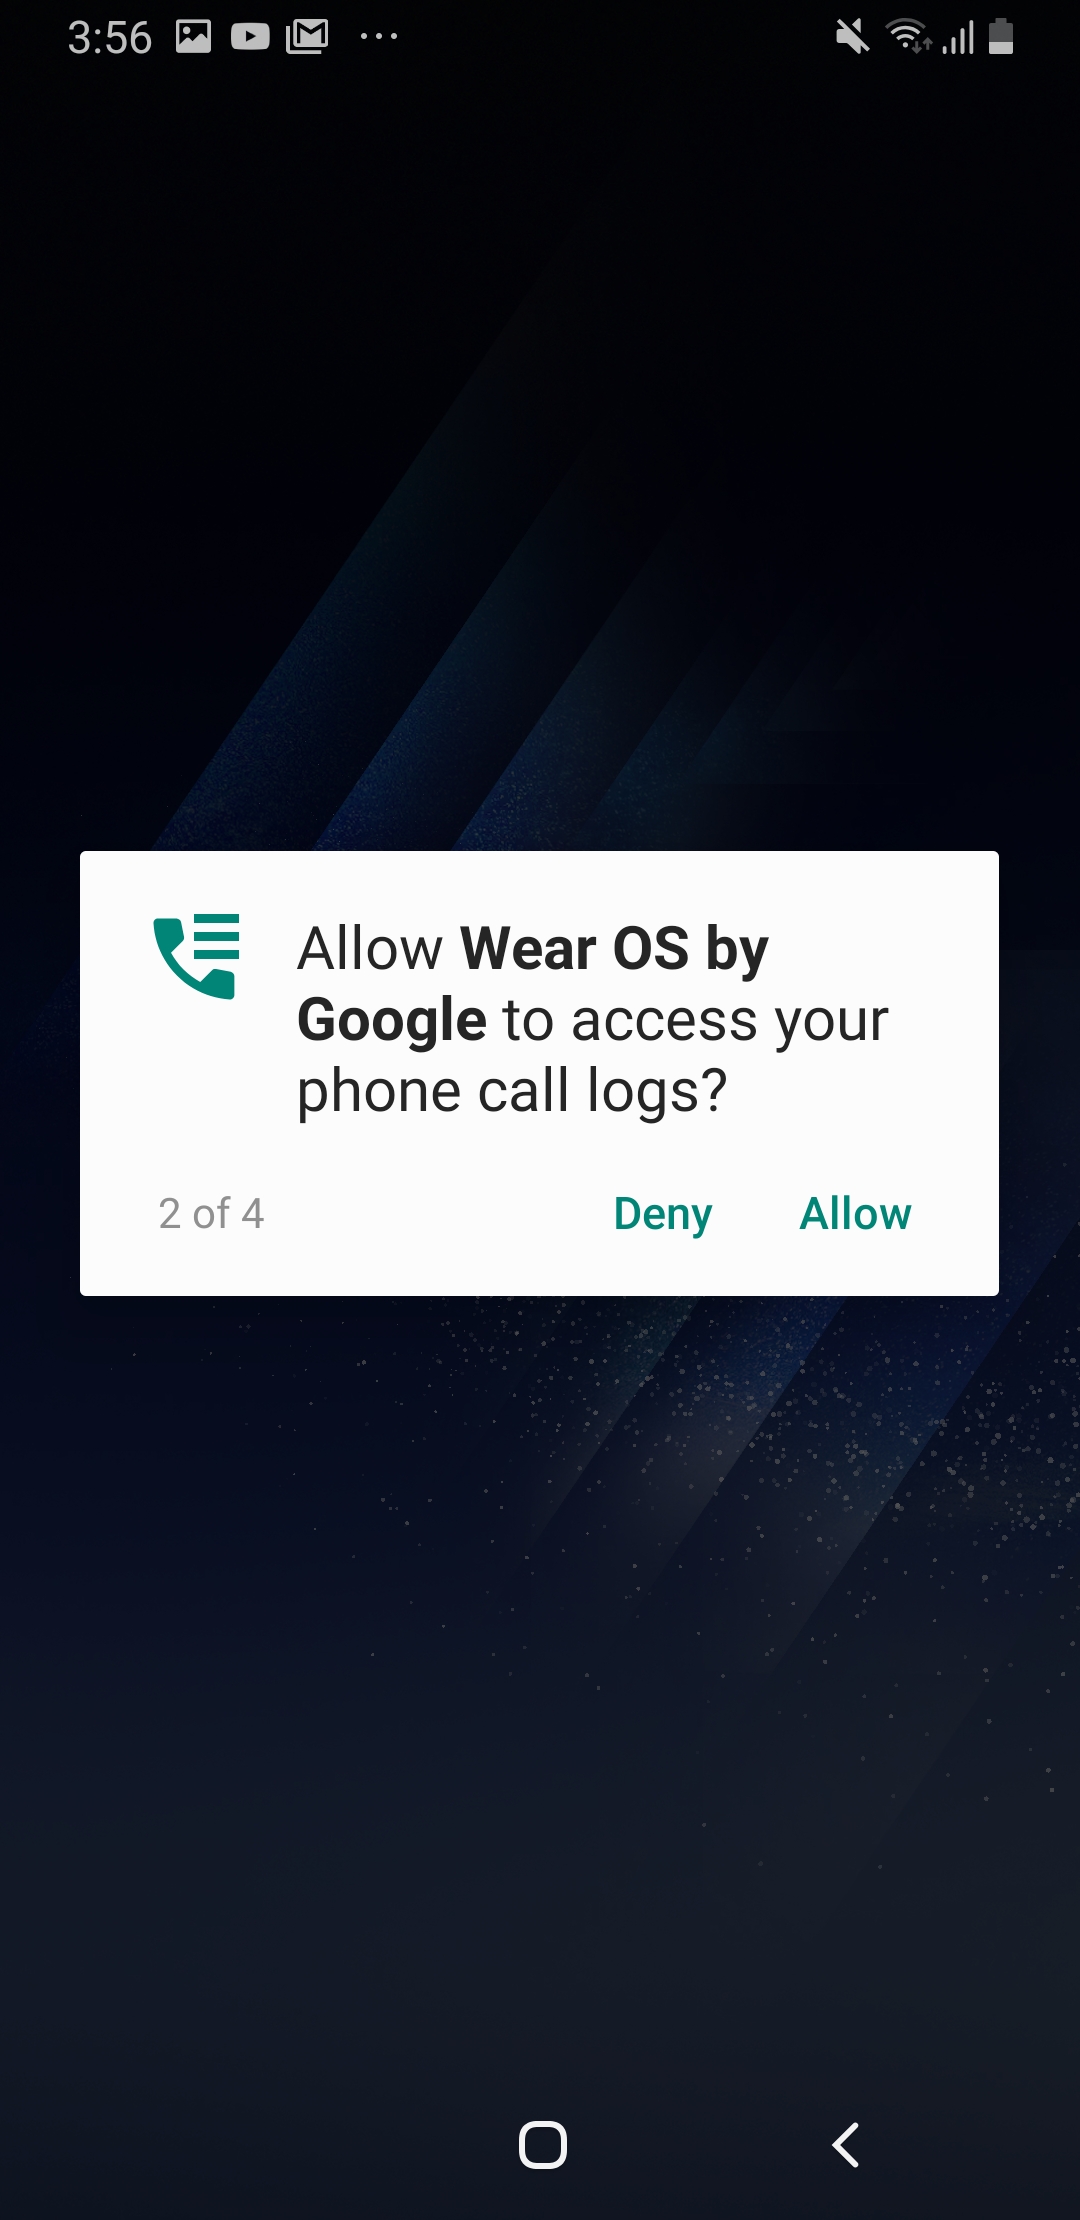 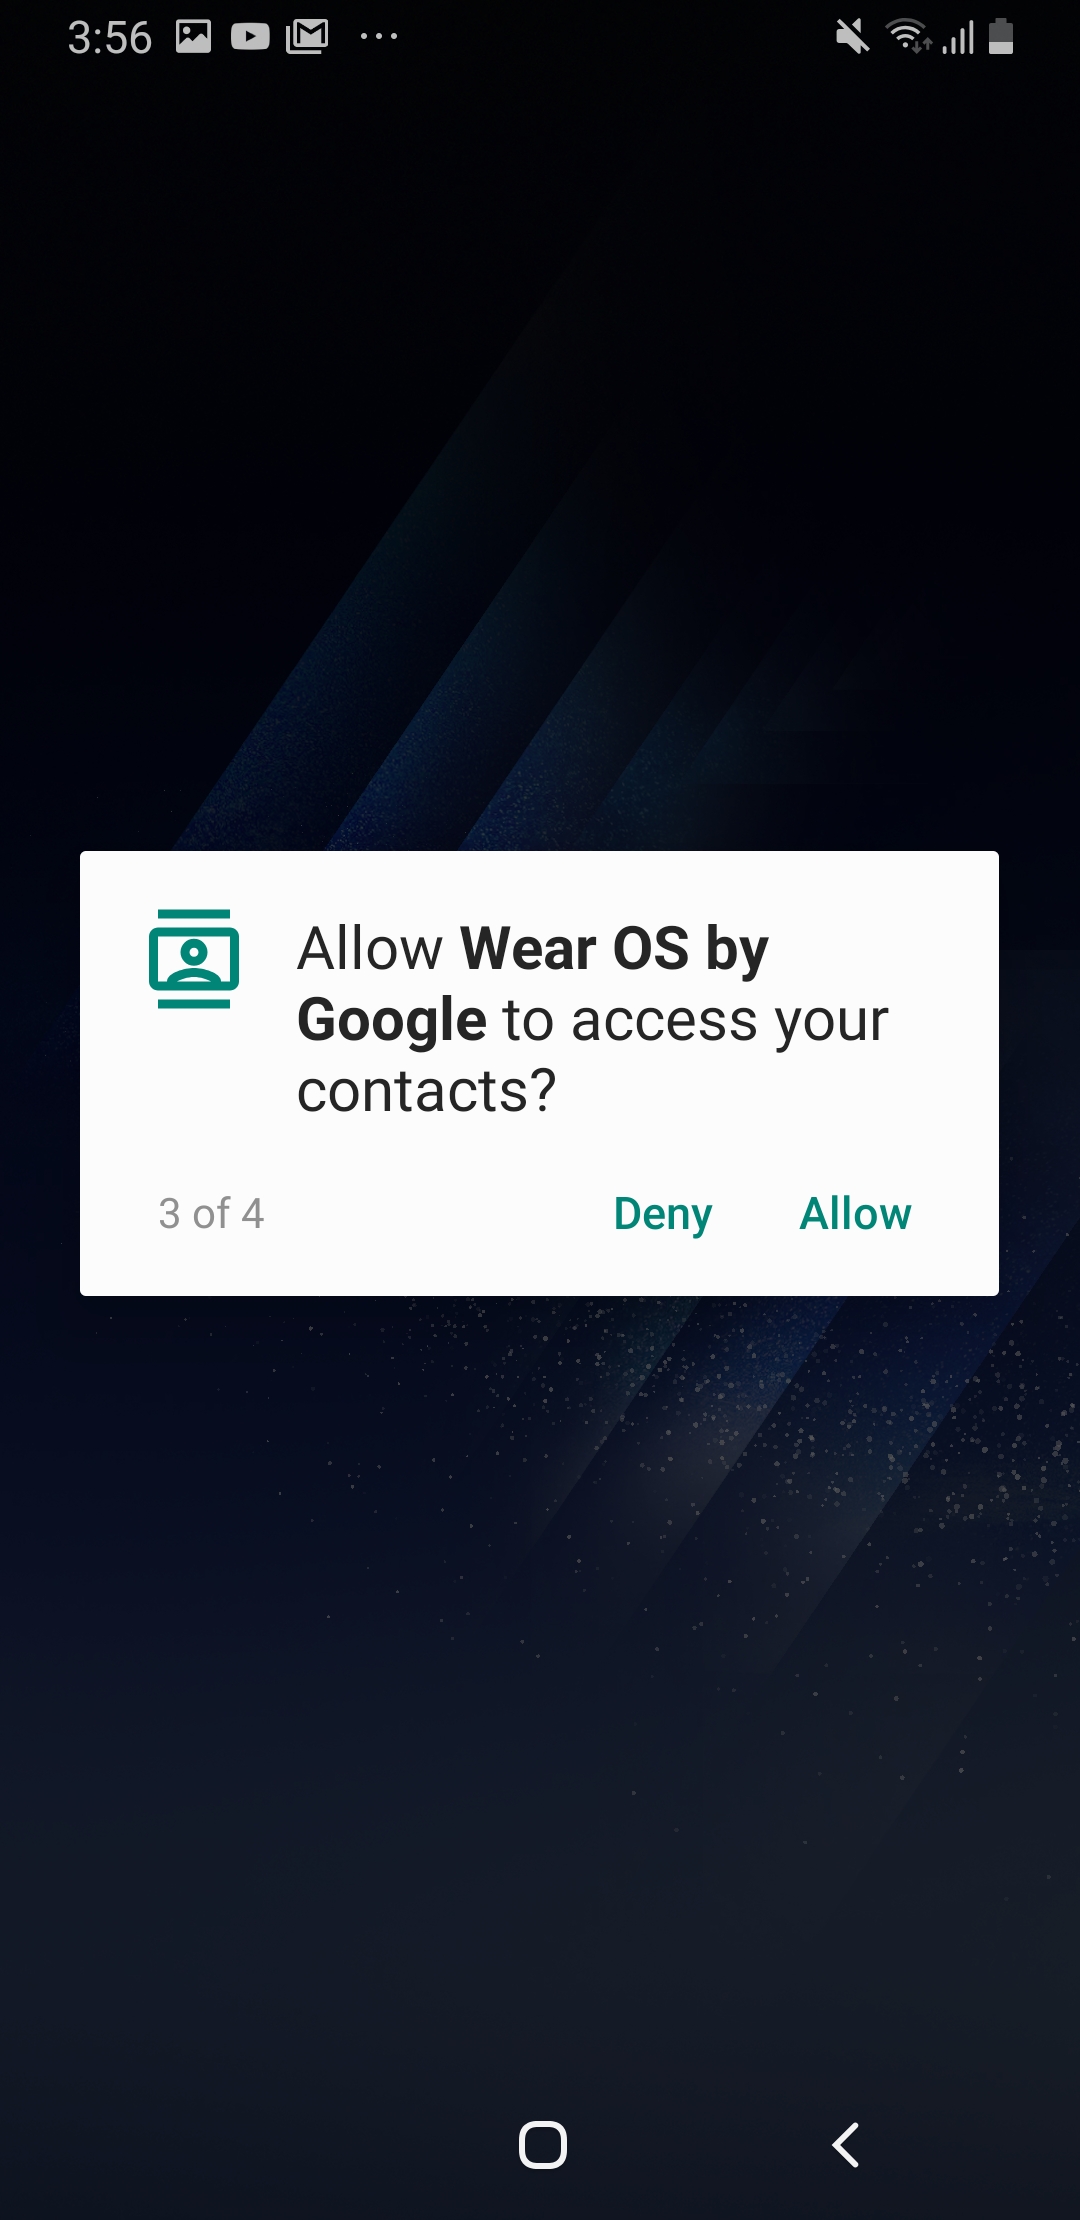 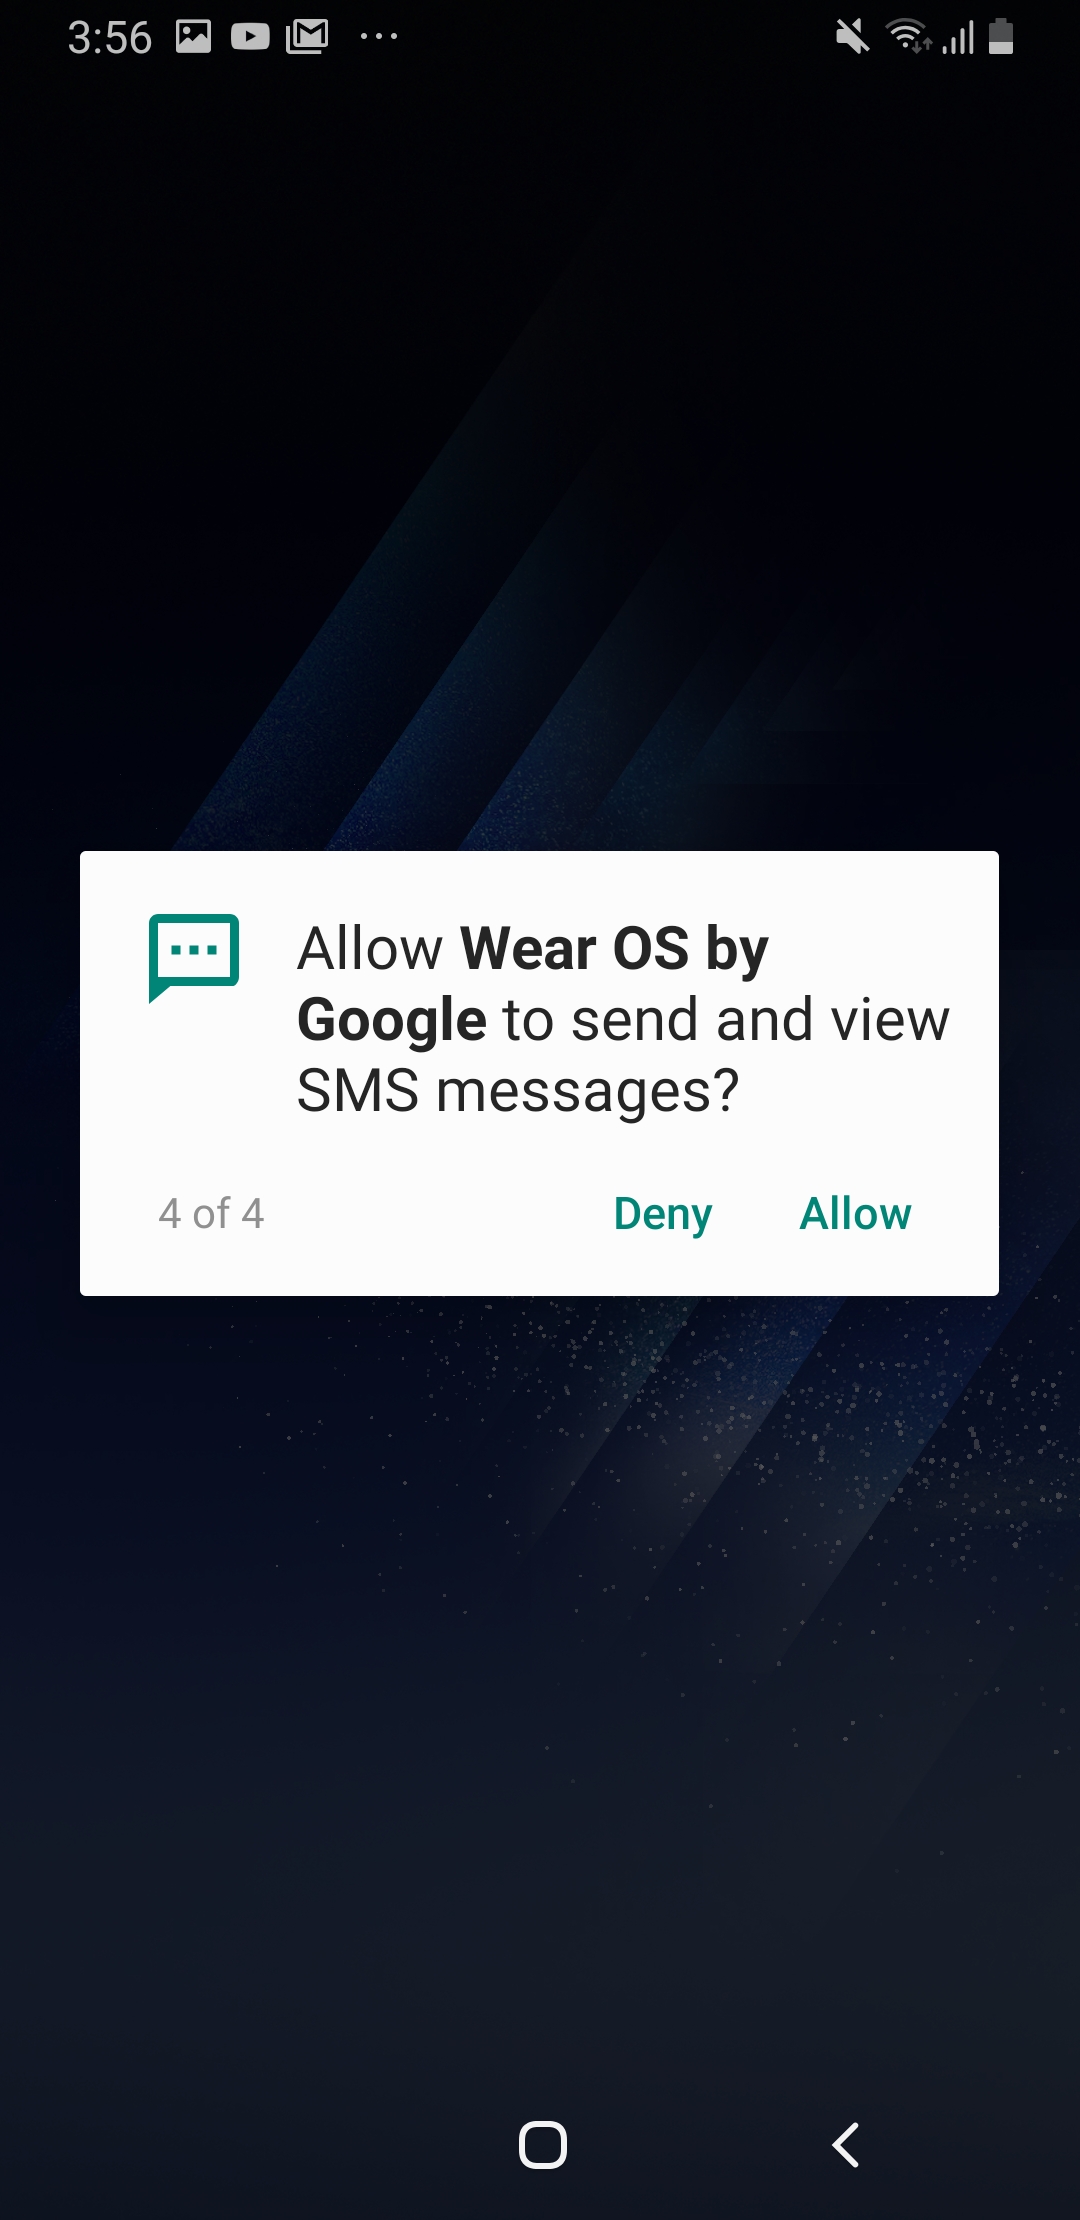 12. Under Check your calendar, press Next and press Allow for the calendar permission 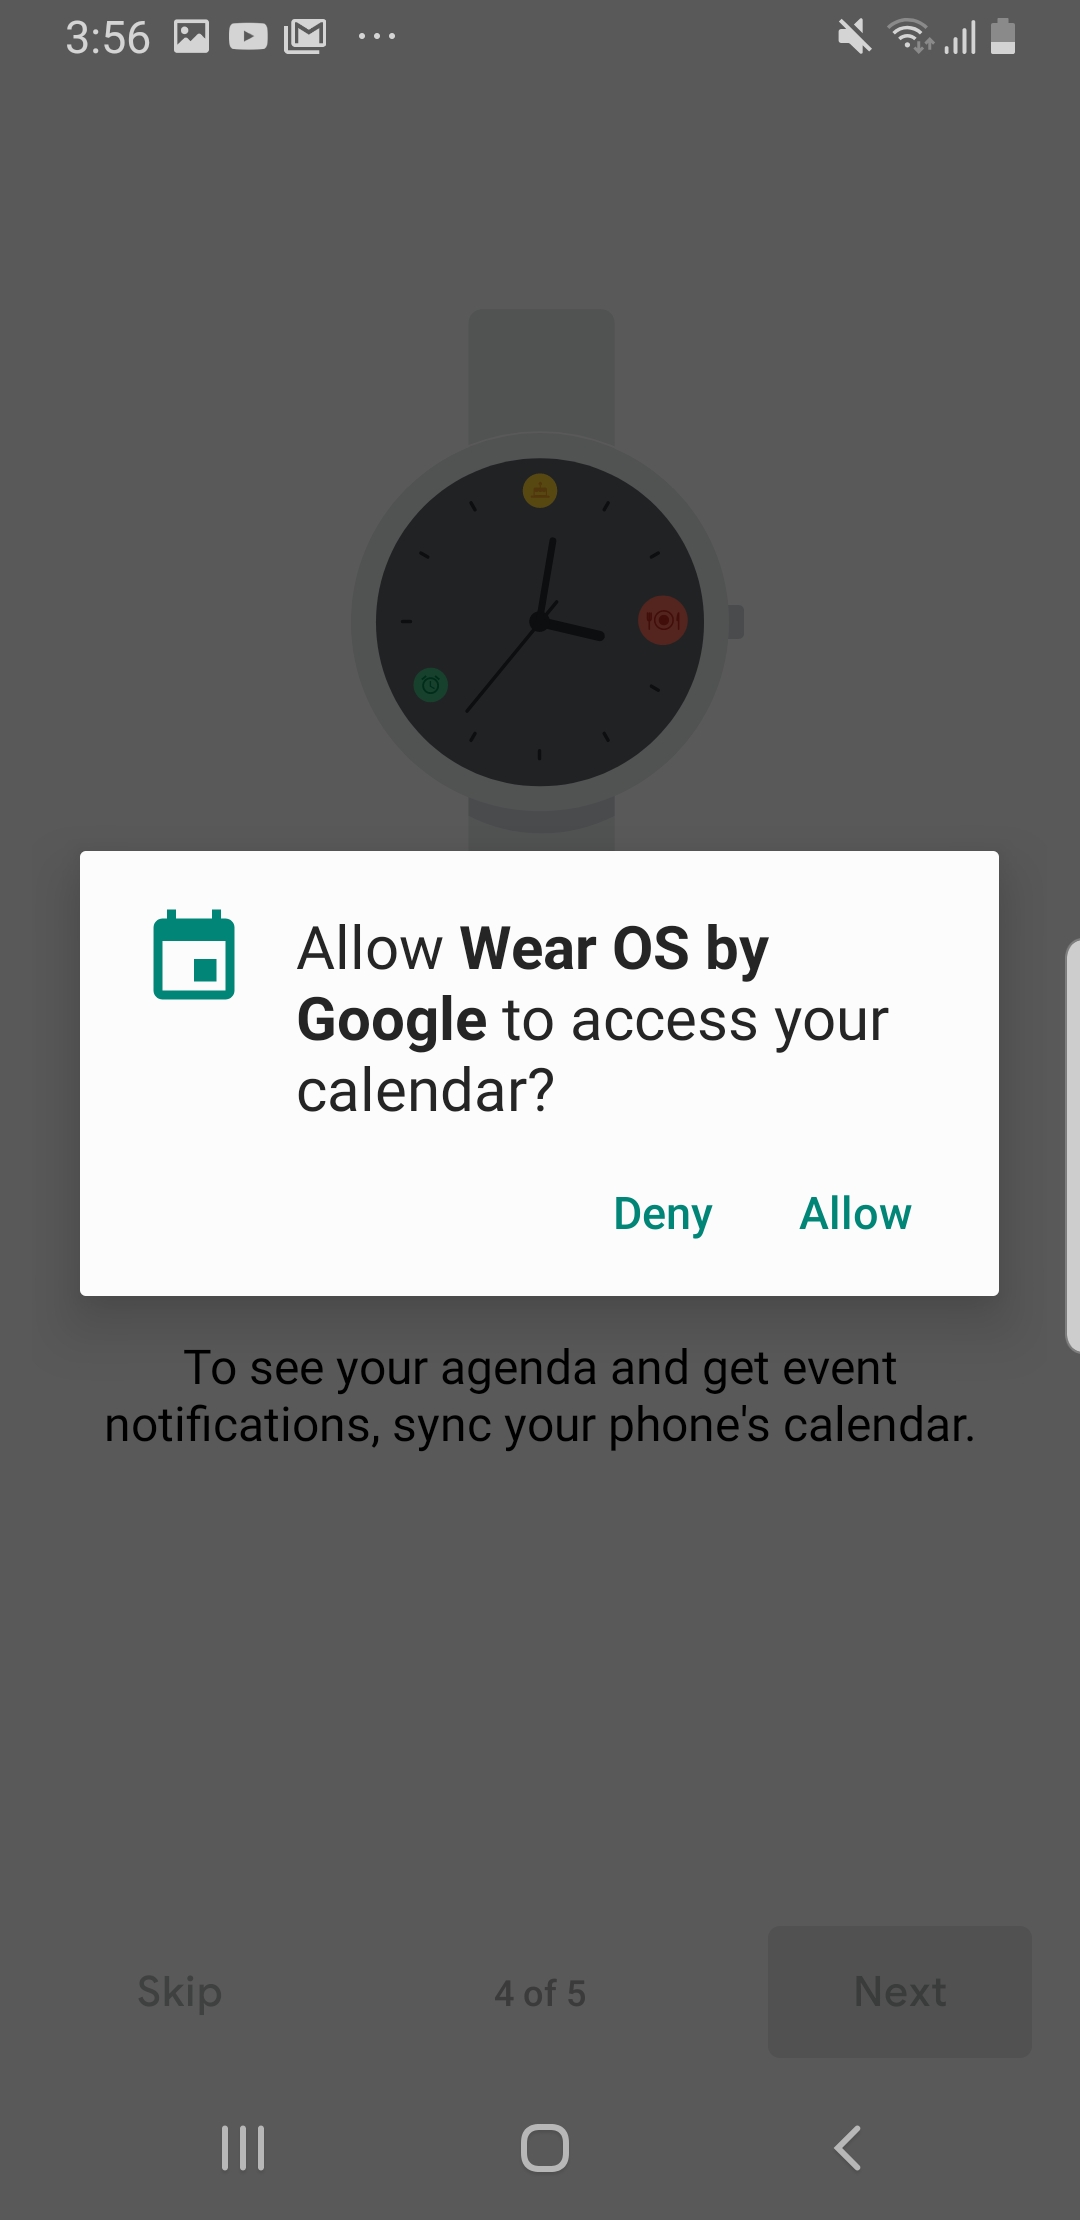 13. Under Get notifications at a glance, press Allow 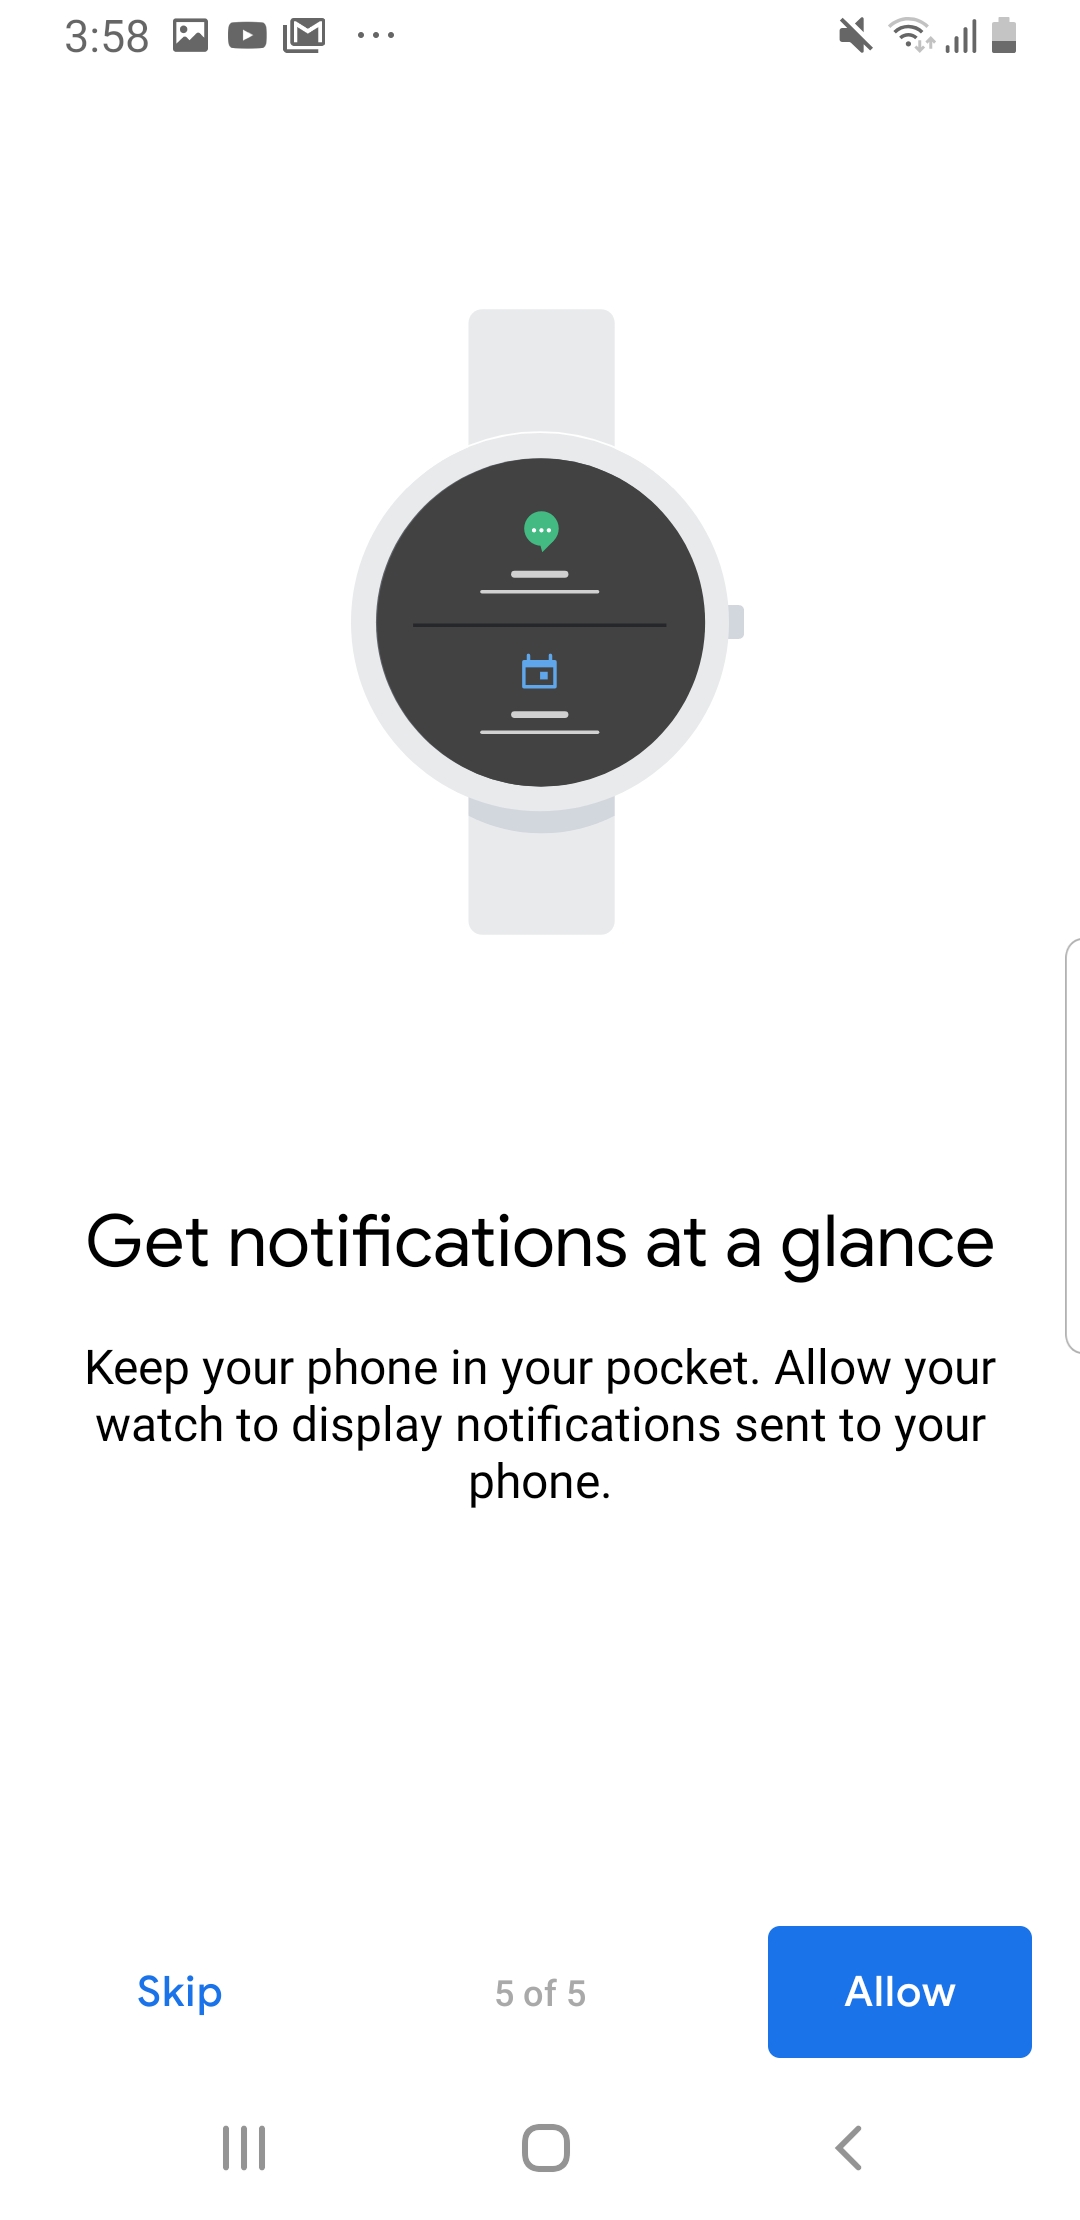 14. Tap on the slider next to Wear OS by Google (it’ll turn blue) 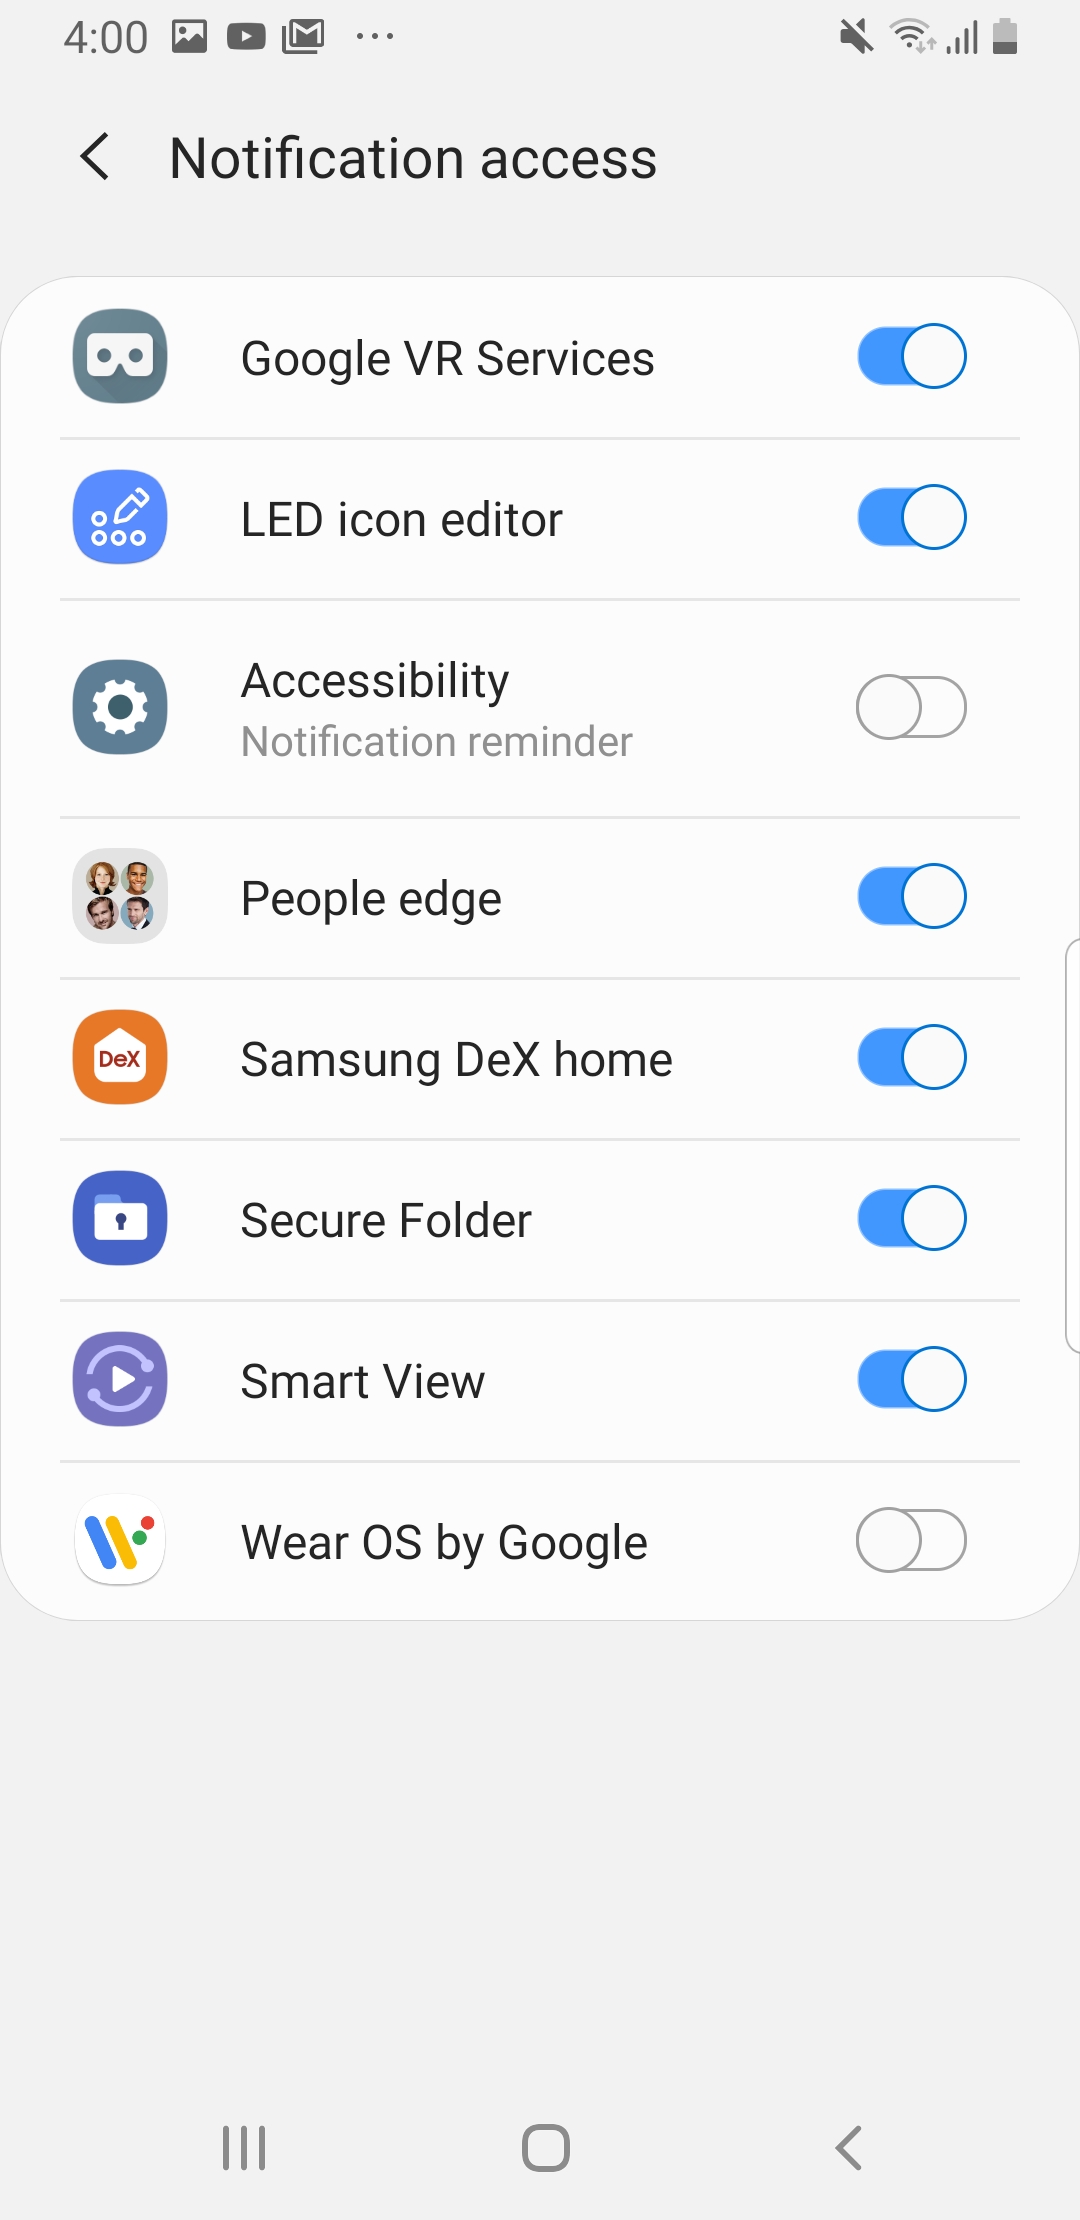 15. Press Allow on the Allow Wear OS by Google pop up 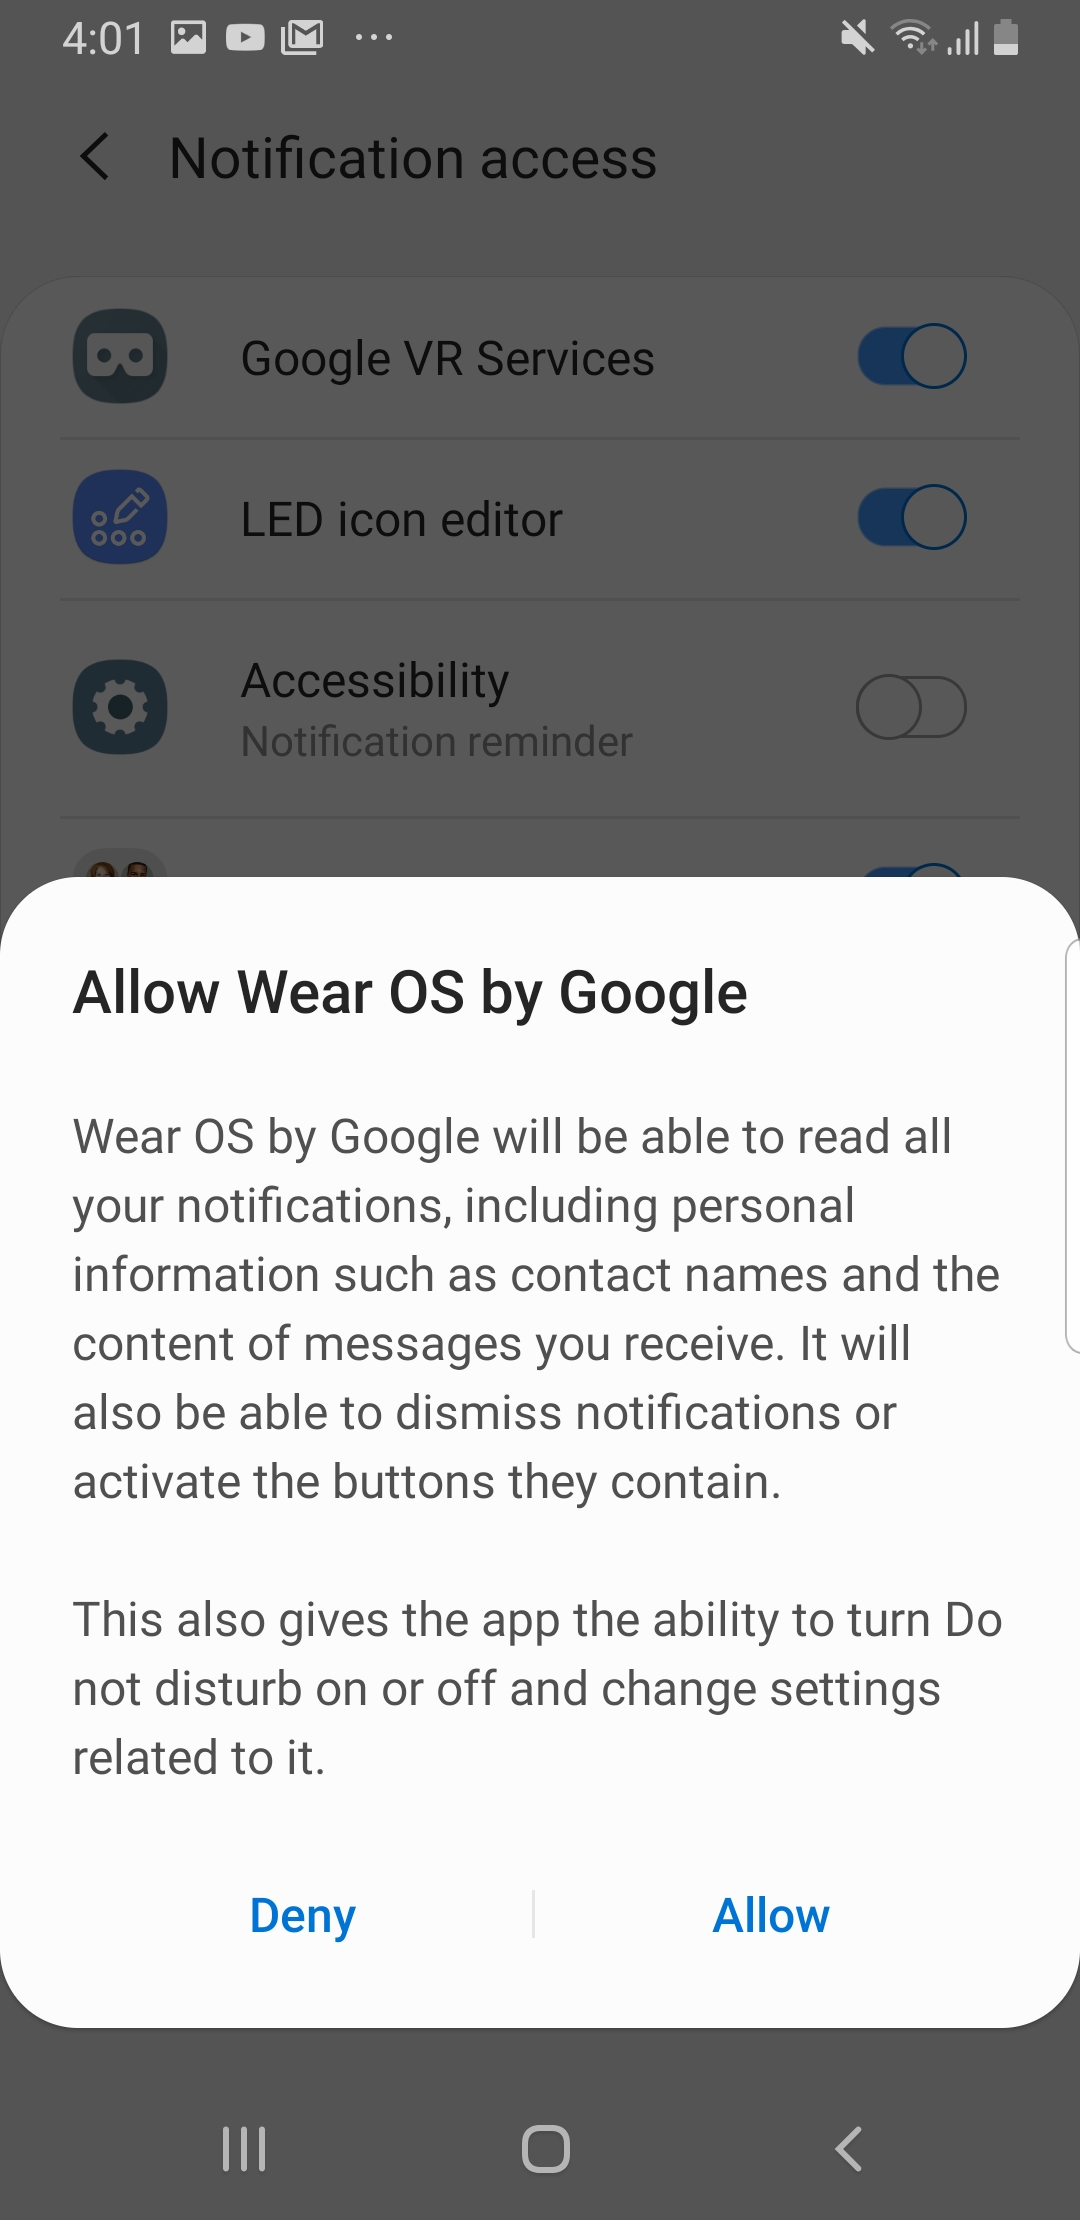 16. Press Next under Location notice 17. The phone will then continue to set up on its own (may take up to 5 minutes). 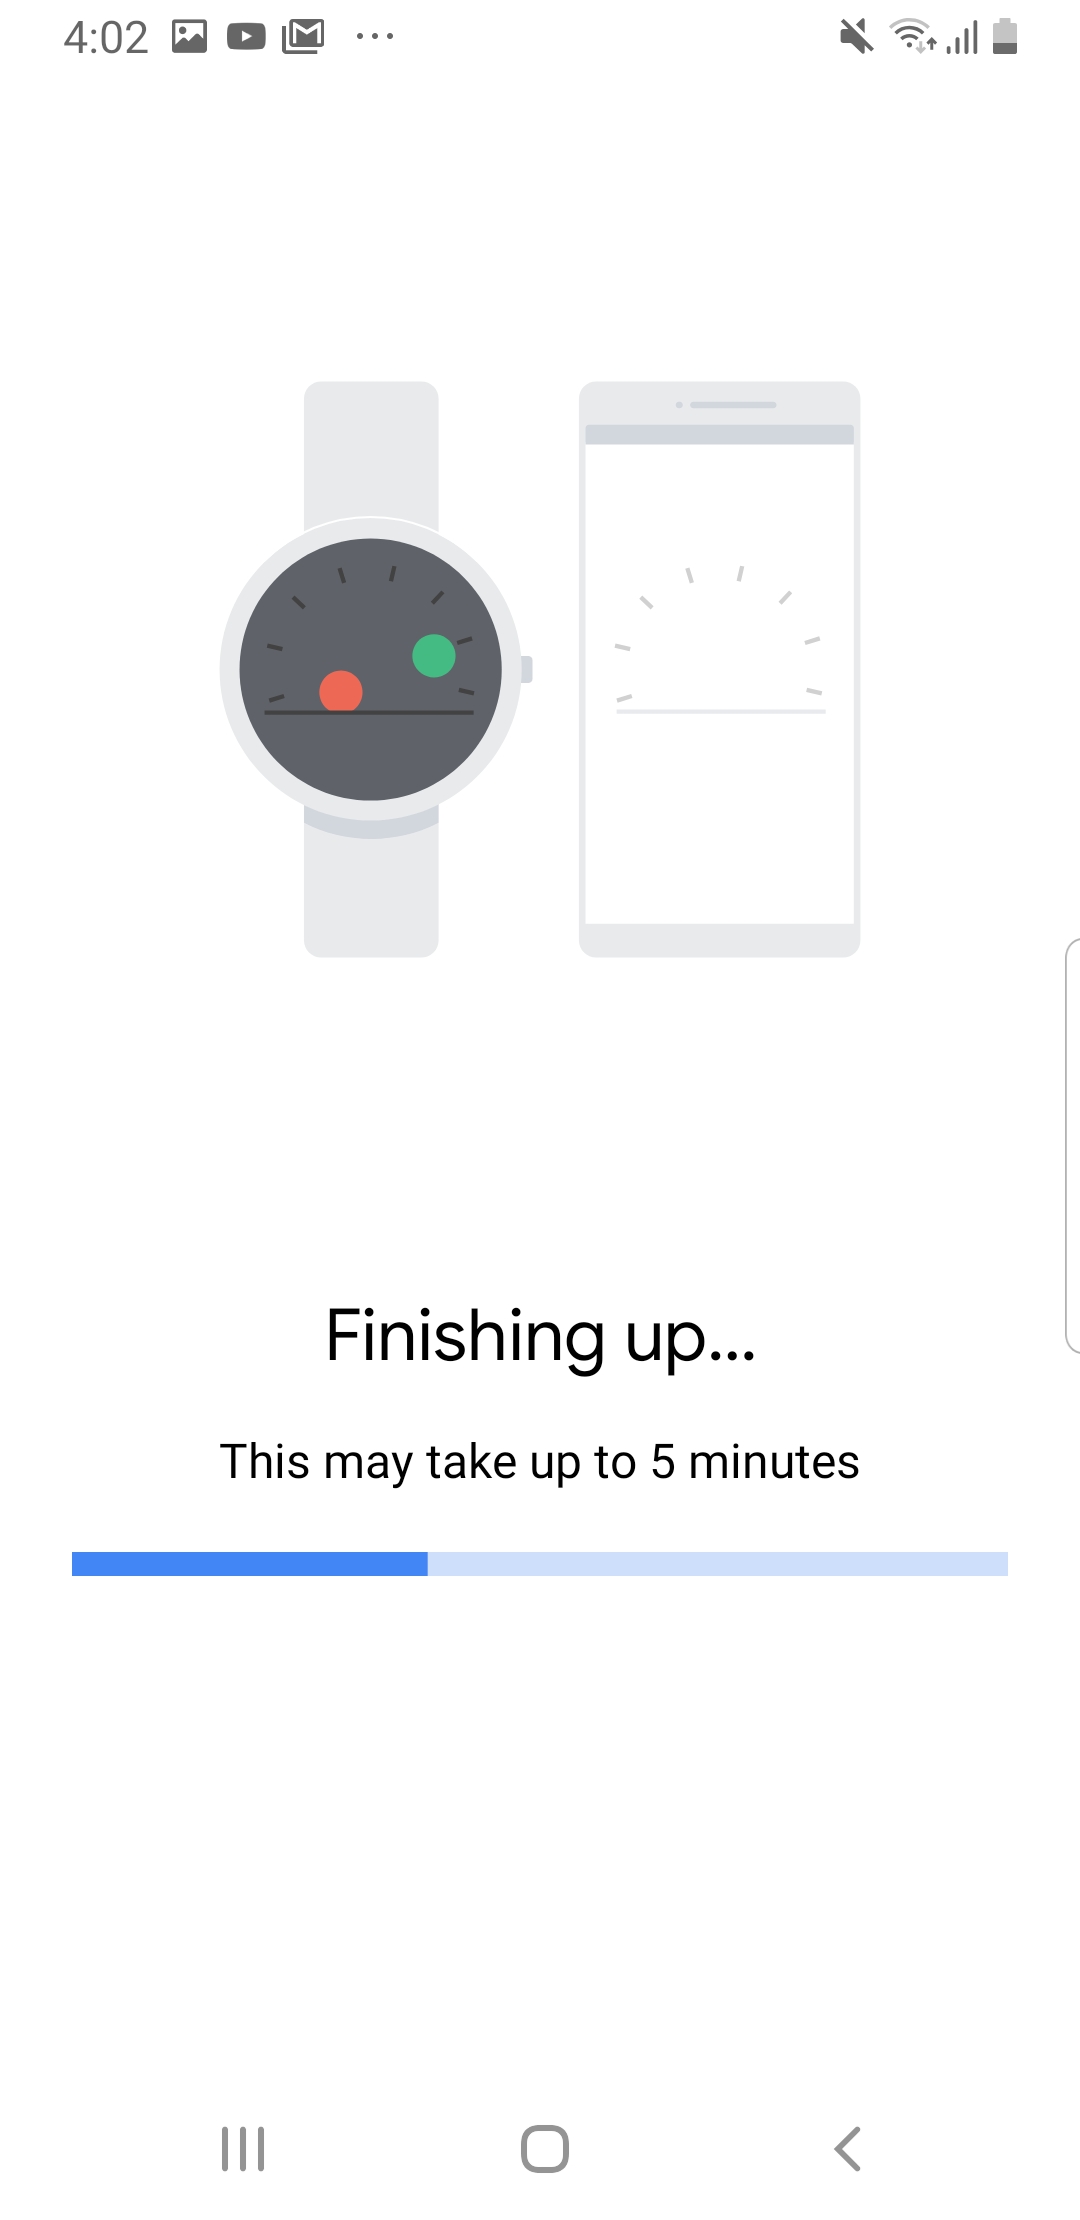 18. Once you see the You’re all set screen, press Done 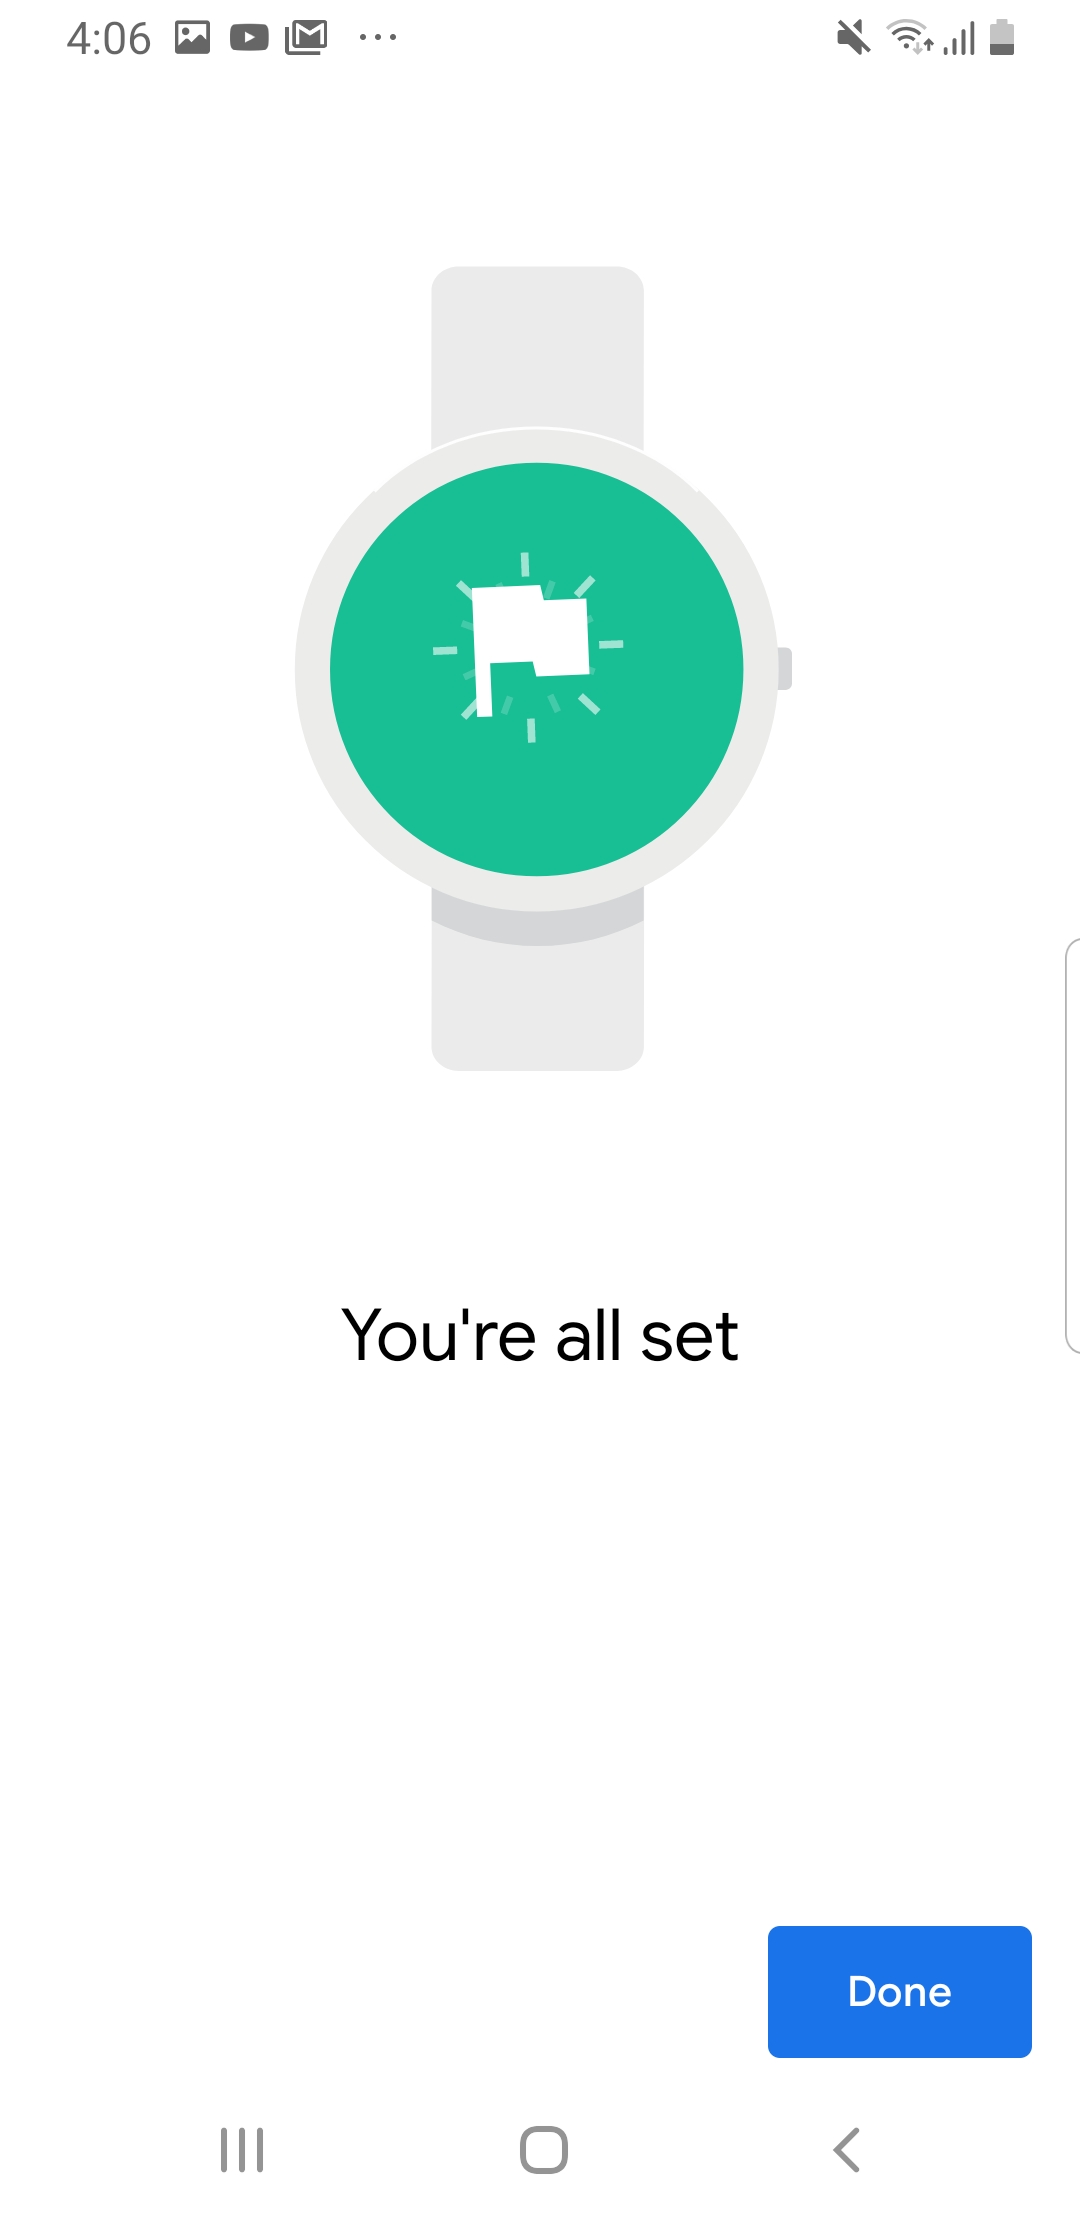 3. Sign in to Google Fit on the Watch Swipe from right to left on the watch Tap the screen to sign in to Google Fit and use the Google account that you copied over to the watch Fill in all the details and accept all the permissions
| Note |
|---|
At this point, the watch should be paired with the phone. A good way to know is to try and change the watch face by going into the Wear OS app on the phone and picking a different face. The face change should get reflected in the watch too. |
4. Download Insight from the Google Play StoreChoose the Google Play Store app from the participant’s phone Search for Insight mHealth Platform Choose Install After the app downloads, choose ACCEPT Open the Insight app Click Allow to all permissions At the “Do not optimize battery usage” prompt, choose YES Create a participant in the CMS and set up the participant on the Insight app. Click here for instructions on participant set up.
| Info |
|---|
We recommend using the Code Method for setting up participants. |
| Note |
|---|
After you setup a participant on the Insight app, please wait for 15-20 minutes for all the setup to finish. If you start setting up participant on the Outsight app too soon, the connection might not be created correctly. |
5. Download mHealth Outsight from Google Play Store 6. Download mHealth OutsightAndroidWear app on the Fossil WatchOn the Fossil watch, press the middle dial to open up the watch’s list of apps. 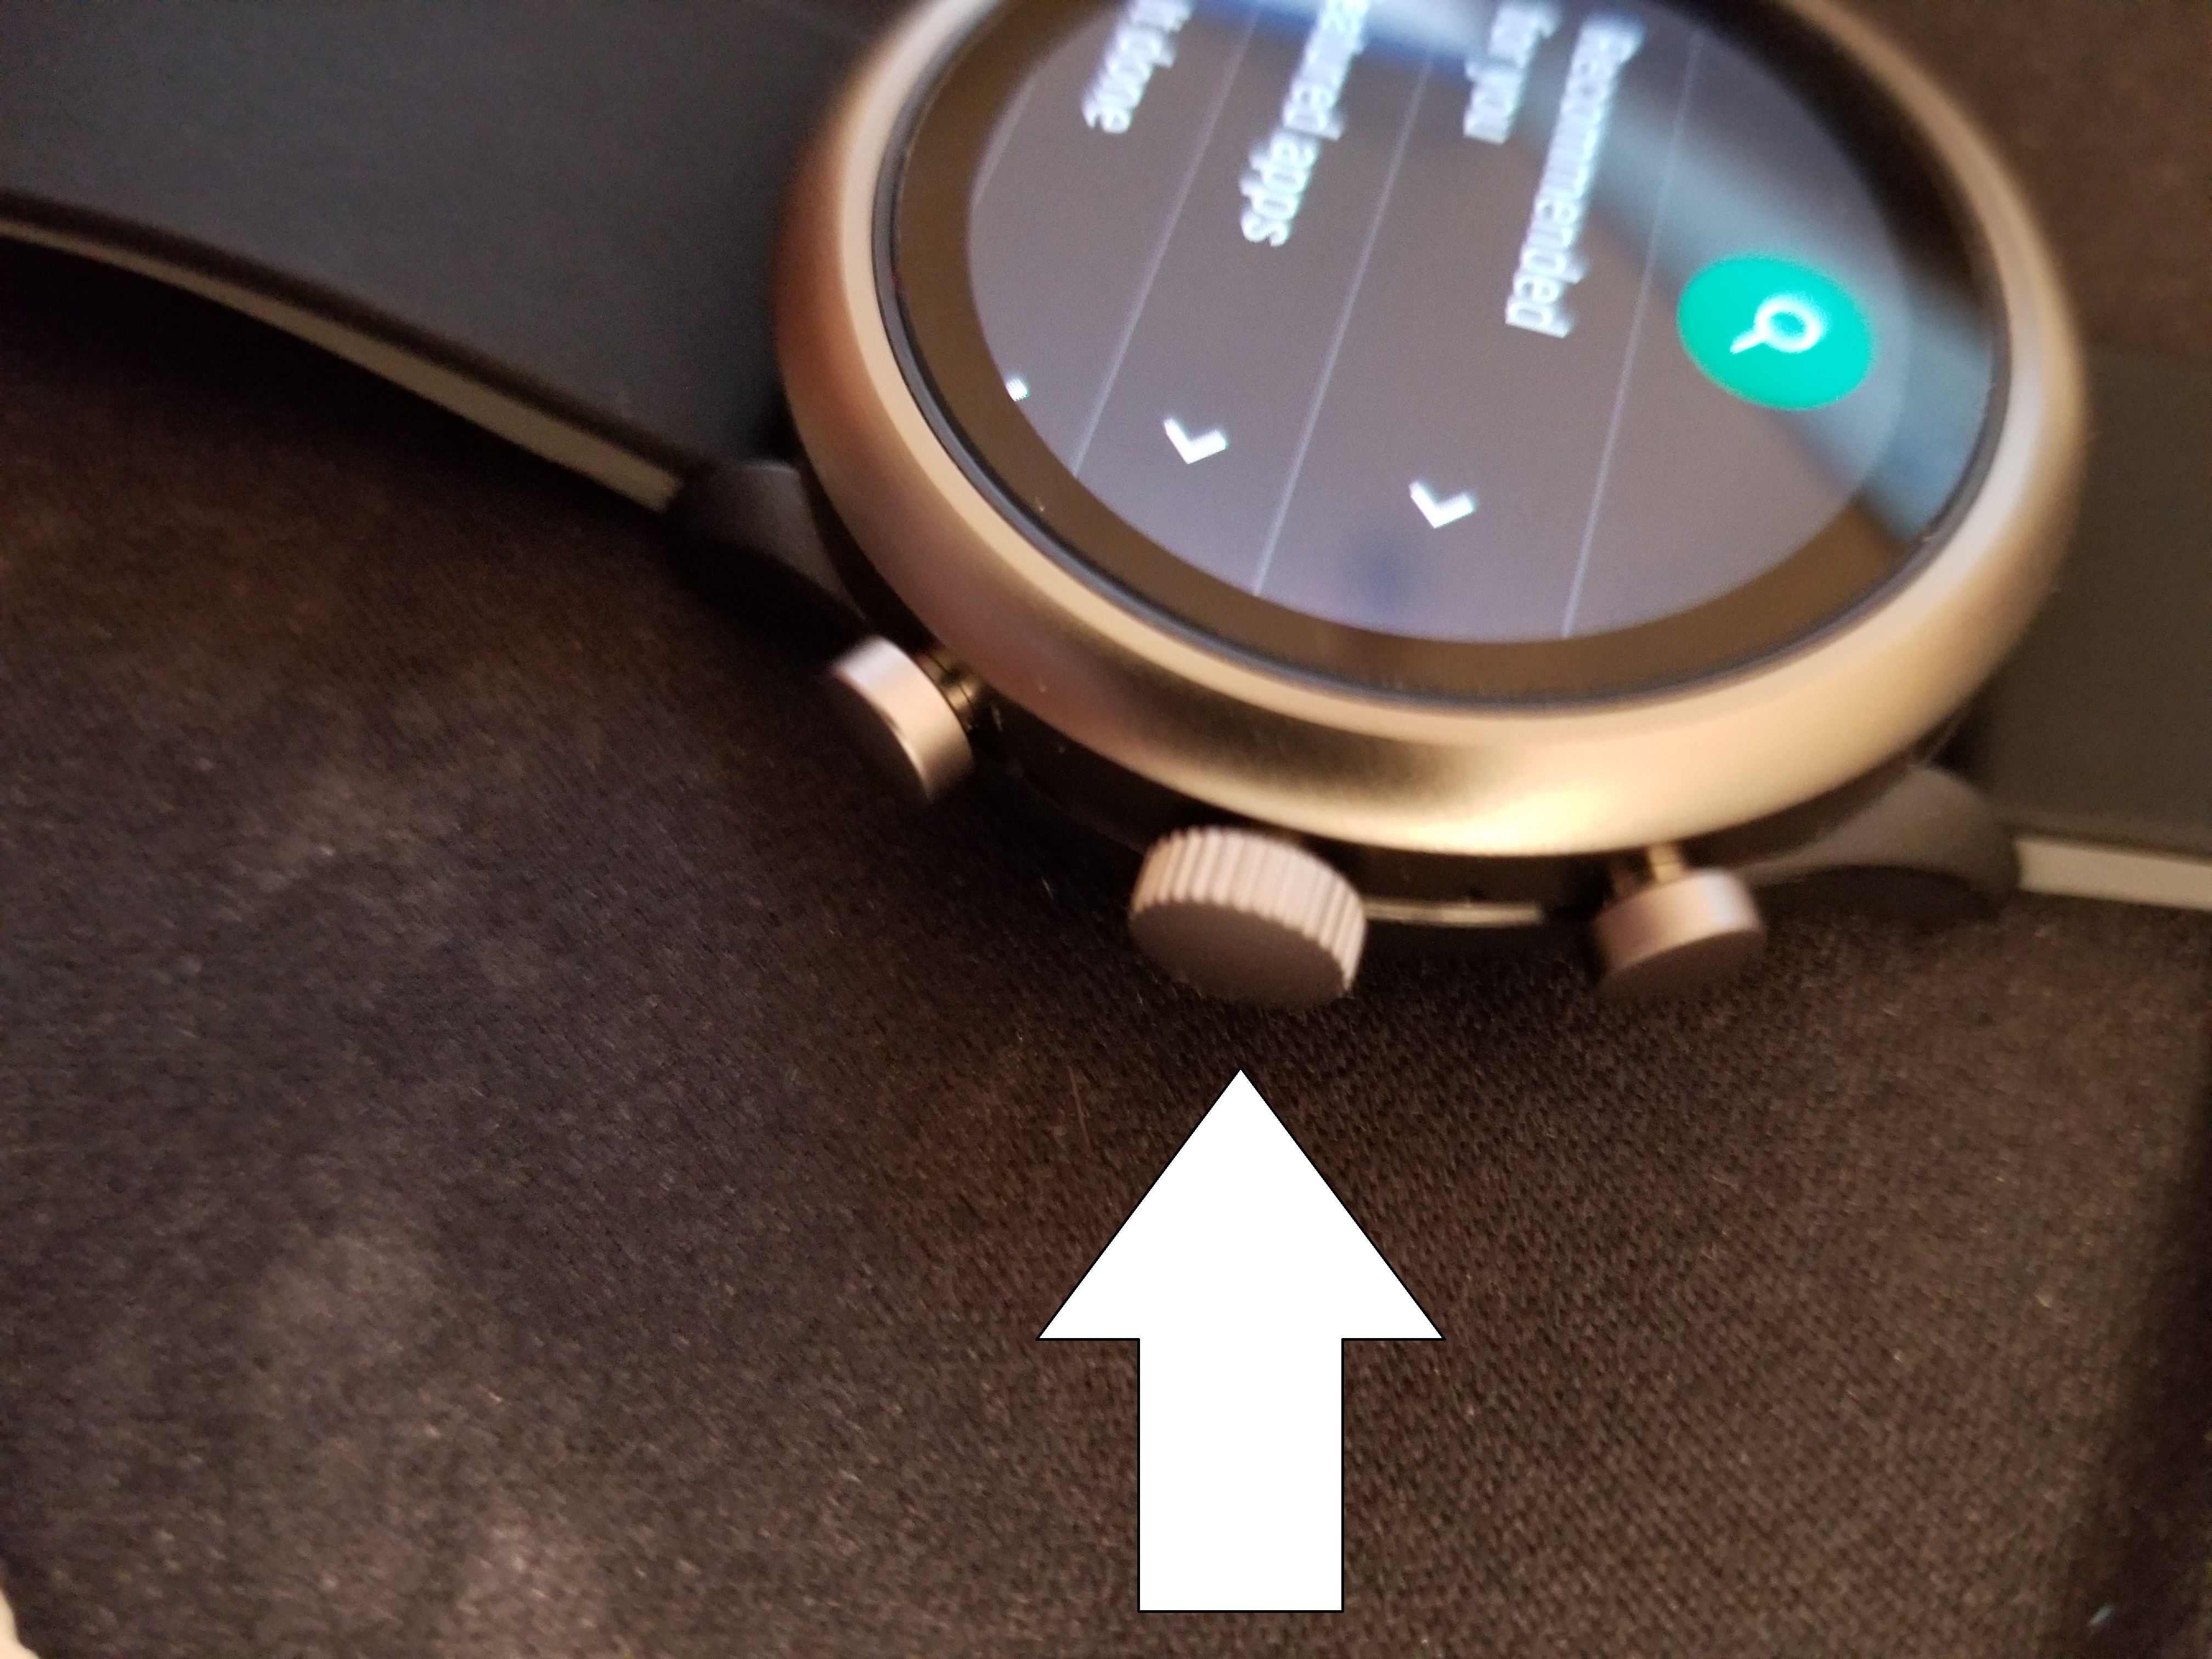 Click on Play Store 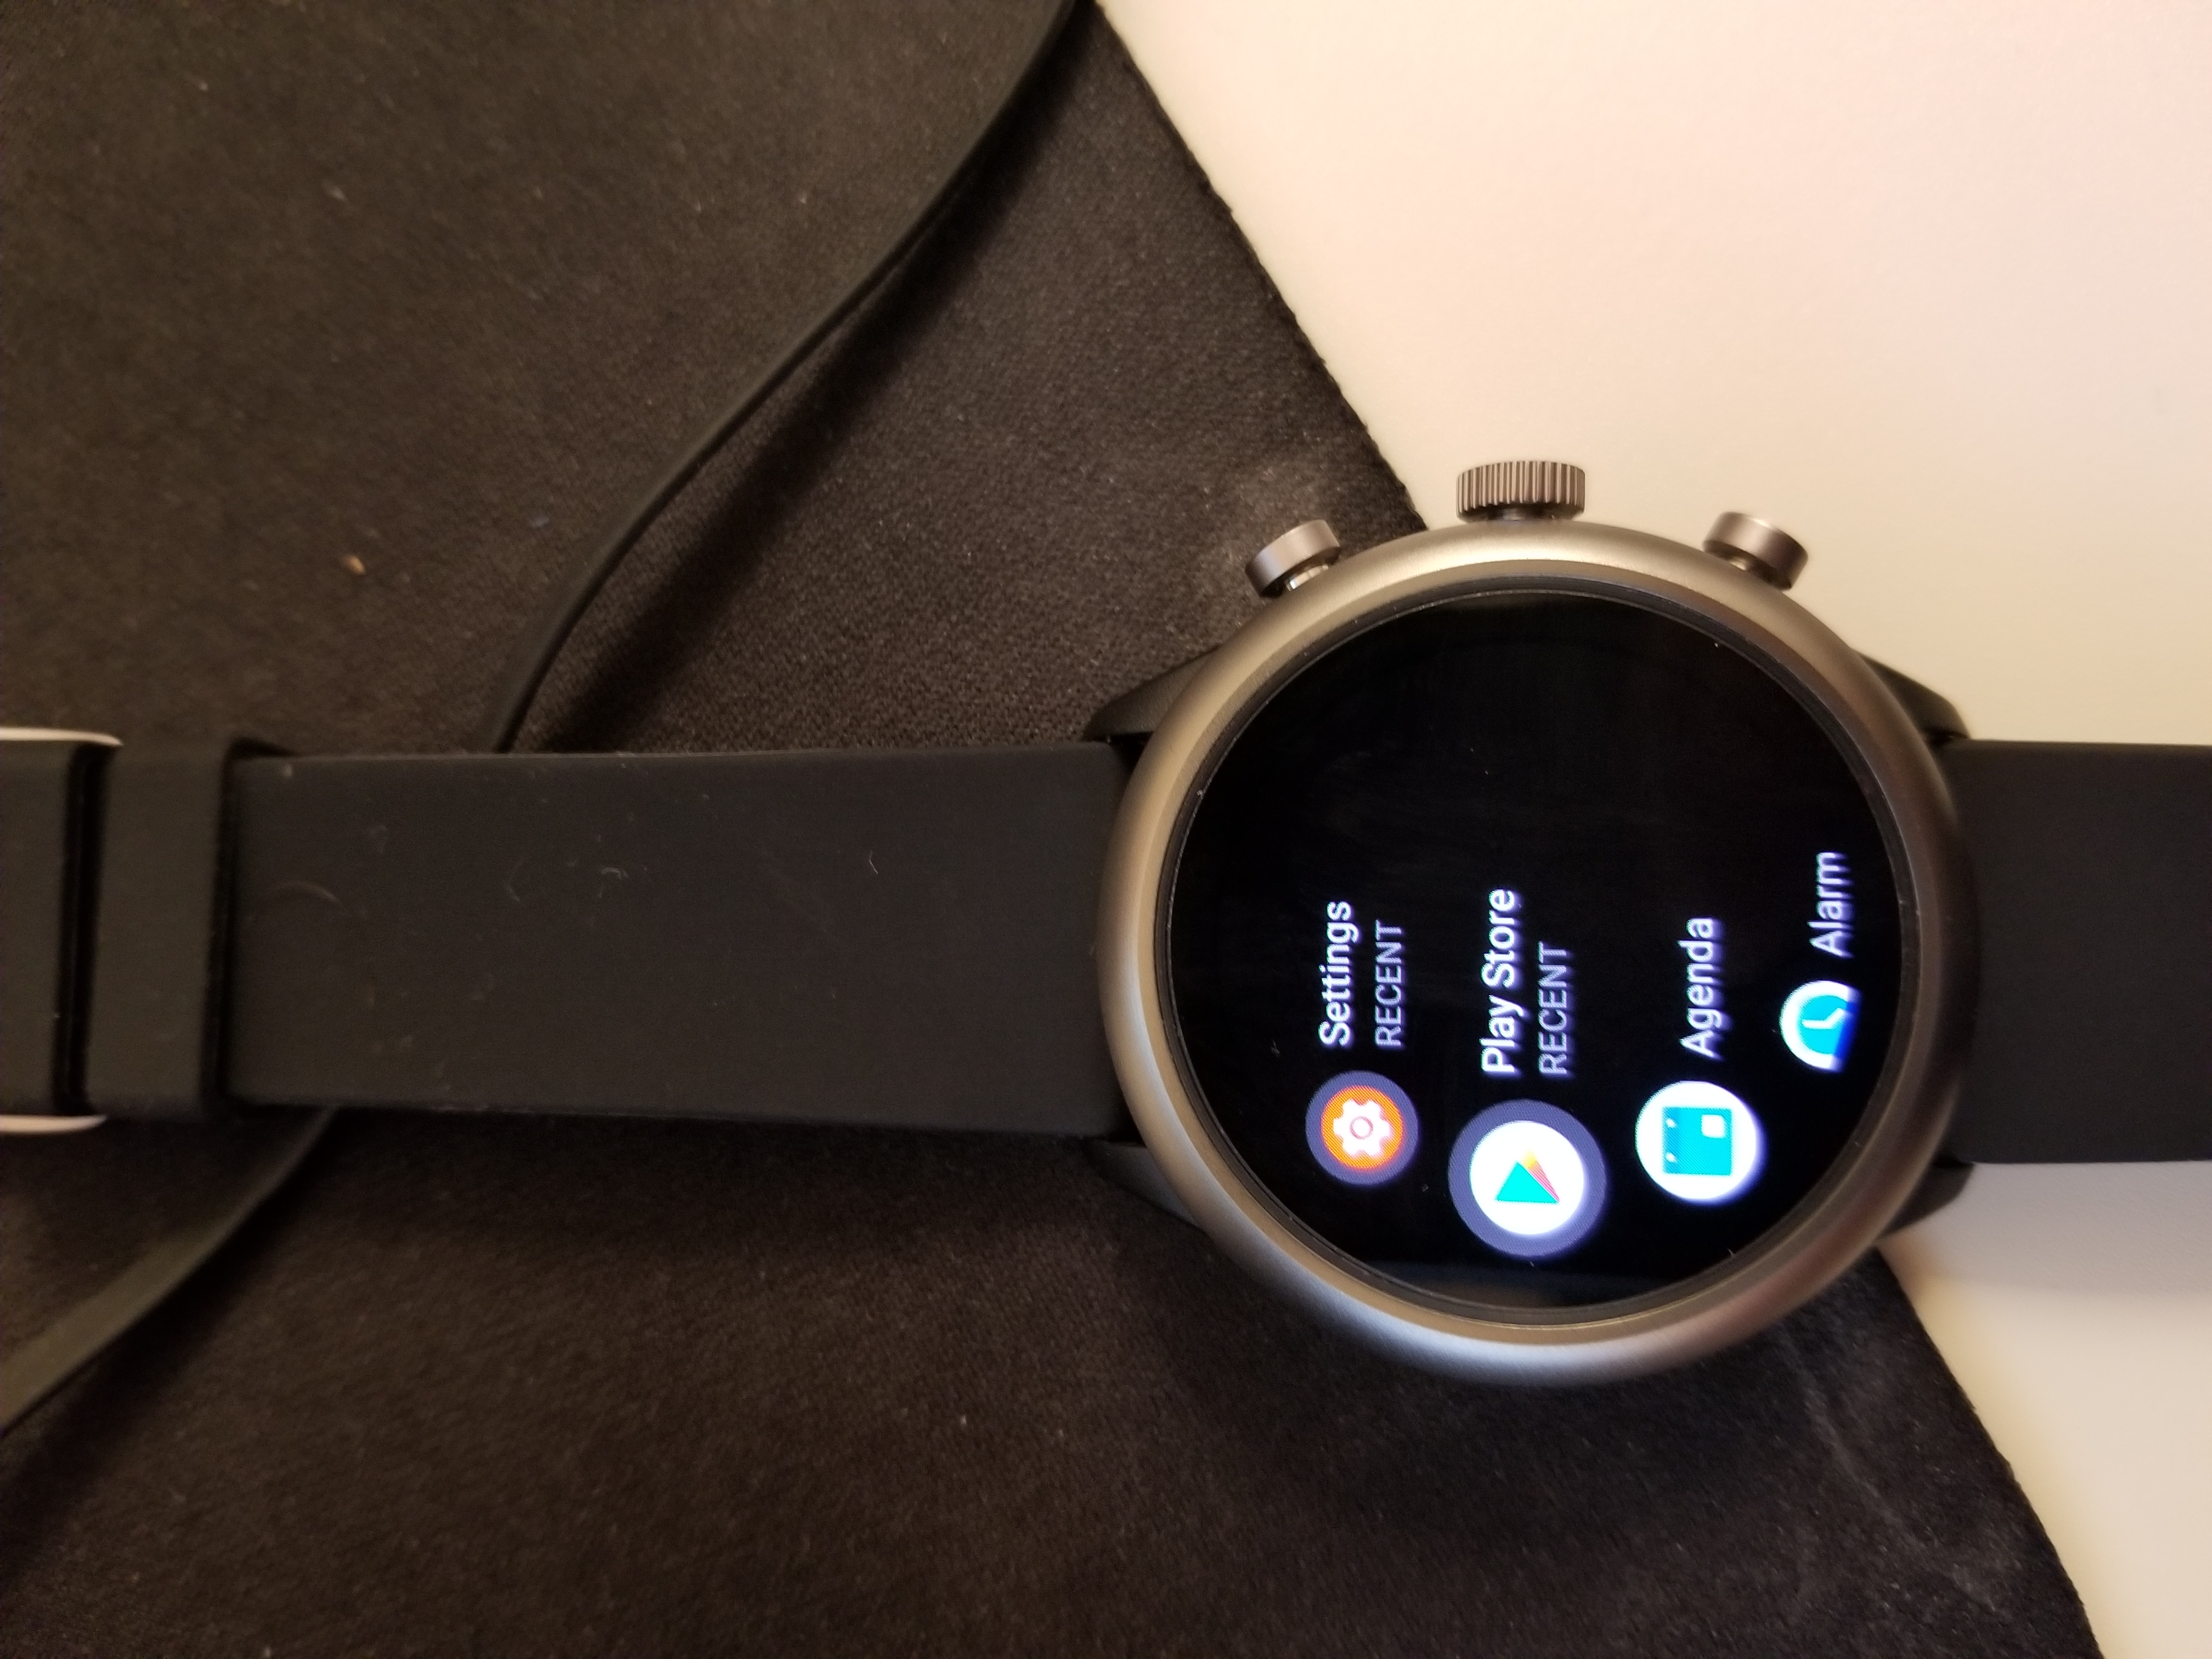 Scroll down until you see Outsight under Apps on your phone and click on the download button Open OutsightAndroidWear in your list of apps, and accept the sensor permission
Troubleshooting Ensure WEAR OS, Insight, and Outsight remain open and running in the background. If the app is open, Click the “Home” button (typically located at the bottom, center of the phone) to allow the app to run in the background. Example of a Recent window below: 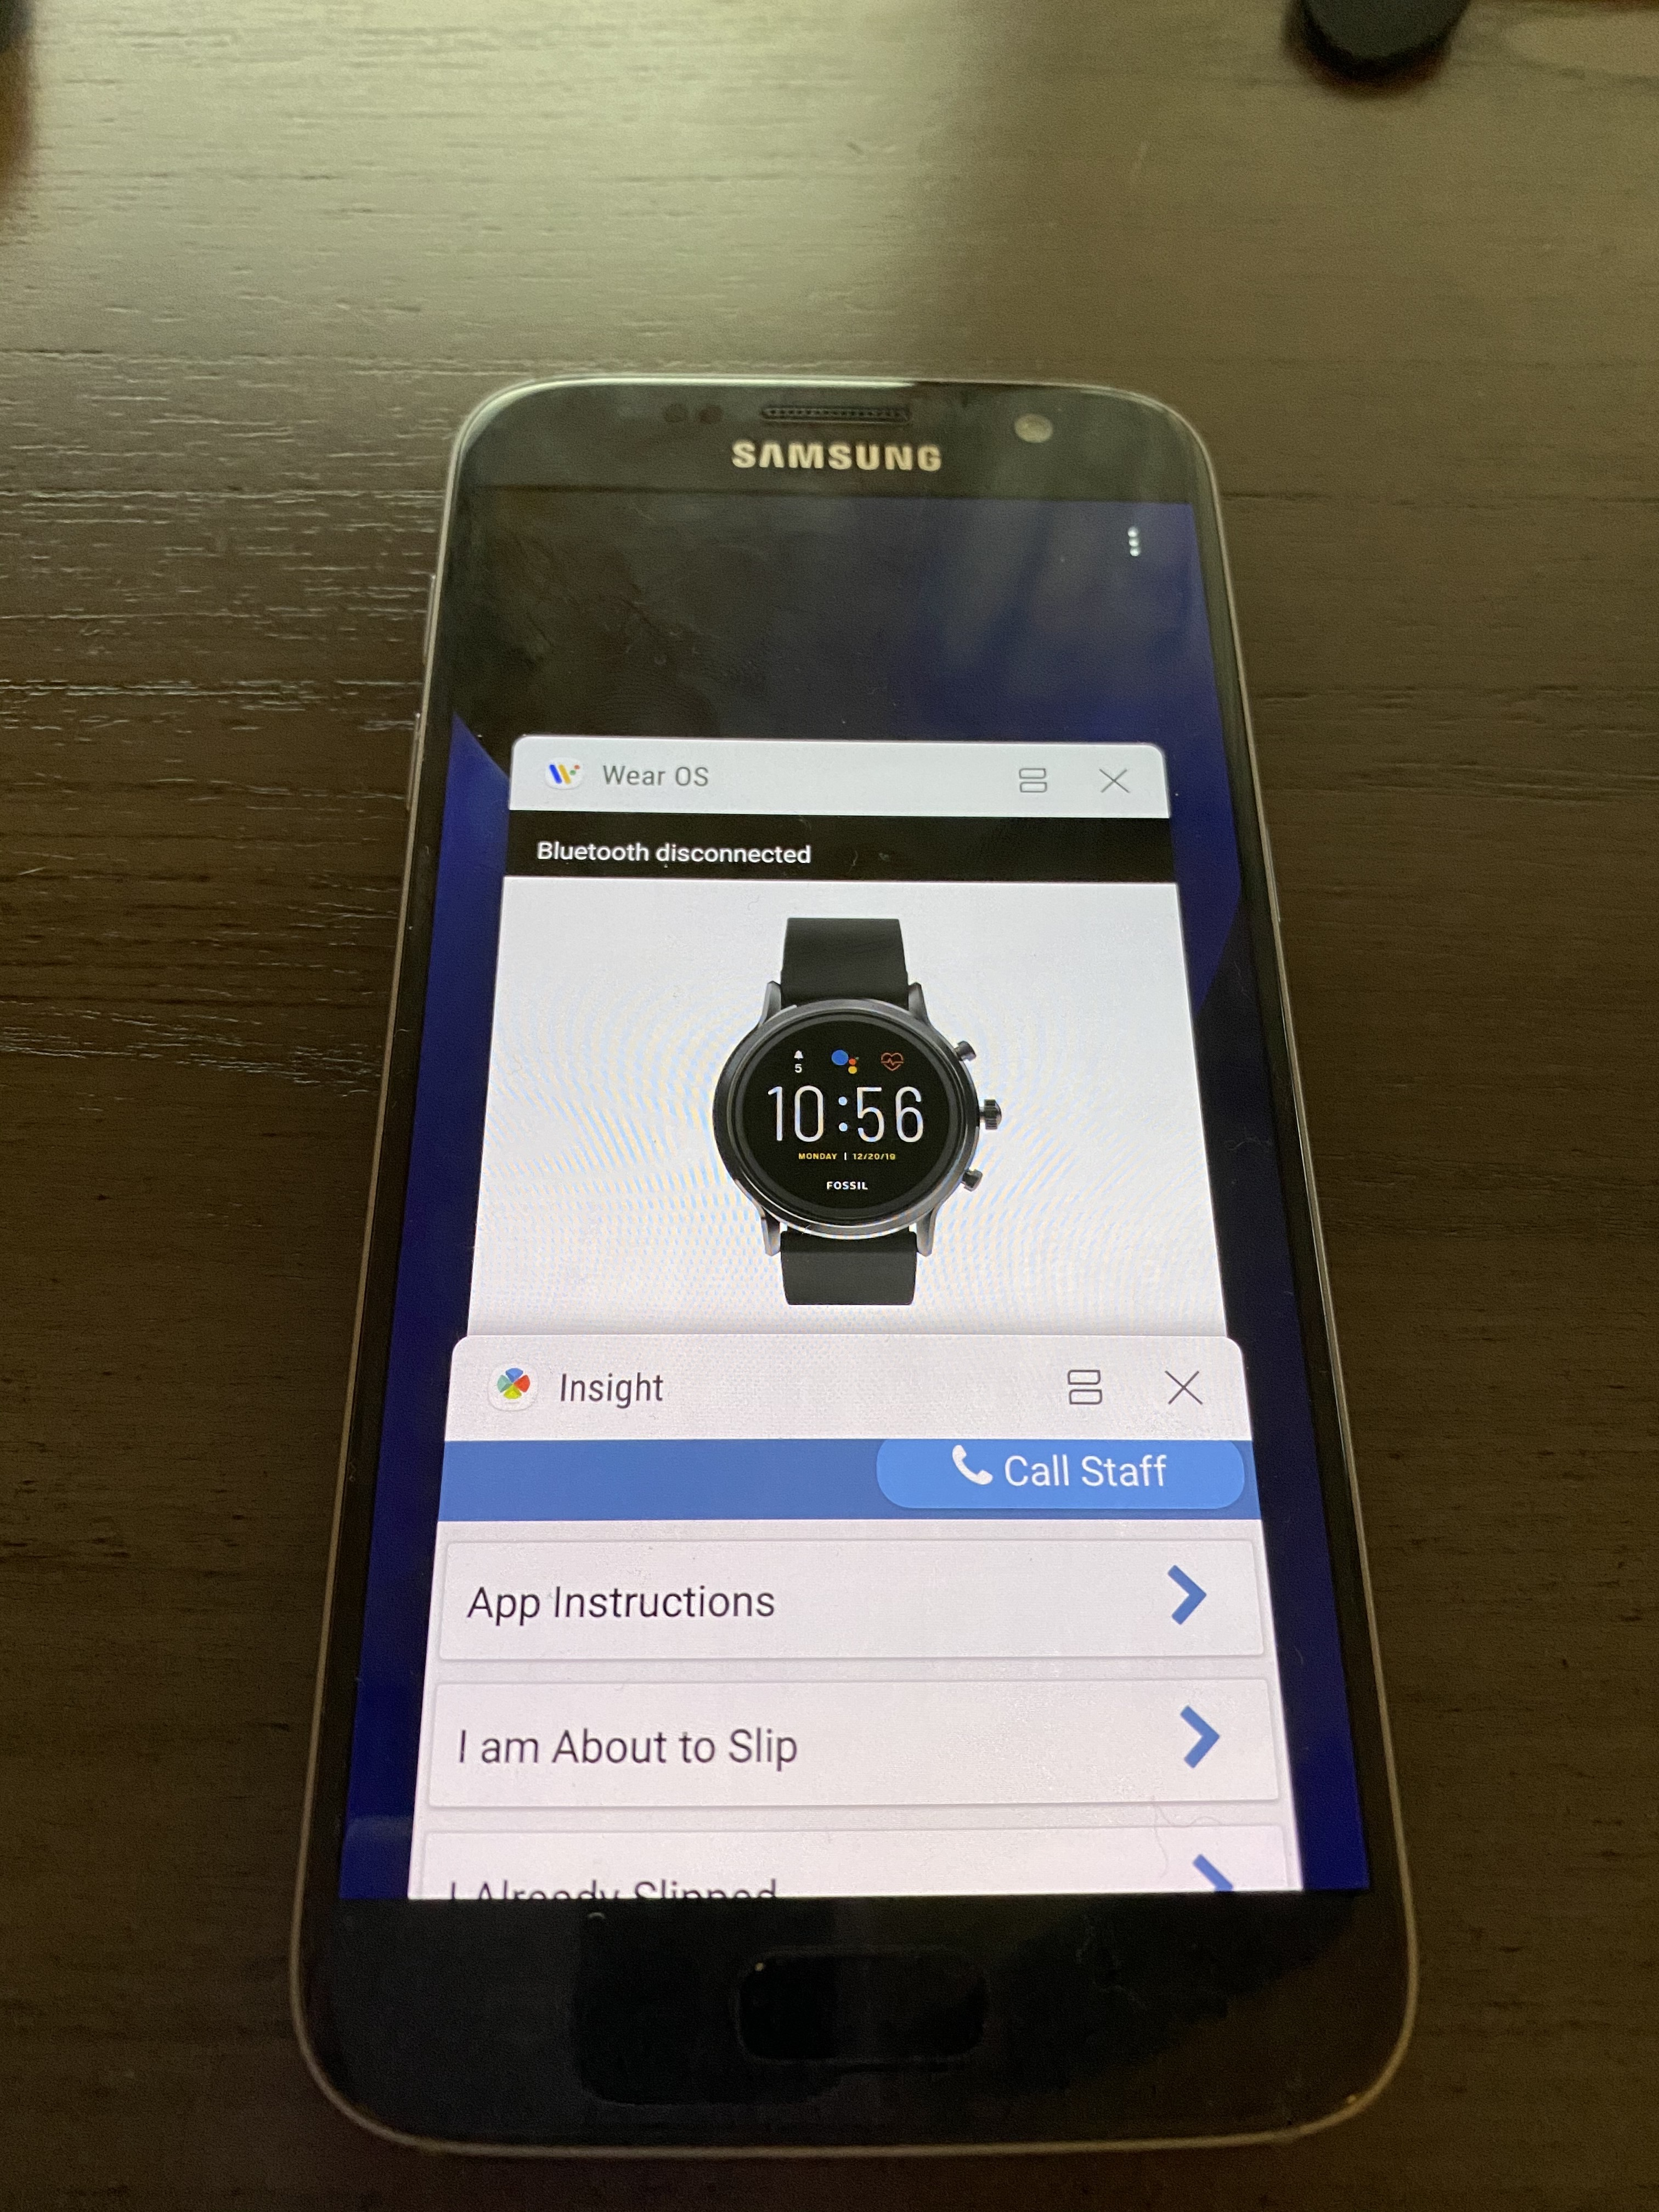 Note: If the app(s) are not displayed in the “Recent” window then the app(s) are closed; this prevents any background operations which hinder collecting sensor data.
Verify there is a connection between the smartwatch and phone. Open the WEAR OS app on the phone > under the watch name “connected” will appear if the phone and watch are paired. If WEAR OS signifies there is no connection, reestablish the connection by hitting reconnect
If there appears to be no connection, open Outsight and Insight on the phone. This can reestablish a connection between Outsight to Insight to allow sensor readings.
Restart the phone and watch if the above methods do not produce the expected results. Restarting Phone: hold down the power button (typically on the side of the phone) until Restart Phone appears > Click Restart Phone Restarting Watch: hold down the large middle dial on the side until Restart appears > Click Restart
Attempt to pair multiple phones and watches while thoroughly reading the instructions (starting from 1. Download Wear OS) to gain more experience; doing this can reduce quantity of errors when pairing the phone and watch.
Supported Devices: |
...
| Expand |
|---|
| title | Creating a Sensor Event |
|---|
|
Create a new Event and set the Schedule Type to “Sensor Data“ Add a Setting ('+') to the “Sensor Data“ Event, also called “Sensor Data” Device: “Android Wear” Choose a Sensor Type Pedometer HeartRate Accelerometer
Repeat Count and Sensor Read Frequency (milliseconds) These values are tied with the Schedule Type/Time to schedule the start of sensor data collection and set how long the delay between readings should be, and how many times the readings should repeat (a repeat of 0 means there will be 1 reading, a repeat of 1 means 2 readings, …). “Repeat Count“ is the number of times per day that this Sensor Event will trigger. The time increment between Sensor Events = T / 1440 (There are 1440 minutes in a day), where T is the value of the “Repeat Count“ field. T = 480 means that the Sensor Event triggers every 3 minutes for the entire 24 hour day. Frequency is the length of time between Sensor Events, in milliseconds (0.001 sec). Repeat Count is the number of times that the Sensor Data event will trigger during each 24-hour cycle, based on the Select Time which is the start of the first Sensor Event. It is the responsibility of the Study designer to ensure that (Frequency * Repeat Count) total is less than or equal to 1440 minutes, which is 1 calendar day. It is recommended to not have multiple sensors firing at the same time. If you need heart rate and pedometer readings, they should be set at least a minute apart as readings (particularly HR) may take time to complete and requests may be dropped if a service is busy with another reading. There is a max of number of “events”, subdivided by day, that can be scheduled. This is a platform limitation, and may vary by vendor but any study scheduling more than 200 events per day should take caution. There is a convention that will leverage “repeating” sensor events and will allow more data to be collected. However, no assessments can be associated with a repeating sensor event (ie, follow ups). If you wanted sensor readings every 10 minutes all day, you would set: Schedule Type = Specific Time Select Time = 12:01am Repeat Count = 143 ((60 mins * 24 hrs / 10) = 144 -1 for initial offset) Sensor Read Frequency = 600,000 (milliseconds)
Post-Sensor Reading Logic (cannot be used for “repeating events, see above)
a. If this formula evaluates to true, the Selected Assessments will trigger b. If left blank or if the formula evaluates to false, the event will passively collect sensor data. c. This formula is not limited to sensor specific formulas. The usual question based formulas work here as well if you need to reference other data. GetStepsPerMinute(n)
Gets the average steps per minute over a given duration Ex: GetStepsPerMinute(30) < 8 would get the average steps per minute from the last 30 minutes and trigger an assessment if that value is less than 8. (less than ~8.33 steps per minute is sedentary)
Using Sensor Data in a Follow Up Event |
...
| Info |
|---|
Any columns that follow the GPSAccuracy column are names of questions and their responses associated with that assessment. |
Data download to SPSS and SAS are coming soon!
Create and Enroll Participants
...
iii. Greenphire Participant – type in the 8 digit Greenphire Master Card number on the card that is given to this participant.
iv. Rich Text Setting –
v. Pedometer Goals – Participant specific goals; if the setting is present at the question and participant level, the participant level setting will take precedence. More information about Pedometer Configuration here.
...