We recommend that you complete the following steps, in order, when creating your study:
Configure the Study Tab
Name your study by typing a name into the Study Name field. This name will appear at the top of the app home screen.
In the Status Field, select Development while the app is in development, or select Active when the app has been fully developed and you are ready to begin enrolling study participants.
If desired, in the Staff Phone field, type a phone number that participants can click to connect them with your research staff. If you use this feature, a Call Staff button will populate on the top right hand corner of the app home screen. A phone call will be made to this number when this button is pressed.
If desired, in the Counselor Phone field, type a phone number that participants use to connect them with a counselor/nurse/doctor of your choosing. If you use this feature, a Call Counselor button will populate on the app home screen. A phone call will be made to this number when this button is pressed.
In Assessment Timeout Minutes, type the number of minutes that you would like participants to have to complete each assessment. The assessment will automatically end when time runs out. Insight will record the duration of each initiated assessment and this information will be saved in the dataset.
Select study features.
Create Groups
This feature enables researchers to provide different content/questions to participants based upon group membership (e.g., Assessment only vs. Assessment + Intervention).
Click the Groups tab.
Click the
 Add button.
Name the Group by typing in the Name textbox; you can also add a brief description of the group in the Description textbox.
Select all features for the new group.
Click the
Save button.
Always click the save button after you make changes to your study. You will lose all work that you do not save.

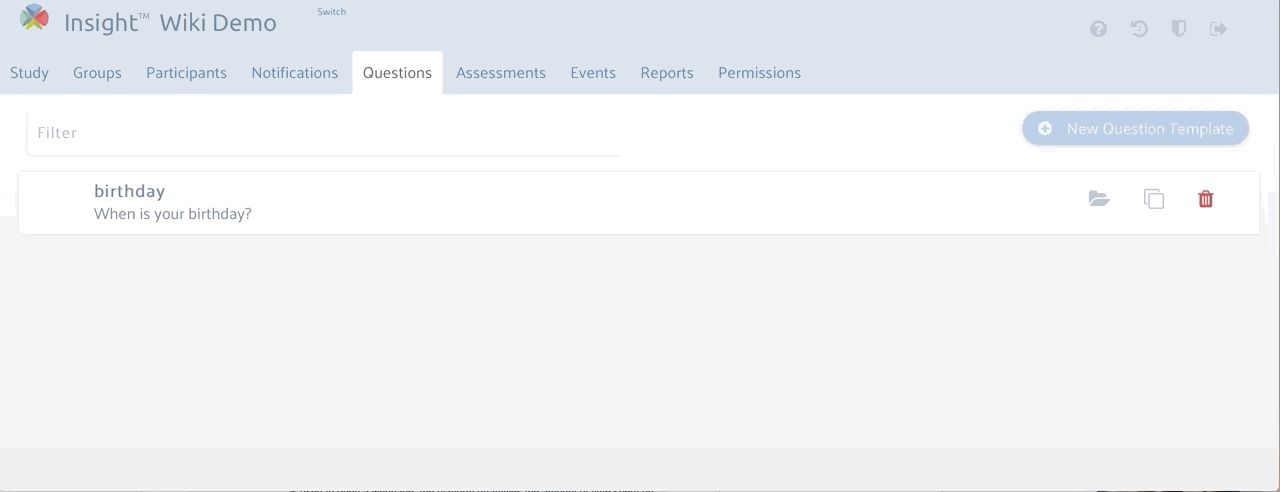
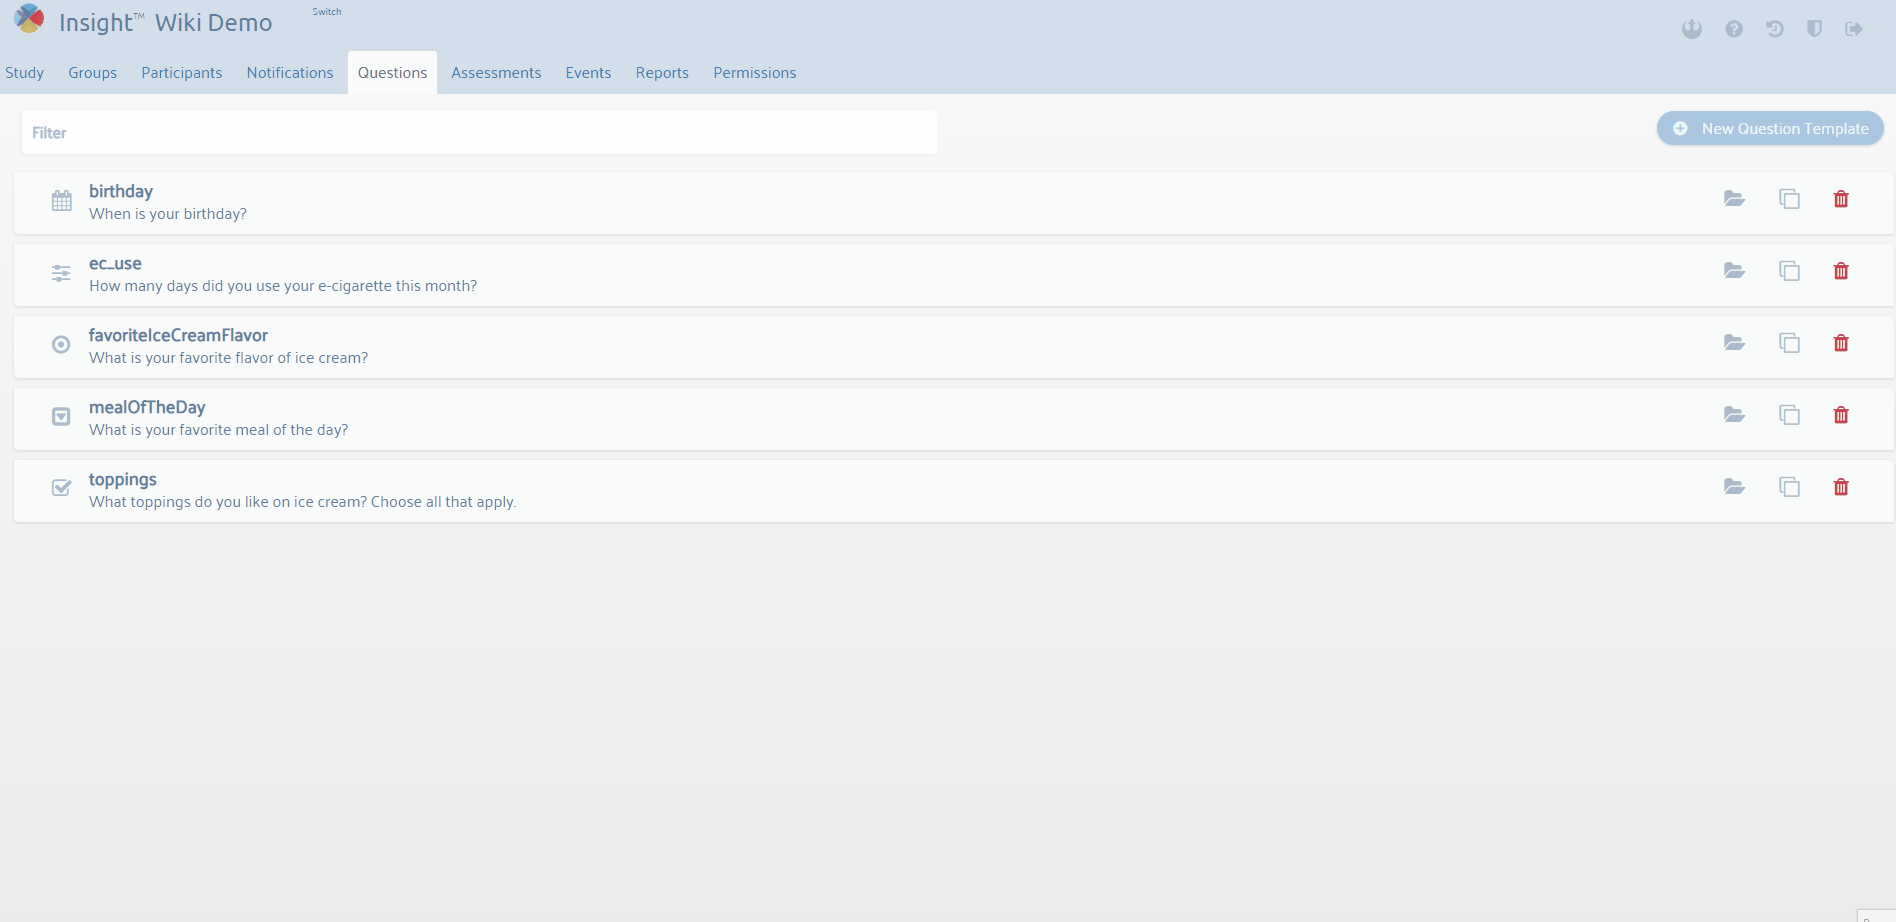
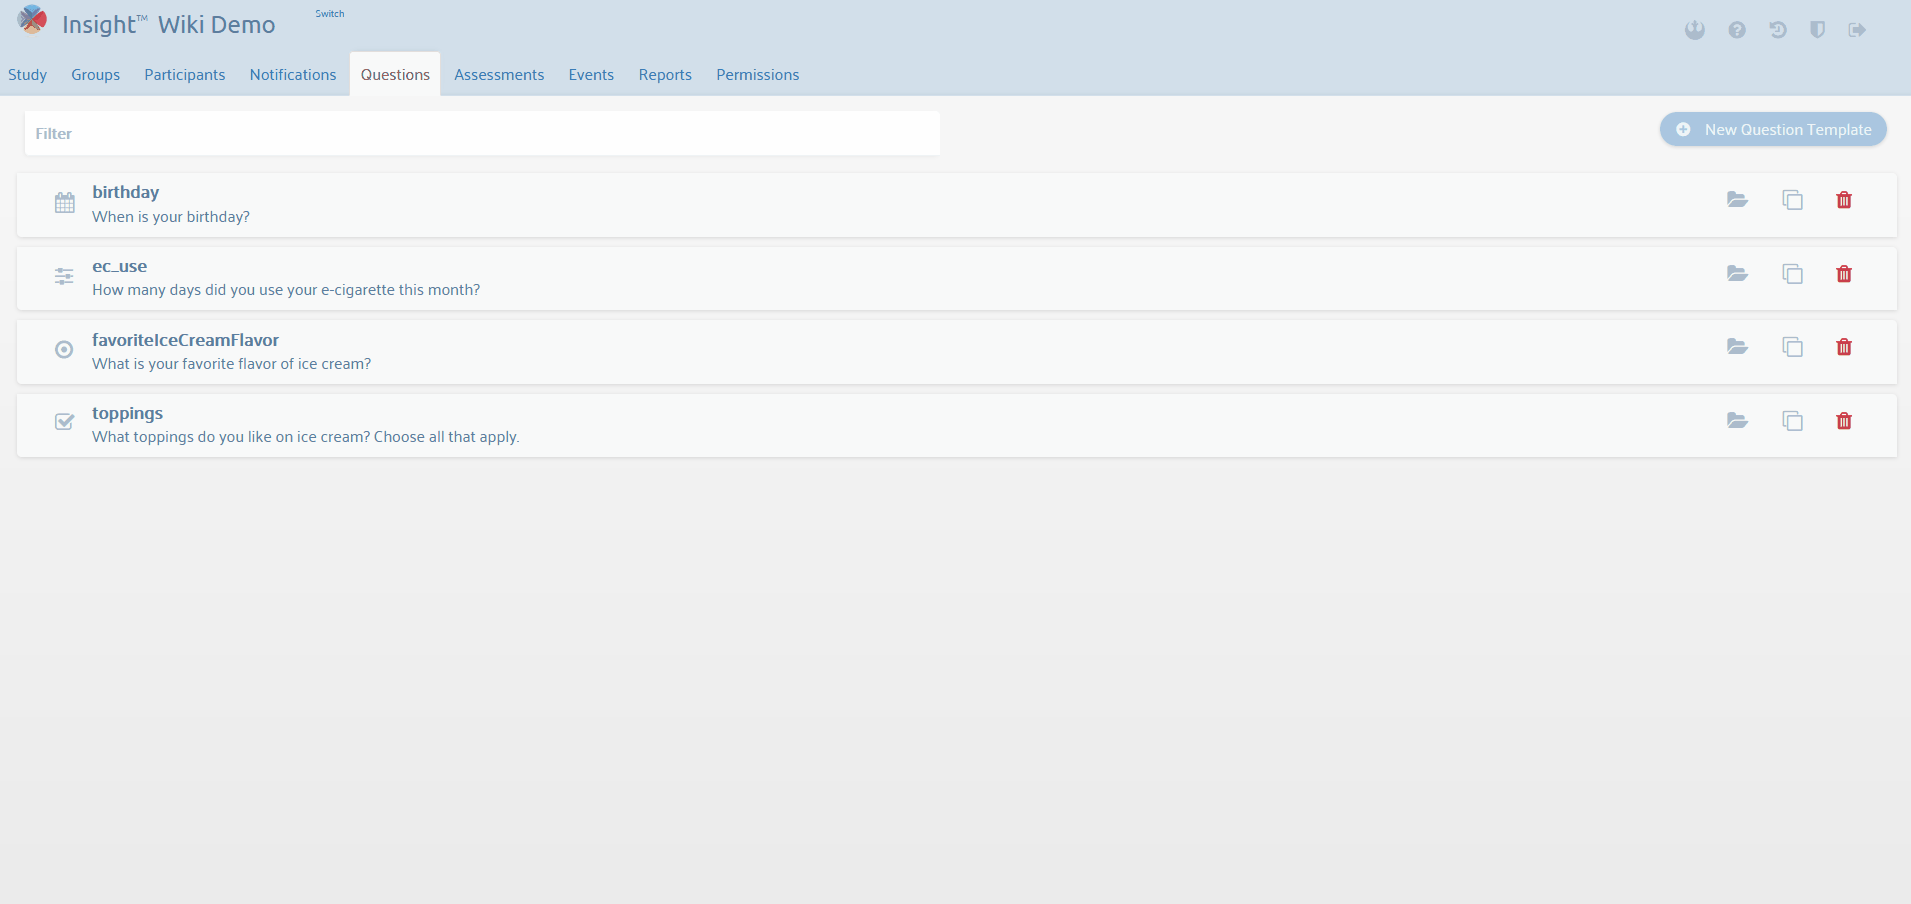
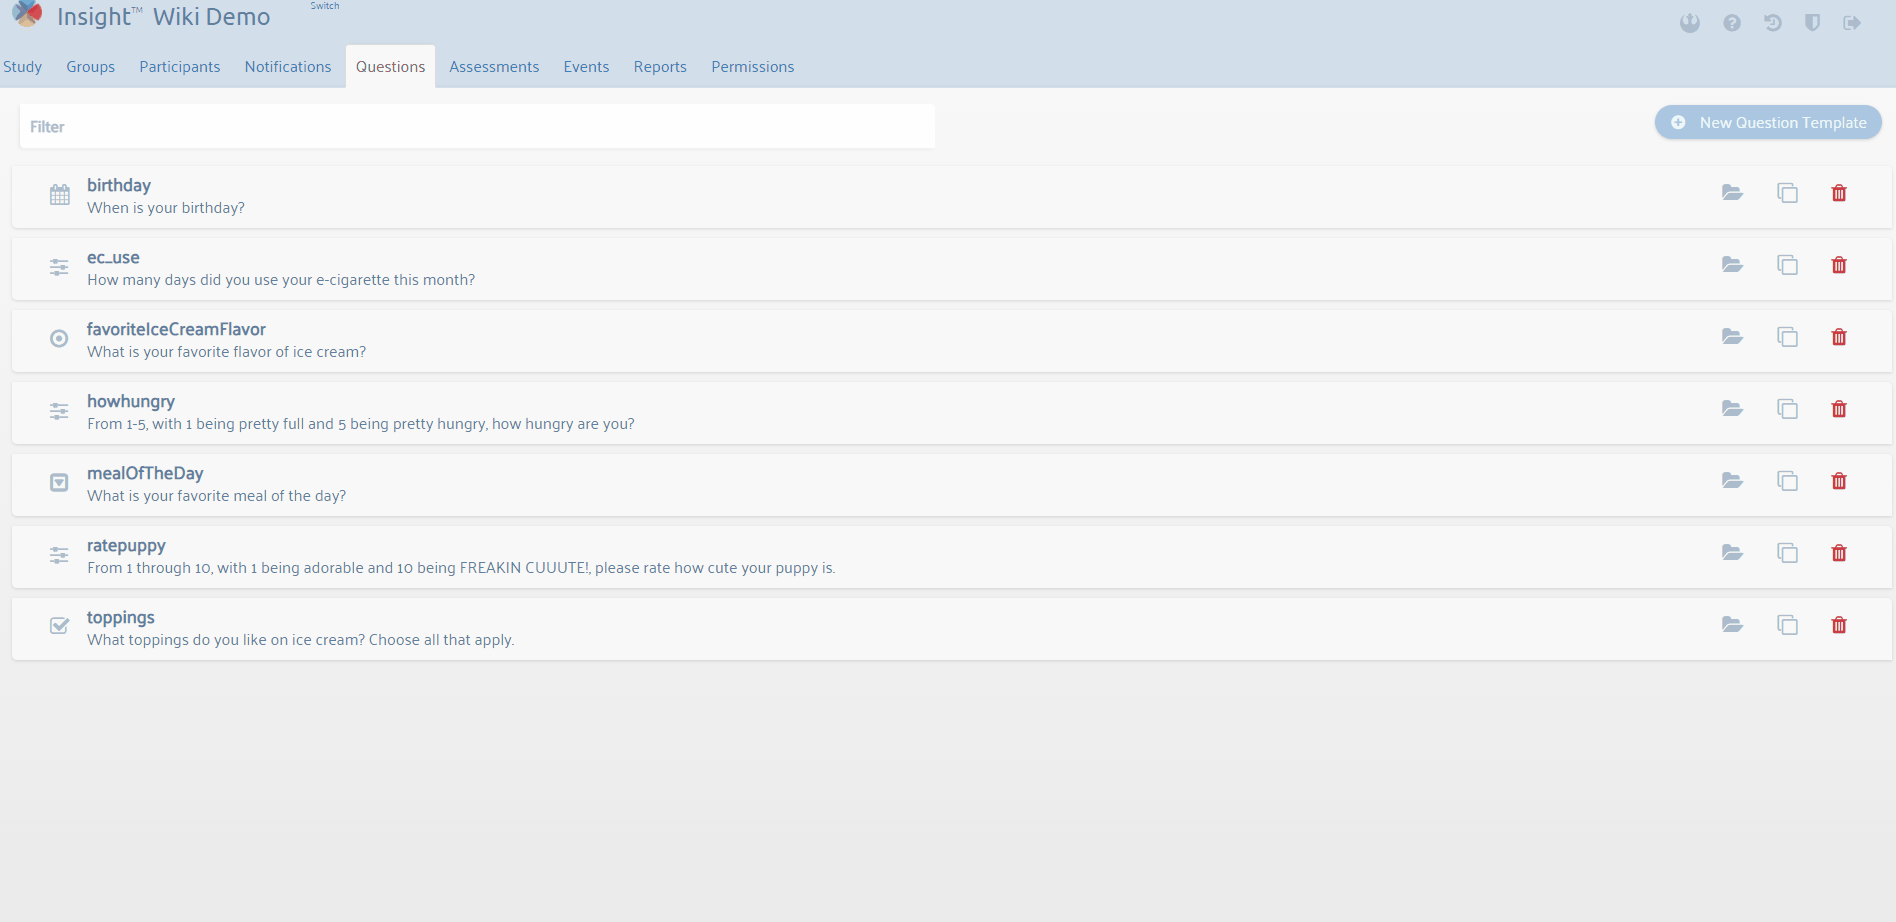
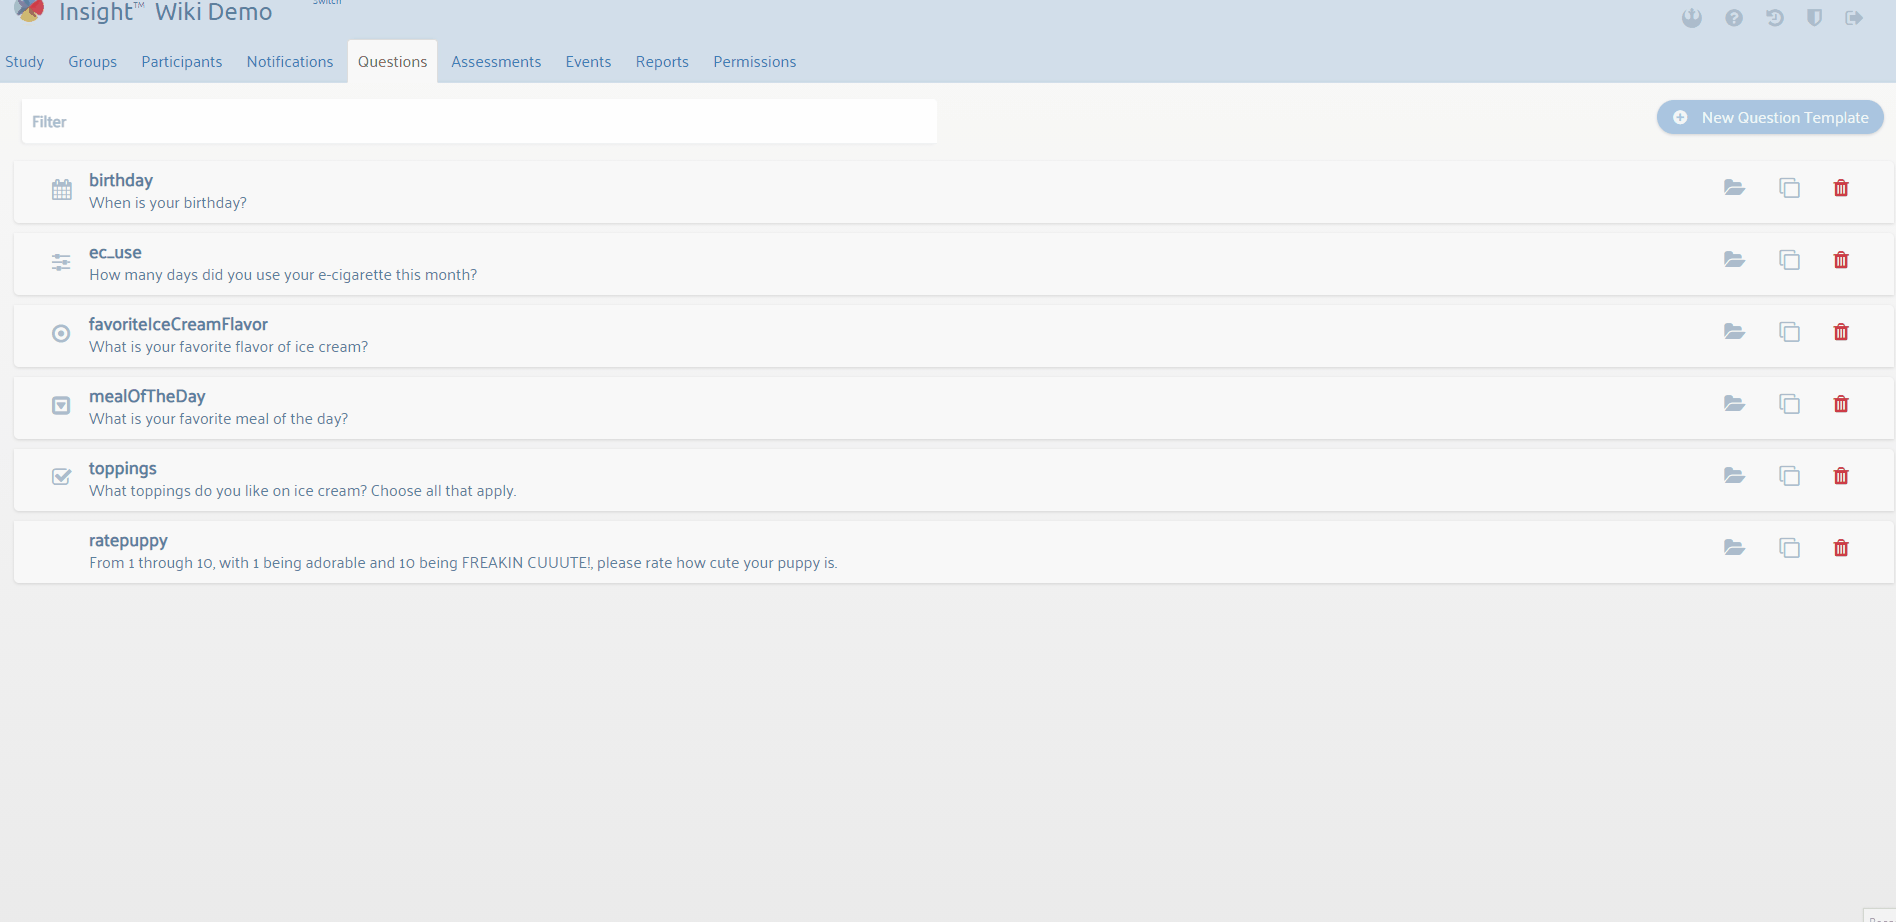
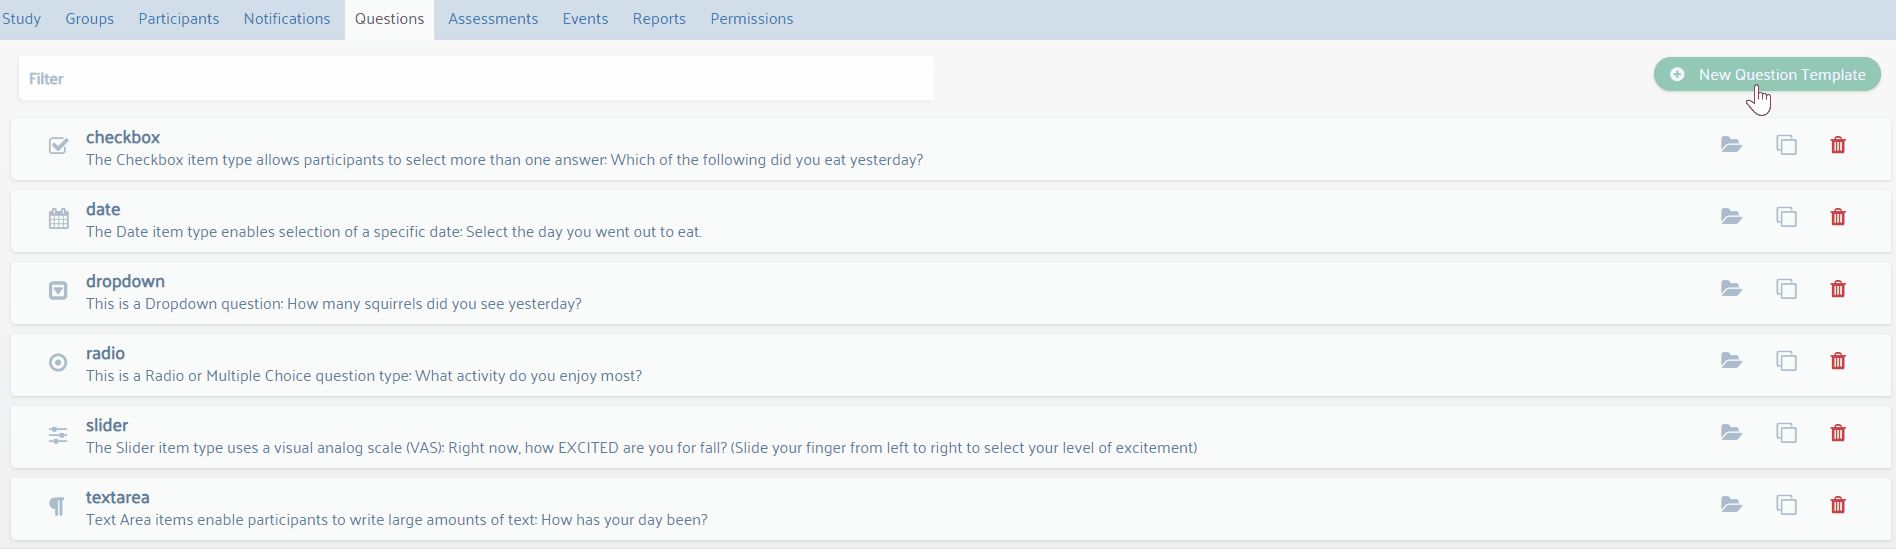
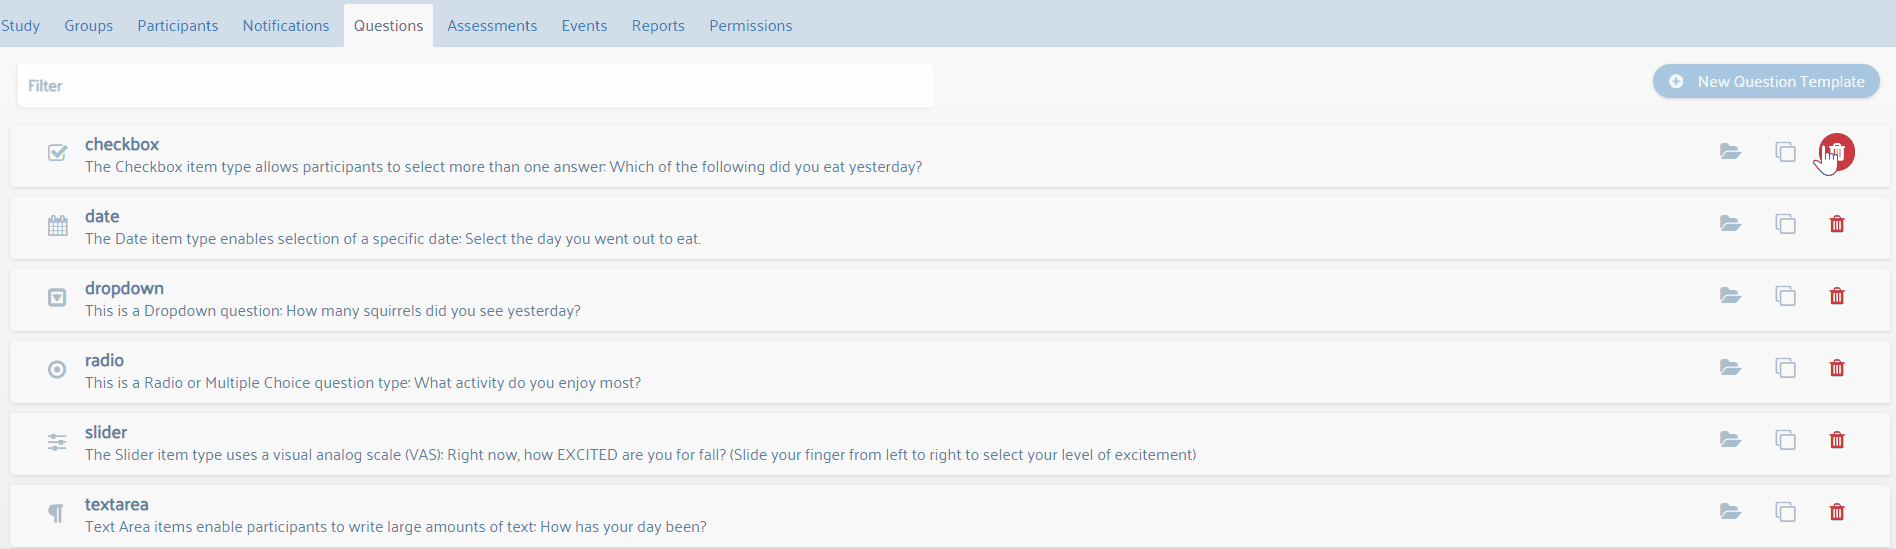
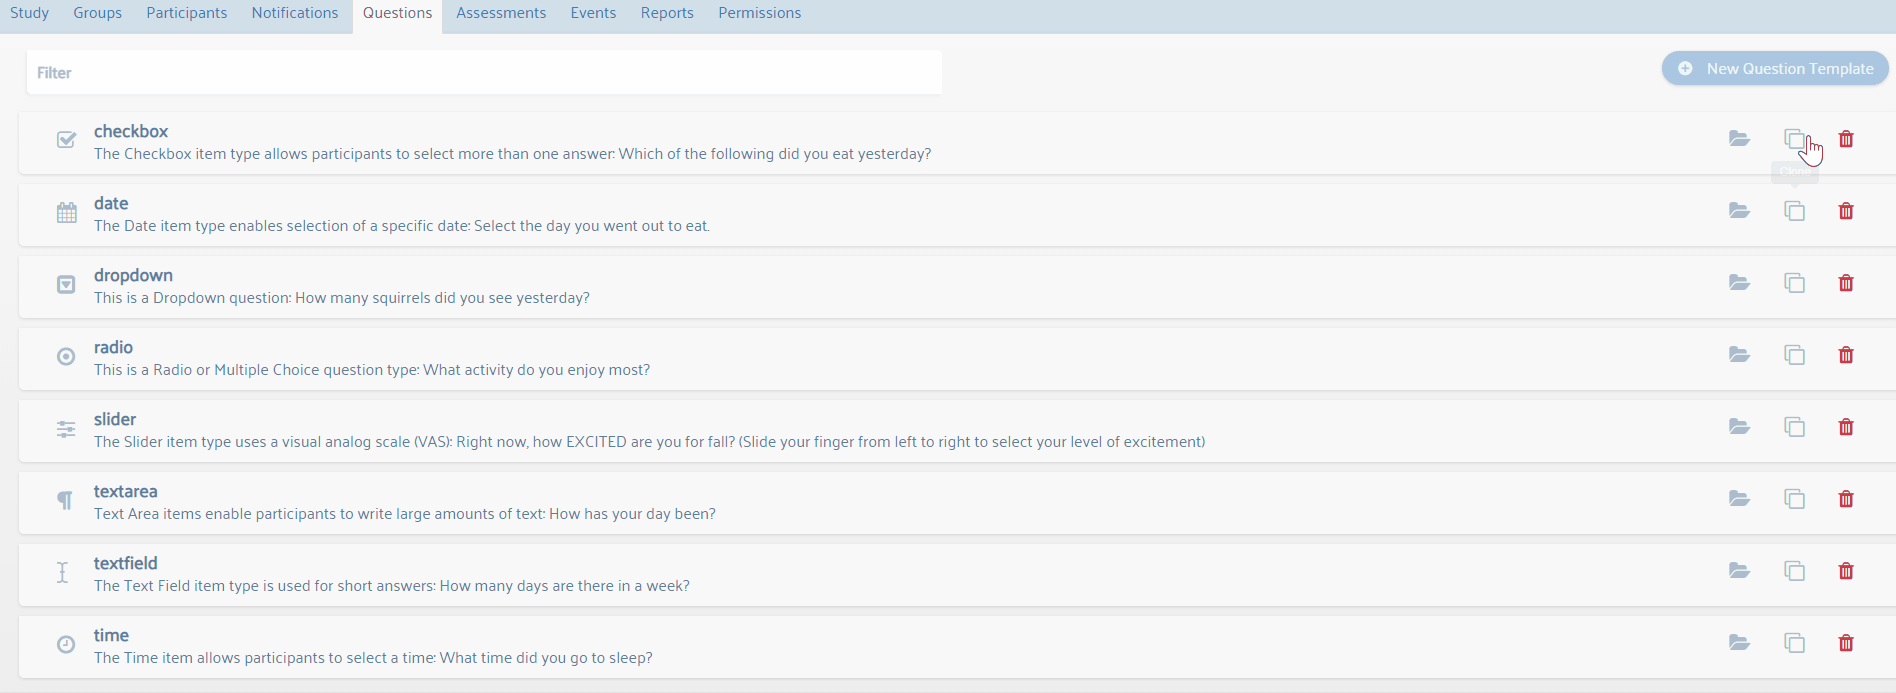
Create Questions
This section describes each of the Insight question types and how to create them.
Click the Questions tab.
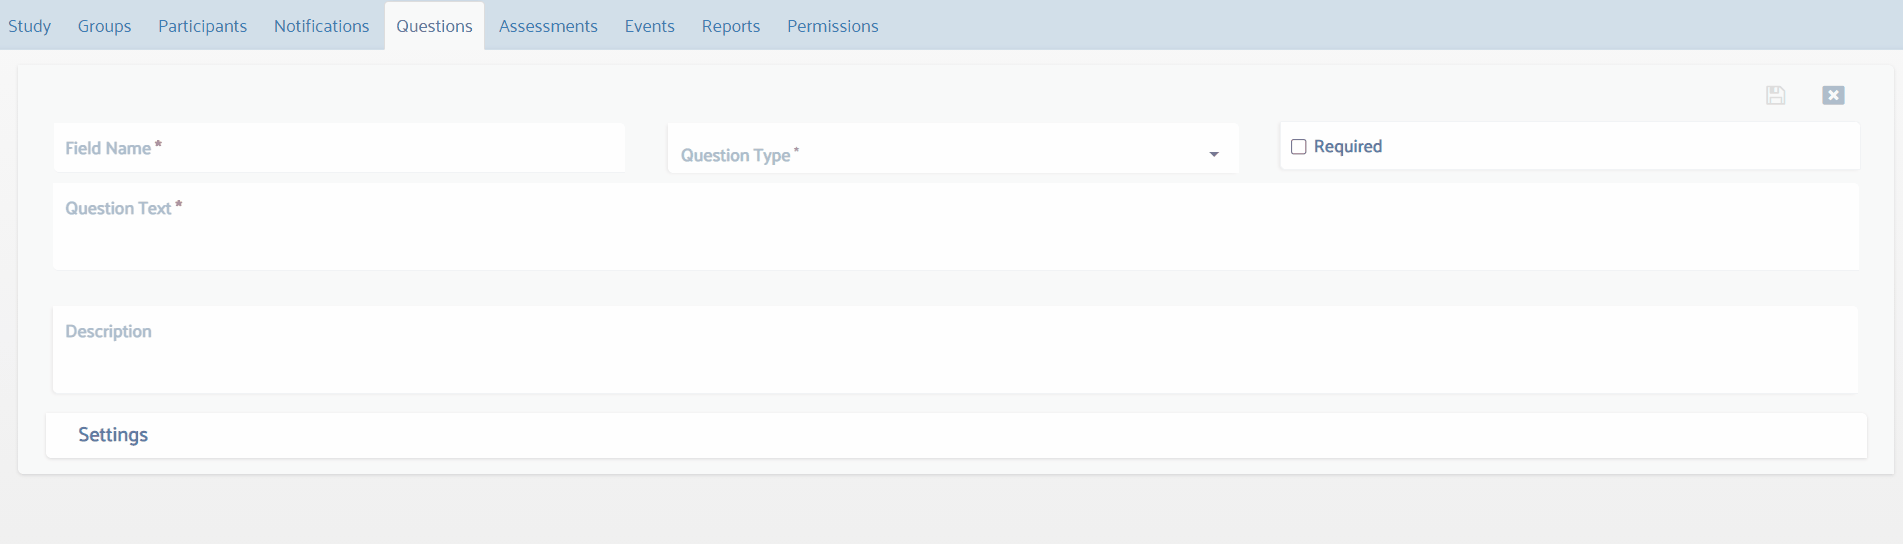
Click the
New Question Template button.Type a variable name into the Field Name textbox. Each Field Name will be a labeled column in your dataset.
Do not use spaces for variable names. If needed, use an underscore. For example, “Question 1” will not be acceptable for a field name. Instead use Question1 or Question_1.
4. Choose a Question Type. We have created many question types (e.g., radio, slider, check all that apply, time, calendar, date).
To create a badge that appears within the Insight app that is a consecutive day counter, follow the steps below:
Select Response Summary under the Question Type dropdown box. Fill out the required fields (Field Name and Question Text). Use Question Text to describe the Response Summary of the Badge.
Automatically under Settings, look for the Response Summary setting type.
Under the Question Name dropdown box, select the question you want associated with this Response Summary.
Under Minimum Goal and Maximum Goal, enter the value(s) associated with the question responses that would trigger the Response Summary Badge streak.
For example, a question picked that asks the participant “if they slept before midnight”. The responses for this question are “Yes” for a value of 1 and “No” for a value of 0. In order to associate “Yes” to the Response Summary, 1 will be entered for both Minimum and Maximum Goal
Set additional Settings for the Response Summary. The “Goal Streak“ badge and Streak Count can be enabled or disabled to be shown during the Assessment. The “Goal Met Pie Chart“ with number of Met / Not-Met Responses can be enabled or disabled to be shown during the Assessment.
Setting the values for the associated Question to a Response Summary:

Settings for the Response Summary to be displayed. “Minimum Goal“ and “Maximum Goal“ values are included in the Goals Met for the Response Summary badge. “Show Goal Streak“ and “Show Goal Met Pie Chart“ can be toggled to be displayed or not during Response Summary Question. If the “Show Goal Met Pie Chart“ is enabled, each section of the Pie Chart will display the text entered as the Label Suffix which is input by the CMS user.

Calculated fields are a question type that uses formula logic to create new values that can be used for data analysis and branching logic within assessments. To help with designing these formulas, a formula editor is included that allows for experimentation with different values to see how a formula will behave to enter the formula editor, click on the ‘Edit formula button’.

This will bring up the formula editor, which has a number of options. To begin, enter a formula in the top text box. Once one is entered, parse/extract the formula using one of the methods detailed below to test how the formula outcomes.
There are two ways to test formulas, ‘Quick’ and ‘Validated'. ‘Quick’ will allow for any formula fields to be subbed in without regard to what exists in the study and is useful for testing proof-of-concept formulas. ‘Validated’ will attempt to locate questions that are referenced within the formula and allows for testing the specific values associated with other questions as well as making sure that the questions are referenced correctly. An example of the ‘Quick’ evaluation is shown below:

5. Check the Required button if you would like this question to be answered before participants can move to the next question. If Required is unchecked, participants are allowed to skip the item.
6. Type your Question Text. This text will appear on the smartphone screen during the assessment.
7. Enter instructions on how to complete the question in the Description textbox (e.g., “Slide your finger from left to right to answer this question”). Use of this feature is optional.
8. Under Settings, select the Font Color and Font Weight for the question (if you do not change the font color or weight, Insight default settings will be used).
9. Under Responses, click ![]() Add for each desired answer response. For example, click
Add for each desired answer response. For example, click ![]() Add 5 times for a 5-item Likert-Type scale (e.g., Strongly Agree, Agree, Neutral, Disagree, Strongly Disagree).
Add 5 times for a 5-item Likert-Type scale (e.g., Strongly Agree, Agree, Neutral, Disagree, Strongly Disagree).
a. Type each answer into the Text field as it should appear on the smartphone screen (e.g., Strongly Agree).
b. Type a Value that corresponds to each answer response (e.g., “1” for Strongly Agree). These Values will appear in your dataset.
c. Hover the mouse over the Move ↕ button, click, hold, and move items up and down to reorder responses. The order of the responses here will set the response order in the app.
d. Click the Configure wheel next to each Response if you would like to change the Font Color and/or Font Weight for each answer response.
e. Click the Remove ![]() button to remove an answer response.
button to remove an answer response.
10. Click the Save ![]() button on the top right hand side of the screen, and always click the save button after you make changes to your study. You will lose all work that you do not save.
button on the top right hand side of the screen, and always click the save button after you make changes to your study. You will lose all work that you do not save.
11. Insight allows you to clone Questions. This feature can save considerable amounts of time if your study contains similarly worded questions, or questions with similar/identical answer responses.
a. From the Questions dashboard, click the Clone ![]() button for a particular question.
button for a particular question.
b. Change the Field Name for this new item.
c. Change the Question Text.
d. Modify answer Responses and Settings as needed.
e. Save ![]() the new item.
the new item.
12. Examples and instructions for creating each question type are available here.
Checkbox - Response choices are shown in a list; multiple answers can be chosen.
Continuous Slider - Participants slide their finger from left to right to choose a continuous response (e.g., 1-10 visual analog scale).
Date - Participant uses a calendar to choose a date.
Dropdown - Participants click a box to select from a long list of potential answer responses.
Payment Log - This item type is used to display the number or percentage of surveys completed, requires HTML file. More information can be found here.
Radio - Response choices are shown in a list; only one answer can be chosen.

Rich Text - A block of text that can be used to provide messages or instructions in the app; rich text allows additional formatting that is not available with the Text Only item type. For example, this item type allows you to embed URL links, underlining, highlighting, and bolding into messages.

Slider - Participant slides their finger from left to right to choose a categorical response.
Text Area - Participant uses their keyboard to type a longer response than the text field question type.
Text Field - Participant uses their keyboard to type a short answer.

Text Only - A block of text that can be used to provide messages or instructions in the app.
Time - Participant uses a clock to choose a time.
Timer - Participants see a configurable countdown timer.
Button List - This item type creates a menu of options/buttons. Each button can be linked with specific content (e.g., messages, message bins, videos, websites) set to other questions types (e.g. Core Web View, Video, Text Only) by using branching logic.

Calculated Field - Enables researchers to create formulas by adding / subtracting / multiplying / etc. participant answers to EMA questions (e.g., question 1 + question 2).
Core Web View - Enables the integration of webpages into Insight. When Insight is used to open a webpage, the platform quantifies the amount of time spent on each webpage.
This feature requires an active data plan or WiFi connection to access the internet.

Email - An encrypted email is generated when an established criterion is met (e.g., if question 1 > 3, then automatically email a study staff member that a participant has requested a medication refill).
This feature involves PHI and requires an active data plan or WiFi connection to access the internet.

Face Verification - Used to take a picture of participant, in conjunction with facial recognition.
This feature involves PHI and is currently only available for OUHSC researchers.

Baseline Facial Recognition Photo - allows participants to take and submit a new or replacement Baseline Photo. Facial Recognition must be enabled on the Study and Group level; adding a Baseline Facial Recognition Photo to a Group that does not have the “Facial Recognition” setting enabled can cause the Insight app to crash if the participant attempts to upload the picture. This question type is able to be added to new or existing assessments. When a participant presses “Submit” during the Assessment, the new Baseline Photo is uploaded. The photo will be available to view in the Insight CMS once image processing and syncing are completed.
Image Picker - Uploads any selected image from a device’s Gallery or Photos
This feature requires an active data plan or WiFi connection to upload.

Picture Preview - Allows participants to take a photo from the Insight app to get a preview of what the camera captures. Participants are allowed to take as many pictures as they like, and the image is not saved on the Insight app nor on the CMS. The image does not show on the app until the participant taps on the “Preview Photo” button to take a picture.
Do NOT select the “Required” checkbox for Picture Preview! Selecting “Required” will not allow the participant to move on to the next question in the assessment

Greenphire Payment – AUTOMATICALLY initiates a payment to a Greenphire Mastercard when a participant completes a specific survey.
This feature involves PHI and is currently only available for OUHSC researchers.
iCO - Pairs with the Bedfont iCO device to collect carbon monoxide samples. Requires purchase of specific third party devices.
Message Bin - Enables delivery of unique content when specific criteria are met. One message is delivered from the bin to the participant on each occasion.

Message Bin Repeating - Enables delivery of unique content when specific criteria are met. One message is delivered from the bin to the participant on each occasion. This type of bin resets to the first message after the last message in the bin is delivered.
Pedometer Summary - Shows summary of steps. Can set graphs to show progress, in conjunction with Android Wear – Coming soon.
Random Number Generator - Generates a random number based upon parameters set by the researcher.
Response Summary – Creates a summary button in the app to indicate if the participant has reached a study defined goal and/or the number of days they have met certain criteria; gamification elements.
Sensor Log - Schedules the frequency for Insight communication with Outsight to record data from Android Wear devices. Will present data from a sensor at specified intervals. For example, if steps are to be collected every 2 minutes the log will display number of steps every 2 minutes – Coming soon.
Video - Shows a video file saved within the Insight App.
Video Link Bin - Enables delivery of a video (using a URL) when specific criteria are met. One video is delivered from the bin to the participant on each occasion.
This feature requires an active data plan or WiFi connection to access the internet.
Youtube Video - Links YouTube URLs to play video content in the app.
This feature requires an active data plan or WiFi connection to access the internet.
Questions can be created in most languages.
Create Assessments
This section explains how to create assessments or surveys.
Click the Assessments tab.
Click Add
to create a new Assessment.Type a name for your assessment in the Assessment Name textbox.
We recommend that you use face value names to distinguish this assessment from other assessments (e.g., Morning Daily Diary - Intervention Group; Quit Date Morning Daily Diary - Control Group).
4. Assessment Timeout Minutes allows studies to customize how long a specific assessment can be; when using Add/Edit/Clone Assessment operations, the Assessment Timeout Minutes is defaulted from the Study Level timeout duration.

a. Change the assessment timeout to a preferred duration. (Optional)
i. The field is mandatory and must be greater than zero (0).
ii. An Event with multiple Assessments will be based on the timeout duration at the Study level, not the Assessment level.
5. Add questions to the assessment:
a. On the left side of the screen, you will find all questions that you have created for this study. On the right side of the screen are the questions that will be included in this particular assessment.
You can reuse questions for multiple assessments (e.g., there is no need to create an item – “I am hungry” more than once because the same item can be used in multiple assessments). However, if you would like to ask the same question twice in a single assessment, you should create two items to differentiate them in your dataset (e.g., “paintime1” and “paintime2”)
i. Use the Filter box as a quicker way to find your questions. Simply type in the variable name.
b. Click ![]() to add a question to the top of the assessment.
to add a question to the top of the assessment.
c. Click ![]() to add a question to the bottom of the assessment.
to add a question to the bottom of the assessment.
d. You can also drag and drop questions from the left side of the screen and place them in the desired order on the right side of the screen (this drag-and-drop feature can be used after at least 1 item has been added to the assessment using the chevron-up button).
6. Question Feature Buttons on the right hand side of the screen will enable you to customize your Assessment.
a. Move questions higher or lower in the assessment by hovering the mouse over the Move ↕ button. Then click, hold, and move the question higher or lower in the assessment.
b. Click the Open ![]() button to create branching logic and to review information about each question. Branching logic enables certain questions to be skipped or presented based upon responses to other questions. Click here to learn more about branching logic formulas, and click here for examples on how to use them.
button to create branching logic and to review information about each question. Branching logic enables certain questions to be skipped or presented based upon responses to other questions. Click here to learn more about branching logic formulas, and click here for examples on how to use them.
c. Click the Clone ![]() button to add a copy of this item to this assessment.
button to add a copy of this item to this assessment.
d. Click the Remove ![]() button to remove a question from the assessment.
button to remove a question from the assessment.
7. Click the Save ![]() button.
button.
Always click the save button after you make changes to your study. You will lose all work that you do not save.
Type in the formula for branching logic instead of copying and pasting formulas.
Copying and Pasting formulas have the potential to carry over hidden characters or HTML tags that are not seen in web browsers.
8. Click Close ![]() to return to the Assessments tab where you will see your new assessment.
to return to the Assessments tab where you will see your new assessment.
Create Stages
Insight conceptualizes Stages as periods of time. The Stage feature allows you to present different questions and intervention content and use different Insight features at different time points in your study. You can include as many stages as you like.
Click the Events tab.
Click Add
to create a new Stage.Type a name for your stage in the Name textbox.
We recommend that you use face value names to distinguish stages (e.g., Stage 1; Study Days 1-14; Pre-Quit).
4. The Type dropdown box allows you to set how this stage will end.
a. Duration – Allows you to set how long (by number of days) a stage will last. The app will automatically move to the next stage (in order) when each stage ends. Type number of days for the stage in the Days Duration textbox.
i. Check the Ends at midnight checkbox if you would like a stage to advance to the next stage at midnight on the last day of the stage. If this box is not checked, the stage will advance at the same time of day as when the participant downloaded the app and started the study (this will result in some participants starting a new stage at 5:00 PM, and others at 8:00 AM). In most cases, the Ends at midnight checkbox should be checked for Duration Stages.
b. Formula – Allows you to end a stage when specific formula criteria are met (e.g., Participant indicates that they have not smoked in the past 7 days; Participant indicates exercising 3 or more days in the past week).
Type in the formula for branching logic instead of copying and pasting formulas.
Copying and Pasting formulas have the potential to carry over hidden characters or HTML tags that are not seen in web browsers.

5. Stage Settings
a. Branching Logic – Enables movement to any stage based upon a set formula. This feature enables circular stage logic. In other words, a participant can complete stage 1, then stage 3, then stage 2, then stage 1 again.
i. In the Branch-to Stage box, select the stage that you would like the participant to move to when the formula criteria are met
ii. In the Condition box, enter the criteria/formula needed to move the participant to the stage that is selected in the Branch-to Stage box
How to only trigger an event if a response is a given value
Instructions:
Select an event, then add a setting and choose branching logic. In the “Formula” area, add the desired logic. This will trigger if any stored data meet the formula conditions.
How to trigger a stage change on multiple conditions
Instructions:
Click the Events tab, then select a stage, under “type” choose the formula. In the “End Date Formula” field, add the desired logic. This can be simple (e.g., [startstudy]== 1; when the Start Study question is answered yes (1), the app will move to the next stage). This will trigger if any stored data meet the formula conditions, and missing values will default to false (thus not triggering a stage change on those variables).
formula example:
Complex logic: datediff("today",[study_startdate], "d", true,true) >= 1 or [skip_to_next_stage]==1
explanation:
This logic will move to the next stage if the participant has been in the study a number of days is > 0.
use the datediff() method to today’s (Note: the today is a variable that is created by the responder or the variable named skip next steps =1) date to the study start date with parameters set to honor negatives and use local time set to ‘true’, and advance the stage if the days (“d” parameters) are greater than 1, or if the “skip_to_next_stage” variable is set to 1.
How to create a “circular stage” path
Instructions:
To create a circular stage (a stage that can loop back to a previous stage (e.g., Pre-Quit, Post-Quit), add logic to trigger that transition to the “End Date Formula” in Stage. In addition, add a stage setting of “branching logic” type, and add the matching criteria and stage to loop back. The tricky bit is that it will loop directly back if you do not add some logic to the looped stage to prevent that immediate loop.
For a simple example, we’ll have stage A and B.
End Date Formula example for stage A:
last([advance_to_stage_b]) == 1 and
  (last([return_to_stage_a:0])==0 or
  datediff(last([advance_to_stage_b_date]),last([return_to_stage_a_date]),"d",true) > 0)
explanation:
Check the user selected to advance, then check to make sure that either the user has never selected to go back to stage yet or if they have, that the date they selected for returning is not greater than the selection to advance. This second part will prevent an immediate loop back.
End Date Formula example for stage B:
last([return_to_stage_a]) == 1 and
  datediff(last([return_to_stage_a_date]),last([advance_to_stage_b_date]),"d",true) > 0
explanation:
check that the user selected to return, then check to make sure the date of the return selection is greater than the last time the user selected to advance . This second part will prevent an immediate loop back.
Branching logic example for stage B:
last([return_to_stage_a]) == 1 and
  datediff(last([return_to_stage_a_date]),last([advance_to_stage_b_date]),"d",true) > 0
explanation:
this will use the exact same logic in this simplistic instance for branching back to stage A, but if there were multiple stages to loop to you would only use the specific logic for looping to that stage. If no branching logic matches, then the next stage in order will start or the study will end.
note:
always add last() for stage change formulas if you are not concerned about checking all prior instances. The default is to check all collected data and this may become slow as the user accumulates more data.
Setting and checking the Value for Dropdown and Radio questions
When a question type is Dropdown or Radio, the responder should input a series of Responses. Clicking the Add+ button will add an additional row for a Response and its Value.
The image below shows a Dropdown item that has four Responses, with the assigned values 0, 1, 2, and 12.

The numeric Values of each Response should be carefully set because this data is what will be downloaded in the dataset.
Forth, Values for each Response must be assigned in order for the Responses to be used in Formulas.
The image below shows conditional logic that can be used to skip or ask specific questions based on previous answers in a survey may be presented to the participant, based on the answer provided for the Dropdown Question, Test_Dropdown.

If no formula is added to a question, it will always be asked during that survey.
Adding a Formula for a Question conditions for when that question should be shown.
In this example, the Question Test_Dropdown is shown every time the Assessment is taken. The Question Test_Radio will only be presented during the Assessment if the Response to Test_Dropdown = 12.
Equality operators (>, >=, <, <=) can be used to allow multiple answers to a question to trigger a later question.
Changing [Test_Dropdown]==1 to [Test_Dropdown] >= 1 will trigger the question when the answer to Test_Dropdown = 1, 2, or 12.
Creating and Using the Random Number Generator
The Random Number Generator Question, requires a minimum and maximum value (Note: the user can also select decimal places for the random number). An example is shown below for a Random Number Generator Question with Minimum value 0, Maximum value 2, and 0 decimal places. This will generate a number that is 0, 1, or 2.

The randomly generated number can be used to drive intervention content.
The Random Number Generator can be added to the Assessment in order. It is possible to have multiple Random Number Generator Questions within a single assessment.
Checkbox item type
The Checkbox item type is very similar to Dropdown and Radio questions, but more than one answer can be selected. This makes Formula logic slightly different.
Creation of Checkbox questions is similar to Radio and Dropdown Questions (e.g., adding Responses and the associated Values). Formulas that depend on specific answers to check box questions have an additional component. The (N) in the example below represents the Value assigned to a specific response.
[Checkbox_Question_Name(N)] == 1
Example below shows favorite animals.
1 = dog
2 = cat
3 = turtle
If select dog(1)[favorite(1)]=1 then ask text type Follow Up of breed. The “==1” the item was checked; “==0” means unchecked.
b. Payment Schedule – Allows you to define a specific payment schedule to a specific stage.
6. Click the Save ![]() button.
button.
Always click the save button after you make changes to your study. You will lose all the work that you do not save.
We recommend that the first stage of any study be a “Start Study” Stage. The Start Study stage will standardize the study experience for all participants and will set the first day of your study for each participant. The Start Study stage should contain a Start Study assessment that includes the question: “Do you want to start the study now?” (Yes = 1; No = 0). The Formula stage change type should be used to move the participant to the first day of the study (type [start_study]==1 into the End Date Formula field). See video below to see an example for creating the Start Study stage.
You can ask baseline questions during the Start Study stage that can be used to drive question, message, and intervention content. For example, you can ask “What is your sex?” during the Start Study stage and use the answer to this question to select appropriate sex-based questions for the duration of your study – For women: “During the past week, how many days did you drink 4 or more alcohol containing beverages?”; for men: “During the past week, how many days did you drink 5 or more alcohol containing beverages?”
To enable this feature, use the LAST command when creating the skip pattern for a question within an assessment. The participant’s answer to the question the last time it was answered will be used to inform the skip logic – see Formulas section to learn more.
Create Events
Events are Assessments that are embedded within stages. There can be many events within a particular stage (e.g., Random Assessments, Fixed Assessments).
Select a stage for a new event.
Click
in the Events section of the stage to create a new Event.Type a name for the new Event in the Schedule Name textbox (e.g., Pre-Quit Daily Diary-Control Group).
For Participant Initiated Events, the name of the Event will appear in the app home screen. Thus, a concise and descriptive name for this type of event should be used (e.g., Meal Survey; I am about to smoke; Relaxation Videos).
You cannot add two (2) events at the same time because the CMS will not save the group or assessment of the second event. To add two (2) events to the same stage, we recommend the following: save the first event, click out of the Events tab, click back into the Events tab, then create the second event.
4. Select the particular group(s) that you would like to associate with this event under Available Groups and drag the group(s) into the Selected Groups box.
In some cases, researchers will assign specific events to specific groups (e.g., Assessment Only Group vs. Assessment + Intervention Group).
If you created an Event you no longer want to appear on the app, you will need to remove the groups from that specific Event. Do not delete the Event as this will result in deletion of previously collected data.
How to only trigger an event if a response is a given value
Instructions:
Select an event, then add a setting and choose branching logic. In the “Formula” area, add the desired logic. This will trigger if any stored data meet the formula conditions.
How to trigger a stage change on multiple conditions
Instructions:
Click the Events tab, then select a stage, under “type” choose the formula. In the “End Date Formula” field, add the desired logic. This can be simple (e.g., [startstudy]== 1; when the Start Study question is answered yes (1), the app will move to the next stage). This will trigger if any stored data meet the formula conditions, and missing values will default to false (thus not triggering a stage change on those variables).
formula example:
Complex logic: datediff("today",[study_startdate], "d", true,true) >= 1 or [skip_to_next_stage]==1
explanation:
This logic will move to the next stage if the participant has been in the study a number of days is > 0.
use the datediff() method to today’s (Note: the today is a variable that is created by the responder or the variable named skip next steps =1) date to the study start date with parameters set to honor negatives and use local time set to ‘true’, and advance the stage if the days (“d” parameters) are greater than 1, or if the “skip_to_next_stage” variable is set to 1.
How to create a “circular stage” path
Instructions:
To create a circular stage (a stage that can loop back to a previous stage (e.g., Pre-Quit, Post-Quit), add logic to trigger that transition to the “End Date Formula” in Stage. In addition, add a stage setting of “branching logic” type, and add the matching criteria and stage to loop back. The tricky bit is that it will loop directly back if you do not add some logic to the looped stage to prevent that immediate loop.
For a simple example, we’ll have stage A and B.
End Date Formula example for stage A:
last([advance_to_stage_b]) == 1 and
  (last([return_to_stage_a:0])==0 or
  datediff(last([advance_to_stage_b_date]),last([return_to_stage_a_date]),"d",true) > 0)
explanation:
Check the user selected to advance, then check to make sure that either the user has never selected to go back to stage yet or if they have, that the date they selected for returning is not greater than the selection to advance. This second part will prevent an immediate loop back.
End Date Formula example for stage B:
last([return_to_stage_a]) == 1 and
  datediff(last([return_to_stage_a_date]),last([advance_to_stage_b_date]),"d",true) > 0
explanation:
check that the user selected to return, then check to make sure the date of the return selection is greater than the last time the user selected to advance . This second part will prevent an immediate loop back.
Branching logic example for stage B:
last([return_to_stage_a]) == 1 and
  datediff(last([return_to_stage_a_date]),last([advance_to_stage_b_date]),"d",true) > 0
explanation:
this will use the exact same logic in this simplistic instance for branching back to stage A, but if there were multiple stages to loop to you would only use the specific logic for looping to that stage. If no branching logic matches, then the next stage in order will start or the study will end.
note:
always add last() for stage change formulas if you are not concerned about checking all prior instances. The default is to check all collected data and this may become slow as the user accumulates more data.
Setting and checking the Value for Dropdown and Radio questions
When a question type is Dropdown or Radio, the responder should input a series of Responses. Clicking the Add+ button will add an additional row for a Response and its Value.
The image below shows a Dropdown item that has four Responses, with the assigned values 0, 1, 2, and 12.
The numeric Values of each Response should be carefully set because this data is what will be downloaded in the dataset.
Forth, Values for each Response must be assigned in order for the Responses to be used in Formulas.
The image below shows conditional logic that can be used to skip or ask specific questions based on previous answers in a survey may be presented to the participant, based on the answer provided for the Dropdown Question, Test_Dropdown.
If no formula is added to a question, it will always be asked during that survey.
Adding a Formula for a Question conditions for when that question should be shown.
In this example, the Question Test_Dropdown is shown every time the Assessment is taken. The Question Test_Radio will only be presented during the Assessment if the Response to Test_Dropdown = 12.
Equality operators (>, >=, <, <=) can be used to allow multiple answers to a question to trigger a later question.
Changing [Test_Dropdown]==1 to [Test_Dropdown] >= 1 will trigger the question when the answer to Test_Dropdown = 1, 2, or 12.
Creating and Using the Random Number Generator
The Random Number Generator Question, requires a minimum and maximum value (Note: the user can also select decimal places for the random number). An example is shown below for a Random Number Generator Question with Minimum value 0, Maximum value 2, and 0 decimal places. This will generate a number that is 0, 1, or 2.
The randomly generated number can be used to drive intervention content.
The Random Number Generator can be added to the Assessment in order. It is possible to have multiple Random Number Generator Questions within a single assessment.
Checkbox item type
The Checkbox item type is very similar to Dropdown and Radio questions, but more than one answer can be selected. This makes Formula logic slightly different.
Creation of Checkbox questions is similar to Radio and Dropdown Questions (e.g., adding Responses and the associated Values). Formulas that depend on specific answers to check box questions have an additional component. The (N) in the example below represents the Value assigned to a specific response.
[Checkbox_Question_Name(N)] == 1
Example below shows favorite animals.
1 = dog
2 = cat
3 = turtle
If select dog(1)[favorite(1)]=1 then ask text type Follow Up of breed. The “==1” the item was checked; “==0” means unchecked.
5. Click the Save ![]() button.
button.
Always click the save button after you make changes to your study. You will lose all work that you do not save.
Configure Events
This section describes the Insight Event types and how to configure them.
How to only trigger an event if a response is a given value
Instructions:
Select an event, then add a setting and choose branching logic. In the “Formula” area, add the desired logic. This will trigger if any stored data meet the formula conditions.
How to trigger a stage change on multiple conditions
Instructions:
Click the Events tab, then select a stage, under “type” choose the formula. In the “End Date Formula” field, add the desired logic. This can be simple (e.g., [startstudy]== 1; when the Start Study question is answered yes (1), the app will move to the next stage). This will trigger if any stored data meet the formula conditions, and missing values will default to false (thus not triggering a stage change on those variables).
formula example:
Complex logic: datediff("today",[study_startdate], "d", true,true) >= 1 or [skip_to_next_stage]==1
explanation:
This logic will move to the next stage if the participant has been in the study a number of days is > 0.
use the datediff() method to today’s (Note: the today is a variable that is created by the responder or the variable named skip next steps =1) date to the study start date with parameters set to honor negatives and use local time set to ‘true’, and advance the stage if the days (“d” parameters) are greater than 1, or if the “skip_to_next_stage” variable is set to 1.
How to create a “circular stage” path
Instructions:
To create a circular stage (a stage that can loop back to a previous stage (e.g., Pre-Quit, Post-Quit), add logic to trigger that transition to the “End Date Formula” in Stage. In addition, add a stage setting of “branching logic” type, and add the matching criteria and stage to loop back. The tricky bit is that it will loop directly back if you do not add some logic to the looped stage to prevent that immediate loop.
For a simple example, we’ll have stage A and B.
End Date Formula example for stage A:
last([advance_to_stage_b]) == 1 and
  (last([return_to_stage_a:0])==0 or
  datediff(last([advance_to_stage_b_date]),last([return_to_stage_a_date]),"d",true) > 0)
explanation:
Check the user selected to advance, then check to make sure that either the user has never selected to go back to stage yet or if they have, that the date they selected for returning is not greater than the selection to advance. This second part will prevent an immediate loop back.
End Date Formula example for stage B:
last([return_to_stage_a]) == 1 and
  datediff(last([return_to_stage_a_date]),last([advance_to_stage_b_date]),"d",true) > 0
explanation:
check that the user selected to return, then check to make sure the date of the return selection is greater than the last time the user selected to advance . This second part will prevent an immediate loop back.
Branching logic example for stage B:
last([return_to_stage_a]) == 1 and
  datediff(last([return_to_stage_a_date]),last([advance_to_stage_b_date]),"d",true) > 0
explanation:
this will use the exact same logic in this simplistic instance for branching back to stage A, but if there were multiple stages to loop to you would only use the specific logic for looping to that stage. If no branching logic matches, then the next stage in order will start or the study will end.
note:
always add last() for stage change formulas if you are not concerned about checking all prior instances. The default is to check all collected data and this may become slow as the user accumulates more data.
Setting and checking the Value for Dropdown and Radio questions
When a question type is Dropdown or Radio, the responder should input a series of Responses. Clicking the Add+ button will add an additional row for a Response and its Value.
The image below shows a Dropdown item that has four Responses, with the assigned values 0, 1, 2, and 12.
The numeric Values of each Response should be carefully set because this data is what will be downloaded in the dataset.
Forth, Values for each Response must be assigned in order for the Responses to be used in Formulas.
The image below shows conditional logic that can be used to skip or ask specific questions based on previous answers in a survey may be presented to the participant, based on the answer provided for the Dropdown Question, Test_Dropdown.
If no formula is added to a question, it will always be asked during that survey.
Adding a Formula for a Question conditions for when that question should be shown.
In this example, the Question Test_Dropdown is shown every time the Assessment is taken. The Question Test_Radio will only be presented during the Assessment if the Response to Test_Dropdown = 12.
Equality operators (>, >=, <, <=) can be used to allow multiple answers to a question to trigger a later question.
Changing [Test_Dropdown]==1 to [Test_Dropdown] >= 1 will trigger the question when the answer to Test_Dropdown = 1, 2, or 12.
Creating and Using the Random Number Generator
The Random Number Generator Question, requires a minimum and maximum value (Note: the user can also select decimal places for the random number). An example is shown below for a Random Number Generator Question with Minimum value 0, Maximum value 2, and 0 decimal places. This will generate a number that is 0, 1, or 2.
The randomly generated number can be used to drive intervention content.
The Random Number Generator can be added to the Assessment in order. It is possible to have multiple Random Number Generator Questions within a single assessment.
Checkbox item type
The Checkbox item type is very similar to Dropdown and Radio questions, but more than one answer can be selected. This makes Formula logic slightly different.
Creation of Checkbox questions is similar to Radio and Dropdown Questions (e.g., adding Responses and the associated Values). Formulas that depend on specific answers to check box questions have an additional component. The (N) in the example below represents the Value assigned to a specific response.
[Checkbox_Question_Name(N)] == 1
Example below shows favorite animals.
1 = dog
2 = cat
3 = turtle
If select dog(1)[favorite(1)]=1 then ask text type Follow Up of breed. The “==1” the item was checked; “==0” means unchecked.
Scheduling for Each Event Type
Under Schedule Type, select Fixed. Fixed events can be scheduled for specific days of the week (i.e., Weekly) or they can be scheduled for specific days of a stage (i.e., Stage Offset).
Weekly – Click the Weekly button, then click the checkbox next to the day(s) you would like the assessment to be prompted.
Stage Offset – Click the Stage Offset button, then enter the specific day you would like the assessment to be prompted. For example, if you created a 14 day stage, and you want this assessment to be prompted on day 7 of that 14 day stage, you would type 7 into the Day of the Stage text field.
Schedule Type – The Schedule Type dropdown allows you to choose from a menu of ways the assessment can be prompted. There are 4 options:
Specific Time – This scheduling type enables researchers to prompt assessments at a specific time (hour and minute; AM or PM). For example, use the “Specific Time” scheduling option to schedule an assessment at 3:15 PM for all participants.
Preferred Time Offset – This schedule type allows each participant to select a preferred time for an assessment. See how Preferred Times can be created here. This schedule type has 3 options:
At the Preferred Time: Click either the Before or After button and type 0 inside the Fixed Time Offset text box. The assessment will be scheduled at the participant’s preferred time.
Before the Preferred Time: Click the Before button and enter the number of minutes in the Fixed Time Offset textbox that you would like the event to be prompted before the Preferred Time. For example, use the “Before the Preferred Time” option if you would like to schedule an assessment 15 minutes before the preferred time.
After the Preferred Time: Click the After button and enter the number of minutes in the Fixed Time Offset textbox that you would like the event to be prompted after the Preferred Time. For example, use the “After the Preferred Time” option if you would like to schedule an assessment 15 minutes after the preferred time.
Before the Preferred Time and After the Preferred Time scheduling options could annoy participants.
Wake Time Offset – This schedule type enables researchers to prompt assessments that are tied to a participant’s daily waking time. See how Wake Times can be created here. This schedule type has 3 options:
After the Wake Time: Click the After button and enter the number of minutes in the Fixed Time Offset textbox that you would like the event to be prompted after the Wake Time. For example, use the “After the Wake Time” option if you would like to schedule an assessment 30 minutes after the participant’s usual Wake Time for that day.
At the Wake Time: Click either the Before or After button and type 0 inside the Fixed Time Offset text box. The assessment will be scheduled at the participant’s wake time.
Before the Wake Time: Click the Before button and enter the number of minutes in the Fixed Time Offset textbox that you would like the event to be prompted before the Wake Time.
This scheduling option could annoy participants.
Sleep Time Offset – This schedule type enables researchers to prompt assessments that are tied to the time a participant goes to sleep each day. See how Sleep Times can be created here. This scheduling type has 3 options:
Before the Sleep Time: Click the Before button and enter the number of minutes in the Fixed Time Offset textbox that you would like the event to be prompted before the Sleep Time. For example, type 30 in the Fixed Time Offset textbox to prompt an assessment 30 minutes before the participant’s usual bedtime.
At the Sleep Time: Click either the Before or After button and type 0 inside the Fixed Time Offset text box. The assessment will be scheduled at the participant’s sleep time.
After the Sleep Time: Click the After button and enter the number of minutes in the Fixed Time Offset textbox that you would like the event to be prompted after the Sleep Time. For example, use the “After the Sleep Time” option if you would like to schedule an assessment 15 minutes after the participant’s usual Sleep Time for that day.
Do not set ANY participants scheduled sleep time past 11:30 pm. Having a sleep time after 11:30 pm will interfere with the assessment schedule.
This scheduling option could annoy participants.
Reschedule Assessments – There are two ways to reschedule prompted events (e.g., Fixed Events, Random Events): Snooze and Event Reschedule Settings. These features give participants another opportunity to complete assessments that may be prompted at inconvenient times.
Snooze and Event Reschedule Settings should never be combined/used for a single event.
Snooze –This feature allows the participant to postpone prompted assessments for a specific amount of time. The researcher sets the duration of the snooze and the number of times the assessment can be snoozed. To access this feature, click “Reschedulable,” then click “Snooze.”
Snooze Time: Enter the number of minutes you would like the event to be prompted after the snooze button is clicked. For example, if the participant snoozes the assessment, prompt the assessment again 15 minutes later.
Snooze Limit: Enter the number of times the assessment can be snoozed by the participant.
The snooze setting does not guarantee that the participant will complete the assessment, but it allows the participant to push back the assessment to a potentially more convenient time.
Event scheduling problems may occur if long snoozes or high quantities of snoozes are allowed (e.g., assessment #1 time window should not be allowed to overlap with Assessment #2 time window).
Event Reschedule Settings – This feature allows prompted assessments (e.g., Fixed or Random Assessments) to be automatically rescheduled if the participant does not start the assessment when it is prompted. This feature is similar to snooze, but it does not require the participant to do anything (i.e., click Snooze) in order for the assessment to be automatically rescheduled. To access this feature, click
in Settings. In the Setting Type dropdown menu, select “Event Reschedule Settings.” Reschedule Attempts: Enter the number of times the assessment should be automatically rescheduled.
Reschedule Minutes: Enter the desired delay (in minutes) between the initial prompt and rescheduled prompt. For example, if the participant does not respond to the first prompt, reschedule the prompt 15 minutes later.
An [event alt ID #####] dismissed“ log will only appear in a Participants Activity tab when they have actively dismissed an assessment; this indicates the participant clicked “dismiss” when the assessment rang/vibrated. If the participant allows the assessment to ring, there will not be an [event alt ID #####] dismissed“ entry.
Example of a dismissed assessment below:

Clicking the “Notification Bar Reminder” will notify a participant of an assessment by displaying the message at the top of the phone screen.
Event Resume - This feature allows Assessments in progress to be resumed at a later time. If the Participant closes the Insight app, accepts a phone call, or powers off their phone during an Assessment, they will be able to Resume the Assessment later. After the specified number of minutes have passed, the Event Resume feature will expire. To enable this feature, follow instructions below:
Select desired study > Click on the Events tab
Find the Stage desired > Click the
button to open Scroll down to Settings > Select the
to open 
Click Setting Text

A dropdown will appear > Scroll until Event Resume is seen > Select it

Check the Allow Resume box > In the Resume Timeout Minutes field, input the desired minutes for an event to be resumed before it expires.

Resume Timeout Minutes - determines the number of minutes that an Event can be Resumed, starting with the timestamp when the Assessment is started. The homepage of the app will show a “Resume XXXXXX“ Assessment (where XXXXXX is the name of the incomplete Assessment) message for an available Assessment until the Resume Timeout Minutes have elapsed.
For example, if an assessment is started at 9:00 AM and the Resume Timeout Minutes is set to 60 then the participant is able to resume the assessment until 10:00 AM.
Resume Timeout Minutes - determines the number of minutes that an Event can be Resumed, starting with the timestamp when the Assessment is started. The homepage of the app will show
Hide Matching Event if Available - When this option is enabled, if an event is currently available to be resumed, the corresponding event button that initially triggered the event will not be available on the home page until the resumed event has been completed or has elapsed.
Click Save
on the Stage level 
The CMS Activity tab shows a log whenever an Event is resumed by a participant.
Under Schedule Type, select Random. Random events can be scheduled for specific days of the week (i.e., Weekly) or they can be scheduled for specific days of a stage (i.e., Stage Offset).
Weekly – Click the Weekly button, then click the checkbox next to the day(s) you would like the assessment to be prompted.
Stage Offset – Click the Stage Offset button, then enter the specific day you would like the assessment to be prompted. For example, if you created a 14 day stage, and you want this assessment to be prompted on day 7 of that 14 day stage, you would type 7 into the Day of the Stage text field.
Scheduling Features
Assessments per Day – Type the number of assessments that should be randomly prompted per day in this text box. Each participant’s daily waking hours will be split into equal epochs and one random assessment will be prompted within each epoch.
Time Buffer (minutes) – This setting prevents random assessments from occurring closer together than desired (e.g., it is technically possible for 2 random assessments to be just one minute apart). Type the minimum allowable number of minutes between the random assessments in this text box.
Wake Time Offset – This setting prevents random assessments from being prompted too close to the participant’s wake time. Type the number of minutes after the participant’s wake time for the initial random assessment window to begin. See how Wake Times can be created here.
When Fixed Events are scheduled 30 minutes after waking time, consider setting Wake Time Offset to 90 minutes - this will ensure that the first random assessment does not occur within 60 minutes of the morning fixed assessment.
Sleep Time Offset – This setting prevents random assessments from being prompted too close to the participant’s bedtime. Type the number of minutes prior to the participant’s bedtime for the final random assessment window to end. See how Sleep Times can be created here.
Do not set ANY participants scheduled sleep time past 11:30 pm. Having a sleep time after 11:30 pm will interfere with the assessment schedule.
Reschedule Assessments - There are two ways to reschedule prompted events (e.g., Fixed Events, Random Events): Snooze and Event Reschedule Settings. These features give participants another opportunity to complete assessments that may be prompted at inconvenient times.
Snooze and Event Reschedule Settings should never be combined/used for a single event.
Snooze –This feature allows the participant to postpone prompted assessments for a specific amount of time. The researcher sets the duration of the snooze and the number of times the assessment can be snoozed. To access this feature, click “Reschedulable,” then click “Snooze.”
Snooze Time: Enter the number of minutes you would like the event to be prompted after the snooze button is clicked. For example, if the participant snoozes the assessment, prompt the assessment again 15 minutes later.
Snooze Limit: Enter the number of times the assessment can be snoozed by the participant.
The snooze setting dos not guarantee that the participant will complete the assessment, but it allows the participant to push back the assessment to a potentially more convenient time.
Event scheduling problems may occur if long snoozes or high quantities of snoozes are allowed (e.g., assessment #1 time window should not be allowed to overlap with Assessment #2 time window).
Event Reschedule Settings – This feature allows prompted assessments (e.g., Fixed or Random Assessments) to be automatically rescheduled if the participant does not start the assessment when it is prompted. This feature is similar to snooze, but it does not require the participant to do anything (i.e., click Snooze) in order for the assessment to be automatically rescheduled. To access this feature, click
in Settings. In the Setting Type dropdown menu, select “Event Reschedule Settings.” Reschedule Attempts: Enter the number of times the assessment should be automatically rescheduled.
Reschedule Minutes: Enter the desired delay (in minutes) between the initial prompt and rescheduled prompt. For example, if the participant does not respond to the first prompt, reschedule the prompt 15 minutes later.
An [event alt ID #####] dismissed“ log will only appear in a Participants Activity tab when they have actively dismissed an assessment; this indicates the participant clicked “dismiss” when the assessment rang/vibrated. If the participant allows the assessment to ring, there will not be an [event alt ID #####] dismissed“ entry.
Example of a dismissed assessment below:

Clicking the “Notification Bar Reminder” will notify a participant of an assessment by displaying the message at the top of the phone screen.
Event Resume -This feature allows Assessments in progress to be resumed at a later time. If the Participant closes the Insight app, accepts a phone call, or powers off their phone during an Assessment, they will be able to Resume the Assessment later. After the specified number of minutes have passed, the Event Resume feature will expire. To enable this feature, follow instructions below:
Select desired study > Click on the Events tab
Find the Stage desired > Click the
button to open Scroll down to Settings > Select
to open 
Click Setting Text

A dropdown will appear > Scroll until Event Resume is seen > Select it

Check the Allow Resume box > In the Resume Timeout Minutes field, input the desired minutes for an event to be resumed before it expires.

Resume Timeout Minutes - determines the number of minutes that an Event can be Resumed, starting with the timestamp when the Assessment is started. The homepage of the app will show a “Resume XXXXXX“ Assessment (where XXXXXX is the name of the incomplete Assessment) message for an available Assessment until the Resume Timeout Minutes have elapsed.
For example, if an assessment is started at 9:00 AM and the Resume Timeout Minutes is set to 60 then the participant is able to resume the assessment until 10:00 AM.
Click Save
on the Stage level 
The CMS Activity tab shows a log whenever an Event is resumed by a participant.
Participant Initiated assessments are initiated when the participant clicks a button in the app home screen.
The name you assign to this Assessment will appear on the app home screen.
Scheduling Features
% Chance for the Event to Trigger – This event type allows the researcher to select the percent of the time that the event will trigger an assessment. In other words, if the % chance for the event to trigger is set to 50%, pressing this button in the app home screen will randomly initiate an assessment 50% of the time. When the button is pressed and an assessment is not triggered, an “Event Recorded” message will pop up. This informs participants that they do not need to press the button again.
The probability that a Participant Initiated event will be triggered is independent of the previous times the button was pressed.
Settings
Font Color – Customizes the text color for the Participant Initiated Event button on the app home screen.
Background Color – Customizes the color of the Participant Initiated Event button on the app home screen.
Follow Up Events
Follow-up events are events that automatically follow a completed participant initiated assessment. For instance, a follow-up event can be scheduled 30 minutes after the participant clicks a participant initiated event labeled “I am about to eat.”
Scheduling Features
Select FollowUp under Schedule Type.
Originating Event – This dropdown box includes all Participant Initiated Events that have been created for this stage. Select the event that you want the follow-up assessment to follow.
Follow up delay in minutes – Type the number of minutes after the originating event that you would like the follow up event to be prompted. Snooze and event reschedule features can be used with this event type.
Follow up assessments need to be delayed for a minimum of 15 minutes. A Follow up assessment delayed for less than 15 minutes will interfere with the assessment schedule.
Reschedule Assessments – There are two ways to reschedule prompted events (e.g., Fixed Events, Random Events): Snooze and Event Reschedule Settings. These features give participants another opportunity to complete assessments that may be prompted at inconvenient times.
Snooze and Event Reschedule Settings should never be combined/used for a single event.
Snooze –This feature allows the participant to postpone prompted assessments for a specific amount of time. The researcher sets the duration of the snooze and the number of times the assessment can be snoozed. To access this feature, click “Reschedulable,” then click “Snooze.”
Snooze Time: Enter the number of minutes you would like the event to be prompted after the snooze button is clicked. For example, if the participant snoozes the assessment, prompt the assessment again 15 minutes later.
Snooze Limit: Enter the number of times the assessment can be snoozed by the participant.
The snooze setting does not guarantee that the participant will complete the assessment, but it allows the participant to push back the assessment to a potentially more convenient time.
Event scheduling problems may occur if long snoozes or high quantities of snoozes are allowed (e.g., assessment #1 time window should not be allowed to overlap with Assessment #2 time window).
Event Reschedule Settings – This feature allows prompted assessments (e.g., Fixed or Random Assessments) to be automatically rescheduled if the participant does not start the assessment when it is prompted. This feature is similar to snooze, but it does not require the participant to do anything (i.e., click Snooze) in order for the assessment to be automatically rescheduled. To access this feature, click
in Settings. In the Setting Type dropdown menu, select “Event Reschedule Settings.” Reschedule Attempts: Enter the number of times the assessment should be automatically rescheduled.
Reschedule Minutes: Enter the desired delay (in minutes) between the initial prompt and rescheduled prompt. For example, if the participant does not respond to the first prompt, reschedule the prompt 15 minutes later.
An [event alt ID #####] dismissed“ log will only appear in a Participants Activity tab when they have actively dismissed an assessment; this indicates the participant clicked “dismiss” when the assessment rang/vibrated. If the participant allows the assessment to ring, there will not be an [event alt ID #####] dismissed“ entry.
Example of a dismissed assessment below:

Clicking the “Notification Bar Reminder” will notify a participant of an assessment by displaying the message at the top of the phone screen.
Event Resume - This feature allows Assessments in progress to be resumed at a later time. If the Participant closes the Insight app, accepts a phone call, or powers off their phone during an Assessment, they will be able to Resume the Assessment later. After the specified number of minutes have passed, the Event Resume feature will expire. To enable this feature, follow instructions below:
Select desired study > Click on the Events tab
Find the Stage desired > Click the
button to open Scroll down to Settings > Select
to open Click Setting Text
A dropdown will appear > Scroll until Event Resume is seen > Select it
Check the Allow Resume box > In the Resume Timeout Minutes field, input the desired minutes for an event to be resumed before it expires.
Resume Timeout Minutes - determines the number of minutes that an Event can be Resumed, starting with the timestamp when the Assessment is started. The homepage of the app will show a “Resume XXXXXX“ Assessment (where XXXXXX is the name of the incomplete Assessment) message for an available Assessment until the Resume Timeout Minutes have elapsed.
For example, if an assessment is started at 9:00 AM and the Resume Timeout Minutes is set to 60 then the participant is able to resume the assessment until 10:00 AM.
Click Save
on the Stage level
The CMS Activity tab shows a log whenever an Event is resumed by a participant.
A Participant Initiated button disappears from the home screen if it has the Event Resume feature enabled. The Participant Initiated event will appear as “Resume [EventName]” on the home screen until the Assessment is completed or Event Resume minutes expire.
The phone call event is a special type of Participant Initiated Event that will automatically place a phone call when the button is pressed. Under schedule name, type the name for this button as you want it to appear in the app home screen (e.g., Call Counselor). Assign this button to particular study groups. Under Scheduling Type select “Phone Call.” Then press ![]() 3 times to create settings that: 1) set the button font color, 2) set the button background color, and 3) set the phone number that will be called when the button is pressed.
3 times to create settings that: 1) set the button font color, 2) set the button background color, and 3) set the phone number that will be called when the button is pressed.
Scheduling Features
Font Color – Customizes the text color for the button on the app home screen.
Background Color – Customizes the color of the button on the app home screen.
Phone Number – Customizes the actual phone number that will be called when the button is pressed. You can also type a label for this phone number in the Label textbox.
Call Monitoring – Coming Soon.
Sensor Data – To learn information about sensor configuration, click here.
Configure Notifications (Optional)
Notifications are messages that are presented to participants during specific stages on specific dates/times.
1. Click the Notifications tab in CMS.
2. In the Schedule Field Name text box type a name for the Notification (e.g., “Day 1 Message”).
3. Select a Message Type.
a. Alert – This message type will cause the phone to ring/vibrate at the assigned time and deliver the message as written.
b. Notification – This message type will cause a message to appear in the phone’s notification bar until it is dismissed.
4. Select the Group(s) that should get this notification. Then press ![]() .
.
The group will not be assigned unless you click ![]() .
.
5. Messages section
a. Message – Type the message as it should appear on the phone.
b. Value – Type the value this message should have in your dataset.
c. Day of Stage – Type the day of the stage for which this message should be presented.
d. Time Type – Select Preferred Time, Specific Time, Wake Time Offset, or Sleep Time Offset, and configure the message for the time you prefer.
6. Click the Save ![]() button.
button.
Always click the save button after you make changes to your study. You will lose all work that you do not save.
Create and Configure Subject Payments (Optional)
This section provides instructions for setting up the optional payment button for your study. The payment button allows participants to review the history of prompted, completed surveys and the amount of credits earned thus far. To enable this option, click on the Custom Payments checkbox under Features in the Study tab and click Save![]() .
.
Research teams utilizing Greenphire:
Reference the attachment below for which PHI (Protected Health Information) fields are required for processing cards.
The ‘State’ field must be written in the abbreviation format; for example, ‘Oklahoma’ must be input as ‘OK’.
Failure to write in the correct format results in cards failing to process.
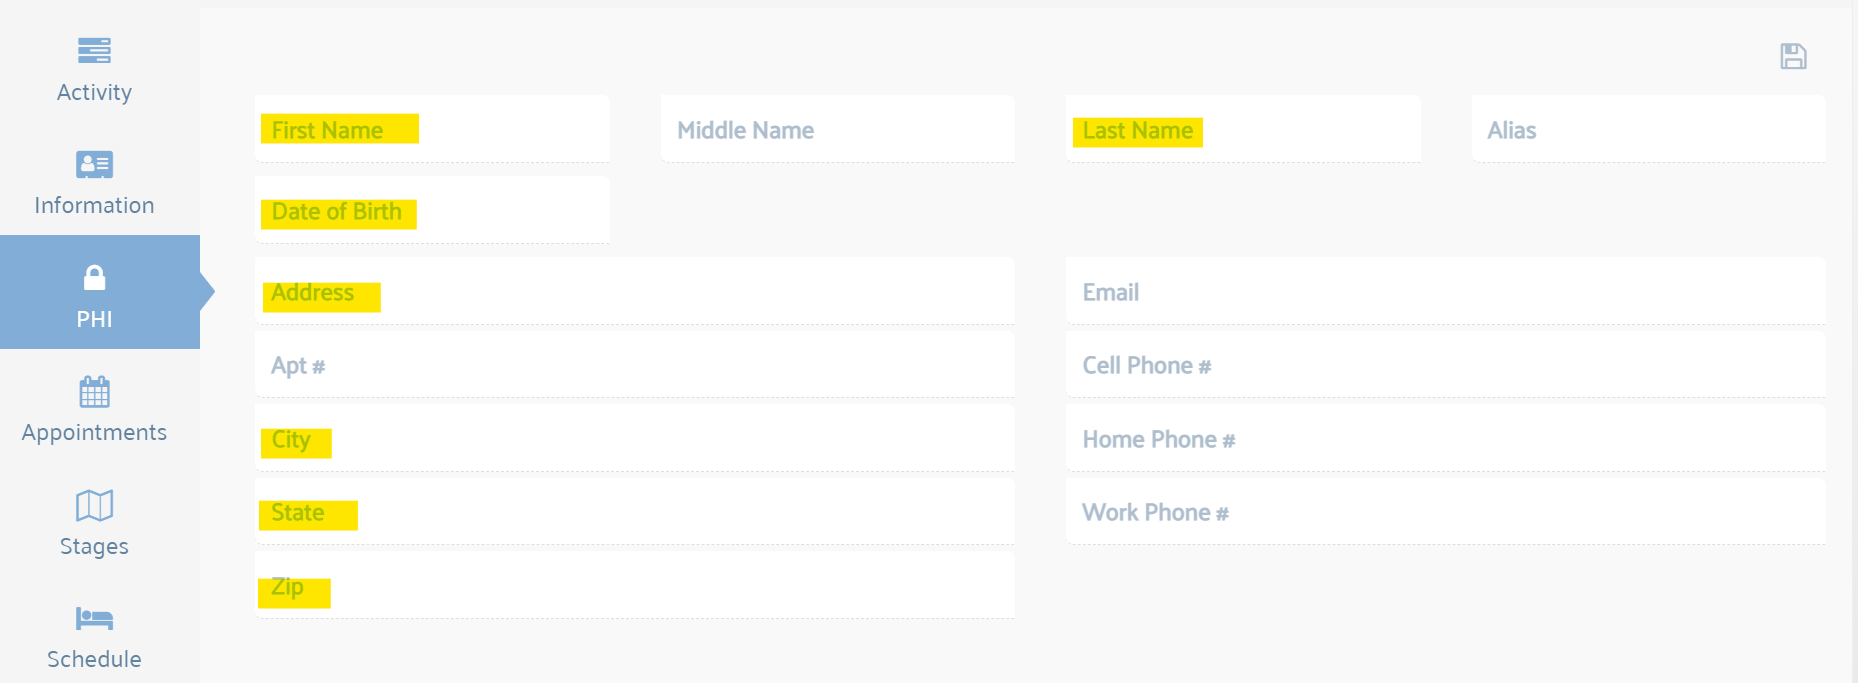
Required PHI fields for Greenphire card processing

Custom Payments checkbox in Study tab
Then click the Payments tab. Three folders will appear: Payment Schedules, Participation Calculation, and Payments. To open each folder, click the Open ![]() button to the right.
button to the right.

Payments tab in Insight CMS
The Payment Schedules section must be set up before setting up the Participation Calculation section.
Payment Schedules
Follow the directions below to create criteria for subject payments.
Open the Payment Schedules folder
Click Add
to add a new scheduleEnter a name for your payment schedule in the Schedule Name textbox (see Figure 1)
There are two payment Schedule Types: Default and Percent.
Default
This payment schedule type enables researchers to pay participants for completing a specific task in the app (e.g., completing a daily carbon monoxide test, completing a weekly EMA, completing a follow-up survey).
Percent
The percent schedule type is used to track the number of scheduled surveys that are prompted and completed by participants.
Fill in the 3 fields: Payment Name, Percent, and Amount
Payment Name will appear as text in this payment schedule.
Add Payment Names for each line in a payment schedule (see example below: 74% to 50%, 89% to 75%, 90% to 100%).
The Percent field is used to define requirements for the percentage of surveys that need to be completed for a specific level of payment (Note: enter .50 for 50%; see example in the payment screen below: 50%, 75%, and 90%). Note that the amount of current compensation is automatically populated for each participant based upon the percentage of EMAs complete up-to-the-moment.
The Amount field is used to define the amount of credit the participant will earn for completing a certain percentage of surveys.
Click Save
once you have configured the payment schedule.
You can add additional payment schedules (e.g., separate payments for different weeks of the study) to customize the payment button. Different schedules allow participants to earn different amounts for completing surveys at different points in the study (e.g., up to $20 for completing 5 EMAs per day during the first week of the study and up to $15 for completing 3 EMAs per day during the second week of the study). The GIF below shows the configuration of two payment schedules using the Percent Schedule Type. The screenshot below is an example of a payment screen created using Percent as the Schedule Type.


Example of Percent Schedule Type
Participation Calculation
The Participant Calculation section enables the researcher to tie specific payment schedules with specific study stages and EMA types. There are 3 types of Participation Calculation: Stage Based, Grouped Stages, and Custom Event Inclusion. Click the Edit button on the corresponding stage to view Events that can be included or excluded in each Participant Calculation. Note: Only events assigned to a specific stage can be selected, but you can tie one payment to many stages. For example, you can tie Payment 1 to Week 1, Week 2, and Week 3 stages. In this case, participants will be able to track their EMA completion and credit earned across Weeks 1-3. Alternatively, you can create separate Payment Schedules for Week 1, Week 2, and Week 3. All payment schedules will be displayed in the same Payment screen.

Payment Schedule seen in dropdown for Participation Calculation
Custom Event Inclusion
This option allows you to associate a payment schedule to specific events within and across stages. You can select which events you would like to count, or not count, towards a payment.
In the example below (Figure 2), Custom Event Inclusion is used to include only the Fixed Morning Daily Diary assessments in the Weeks 1-2 Payment calculation. None of the other interactions with the app (e.g., participant initiated EMAs) will be included in this payment calculation.

Figure 2, Example of Custom Event Inclusion
Payments (for Businelle/Kendzor studies only, used with Greenphire)
The Payments folder is used to track payments made to participant Greenphire MasterCards. The status (e.g., processing, pending, paid, failed) of each payment can be viewed in this section. Currently, this feature is only available to OUHSC researchers.
Manually clicking the “Mark Paid” button changes the Payment status shown in the CMS (Content Management System). However, this status has no correlation with Greenphire processing transactions.
Payments that do not meet Study or Assessment settings will not be submitted to Greenphire for processing.
Payment Log Question Type (for Businelle/Kendzor studies only)
In order to make the Payment button appear on the Insight app home screen, you will need to do the following:
Create a Payment Log question. To do this, select Payment Log under Question Type Dropdown. Under settings select Web View HTML.
Contact the mHealth Support team to create a HTML file and Payment Log.
The types of Payment Logs mHealth has to offer:
PercentPaymentLog - Shows percentage of assessments completed vs total possible assessments taken per stage
FlatPaymentLog - Shows history of payments
FlatPaymentLogV2 - Shows history of payments. Includes Events that triggered each payment.
FlatPaymentWithQ - Shows history of payments. Includes Questions that triggered each payment
Once that Payment Log is created, you will need to create a “Payment” Event with Payment Log as the assessment for each stage of your study.
Sensor Incorporation (Optional)
Follow the Android Wear instructions in the order listed on this page. Doing any of these steps out of order may result in data being skewed or other set up errors!
To download the necessary apps from the Google Play Store and to continue to get updates, a participant must have a Google account (participant can use any email to sign up for a Google account). We recommend that participants use their own account. Do not delete the Google account. Insight (or any app) cannot update without a Google account active on the phone.
Note: Connect to Wi-Fi
1. Download Wear OS from the Google Play Store
Choose the Google Play Store app from the participant’s phone
Search Wear OS by Google
Choose INSTALL
2. Connect Wear OS Watch to Phone
This section will require both the watch and the phone.
WEAR OS SETUP
Tap on the watch screen when it says Tap to begin

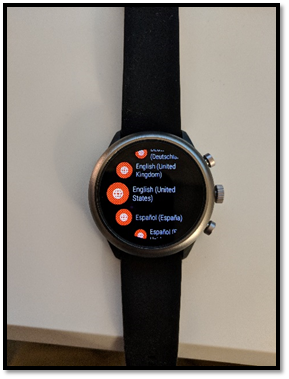
Select English (United States) as your language
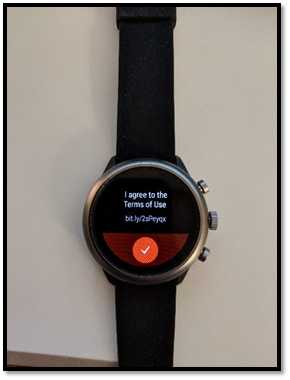
Press the check mark to agree to the Terms of Use
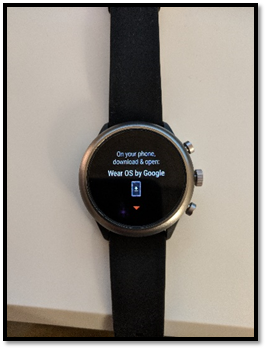
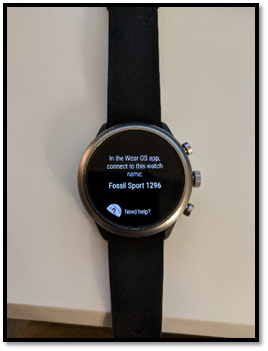
The watch will then prompt you to open the Wear OS app on your phone. Scroll down and you’ll see the watch name. Take note of the watch name as you’ll use this as a reference to it later during the phone setup.
PHONE SETUP
Press Start Setup
Press Agree for Terms of Service

Press Agree for Make Wear OS better
The phone will then attempt to link with your watch. Turn on Bluetooth if the phone prompts you to turn it on.

5. Match the watch name seen on the watch with the watch name on the phone and click on it.

6. A pass key will appear on the watch. Make sure it matches the one on your phone and press OK to pair the phone with the watch.

7. Under Choose which Google Accounts to copy to your watch, make sure the slider is on (slider will be blue if it’s set to on) next to the participant’s google account. Click on Next

8. Press Copy to copy the google account to the watch

9. Under Stay connected to Wi-Fi, press Connect

10. Press Next under Chat with your friends

11. Press Allow for all 4 of the permissions.


12. Under Check your calendar, press Next and press Allow for the calendar permission

13. Under Get notifications at a glance, press Allow

14. Tap on the slider next to Wear OS by Google (it’ll turn blue)

15. Press Allow on the Allow Wear OS by Google pop up

16. Press Next under Location notice
17. The phone will then continue to set up on its own (may take up to 5 minutes).

18. Once you see the You’re all set screen, press Done

3. Sign in to Google Fit on the Watch
Swipe from right to left on the watch
Tap the screen to sign in to Google Fit and use the Google account that you copied over to the watch
Fill in all the details and accept all the permissions
At this point, the watch should be paired with the phone. A good way to know is to try and change the watch face by going into the Wear OS app on the phone and picking a different face. The face change should get reflected in the watch too.
4. Download Insight from the Google Play Store
Choose the Google Play Store app from the participant’s phone
Search for Insight mHealth Platform
Choose Install
After the app downloads, choose ACCEPT
Open the Insight app
Click Allow to all permissions
At the “Do not optimize battery usage” prompt, choose YES
Create a participant in the CMS and set up the participant on the Insight app. Click here for instructions on participant set up.
We recommend using the Code Method for setting up participants.
After you setup a participant on the Insight app, please wait for 15-20 minutes for all the setup to finish. If you start setting up participant on the Outsight app too soon, the connection might not be created correctly.
5. Download mHealth Outsight from Google Play Store
Choose the Google Play Store app from the participant’s phone
Search mHealth Outsight
If the mHealth Outsight app does not pull up in the search result, use the following link on the phones’s Google Chrome browser and press Open in app when it prompts you: https://play.google.com/store/apps/details?id=com.mhealth.corehardware
Click on Install
Click on Open to open the Outsight app
Press Allow on all the permissions
6. Download mHealth OutsightAndroidWear app on the Fossil Watch
On the Fossil watch, press the middle dial to open up the watch’s list of apps.

Click on Play Store

Scroll down until you see Outsight under Apps on your phone and click on the download button
Open OutsightAndroidWear in your list of apps, and accept the sensor permission
Troubleshooting
Ensure WEAR OS, Insight, and Outsight remain open and running in the background.
If the app is open, Click the “Home” button (typically located at the bottom, center of the phone) to allow the app to run in the background. Example of a Recent window below:

Note: If the app(s) are not displayed in the “Recent” window then the app(s) are closed; this prevents any background operations which hinder collecting sensor data.
Verify there is a connection between the smartwatch and phone.
Open the WEAR OS app on the phone > under the watch name “connected” will appear if the phone and watch are paired.
If WEAR OS signifies there is no connection, reestablish the connection by hitting reconnect
If there appears to be no connection, open Outsight and Insight on the phone.
This can reestablish a connection between Outsight to Insight to allow sensor readings.
Restart the phone and watch if the above methods do not produce the expected results.
Restarting Phone: hold down the power button (typically on the side of the phone) until Restart Phone appears > Click Restart Phone
Restarting Watch: hold down the large middle dial on the side until Restart appears > Click Restart
Attempt to pair multiple phones and watches while thoroughly reading the instructions (starting from 1. Download Wear OS) to gain more experience; doing this can reduce quantity of errors when pairing the phone and watch.
Supported Devices:
Fossil Smartwatch 5th Generation
1. Find Heart Rate Tile
Swipe from right to left on the watch
Find Heart Rate by scrolling to the left
If it cannot be located, Add a Tile by holding a finger on the watch screen until a slight vibration is felt and the tiles are minimized
Select + under the heading Add Tile

Find and Select Heart Rate by Google Fit

Heart Rate is now added as a Tile

2. Allow all Permissions
Click on the checkmark when asked “Continuously read your heart rate?”

When prompted, “Tap to start tracking your heart rate”

Reading will appear once the watch is ready to start measuring the heart beat; a number will appear when set up is completed

Troubleshooting
Ensure WEAR OS, Insight, and Outsight remain open and running in the background.
If the app is open, Click the “Home” button (typically located at the bottom, center of the phone) to allow the app to run in the background. Example of a Recent window below:

Note: If the app(s) are not displayed in the “Recent” window then the app(s) are closed; this prevents any background operations which hinder collecting sensor data.
Verify there is a connection between the smartwatch and phone.
Open the WEAR OS app on the phone > under the watch name “connected” will appear if the phone and watch are paired.
If WEAR OS signifies there is no connection, reestablish the connection by hitting reconnect
If there appears to be no connection, open Outsight and Insight on the phone.
This can reestablish a connection between Outsight to Insight to allow sensor readings.
Restart the phone and watch if the above methods do not produce the expected results.
Restarting Phone: hold down the power button (typically on the side of the phone) until Restart Phone appears > Click Restart Phone
Restarting Watch: hold down the large middle dial on the side until Restart appears > Click Restart
Attempt to pair multiple phones and watches while thoroughly reading the instructions (starting from 1. Download Wear OS) to gain more experience; doing this can reduce quantity of errors when pairing the phone and watch.
Supported Devices:
Fossil Smartwatch 5th Generation
Create a Question with the Question Type “Pedometer Summary”
Add the “Pedometer Summary” Setting
Each of the below settings will apply to calculations and charts for each of the Pedometer Summary tabs (Today, Week, Month, and All).
The Today tab will show data from 12:00 am - 11:59 pm of the current date
The Week tab will be 12:00 am of the date 7 days ago through 11:59 pm of the current date
The Month tab will be 12:00 am of the date 1 month ago through 11:59 pm of the current date
The All tab will show all readings
“Exclude readings between sleep and wake”
Readings before wake time and prior to sleep time will not be considered in bouts or charted
Readings are excluded based on the participant’s daily schedule for each reading. If sleep and wake times are highly variable across different days (weekdays vs weekends), “Week”, “Month”, and “All” averages and charts may show values for earlier or later times than the current day as all days are averaged equally.
“Show Active Bout Gauges” and “Show Active Minute Gauges”
Often used together, though can be shown independently
Active Minutes is summed per reading (based on event Sensor Read Frequency). A reading is considered active if its average steps per minute is greater than or equal to “Bout Step Goal”/”Bout Duration Minutes” from the Pedometer Goals Setting.
Active Bouts is the total bouts where readings were considered active. Bouts are determined as consecutive active readings that were at least as long as the “Bout Duration Minutes” Pedometer Goals Setting. (Note: A stretch of readings that is twice as long as the Bout Duration Minutes setting is considered 2 bouts.)

“Show Sedentary Bout Gauges” and “Show Sedentary Hours Gauges”
Often used together, though can be shown independently
Sedentary Hours is summed per reading (based on event Sensor Read Frequency). A reading is considered sedentary if its average steps per minute is less than “Bout Step Goal”/”Bout Duration Minutes” from the Pedometer Goals Setting. (rounded to half hour increments or the chosen “bout duration minutes” on the question settings)
Sedentary Bouts is the total of bouts where readings were considered sedentary. Bouts are determined as consecutive sedentary readings that were at least as long as the “Bout Duration Minutes” Pedometer Goals Setting. (Note: A stretch of readings that is twice as long as the Bout Duration Minutes setting is still considered 2 bouts.)

“Show Step Timelines”
Step Goal shows today’s or the average steps compared to the “Daily Step Goal” Pedometer Goals Setting.
Step Timeline charts readings from 12:00 am to 11:59 pm and highlights sedentary readings


“Show Activity Timelines,” “Show Sedentary Timelines,” and “Timeline Hour Grouping”
Activity Timeline sums all individual readings (not bouts) considered to be active and groups them into time of day groups based on the Timeline Hour Grouping setting. (Y axis in minutes)
Sedentary Timeline sums all individual readings (not bouts) considered to be sedentary and groups them into time of day groups based on the Timeline Hour Grouping setting. (Y axis in minutes if 1 hour grouping, in hours if 3+ hour grouping)
Timeline Hour Grouping groups reading sums in hourly block (options: 1, 3, 4, 6)
1 hour grouping: separate totals for 0, 1, 2, 3, 4, 5, …, 24th hour
3 hour grouping: grouped totals for 0-3, 4-6, 6-12, 13-15, 16-18, 19-21, 22-24 hour blocks
4 hour grouping: grouped totals for 0-4, 5-8, 9-12, 13-16, 17-20, 21-24 hour blocks
6 hour grouping: grouped totals for 0-6, 7-12, 13-18, 19-24 hour blocks

Add the “Pedometer Goals” Setting
This setting is separate from the Pedometer Summary setting because it can be set at the participant level in order to have participant specific goals. If the setting is present at the question and participant level, the participant level setting will take precedence.
“Daily Step Goal”
Recommended value: between 7,500 and 10,000 steps
Not necessary if “Show Step Timelines” is false
“Bout Duration Minutes” and “Bout Step Goal”
Required for all charts
“Bout Step Goal”/“Bout Duration Minutes” is used to determine the steps per minute threshold for determining if a reading is active or sedentary
Bout Duration Minutes recommended value: ~30 minutes
Bout Step Goal recommended value: ~250 steps for a 30 minute bout duration
“Daily Active Minutes Goal”
Not necessary if “Show Active Minutes Gauges” is false
“Daily Active Bout Goal”
Not necessary if “Show Active Bout Gauges” is false
“Daily Sedentary Minutes Goal”
Not necessary if “Show Sedentary Minutes Gauges” is false
“Daily Sedentary Bout Goal”
Not necessary if “Show Sedentary Bouts Gauges” is false
Save the question
Add the question to an assessment and create a Participant Initiated event in the Events tab for the relevant stage(s) and group(s)
Multiple Pedometer Summary questions may be necessary if stages and/or groups are meant to show different charts and/or goals.
Creating BT iCO Question Type + Assigning to an Assessment
Create a Question with the Question Type iCO Bluetooth LE
Fill out the associated fields for the question (Field Name, Required, and Description).
Click Save
once finished inputting information
Add the previously created iCO Bluetooth LE question to an existing assessment or create a new one.
(Optional) Facial Recognition
(Question Tab) If the study has the “Facial Recognition setting enabled, and facial recognition verification is desired, create another question with the Question Type Face Verification
Fill out the associated fields for the question (Field Name, Required, and Description).
(Assessment Tab) If the study has the “Facial Recognition” setting enabled and facial recognition verification is desired for the assessment, add the Face Verification question type to the assessment immediately following the iCO Bluetooth LE question type added in Step 2.
Always click the save button after changes are made to the study. All work will be lost if the save button is not pressed.
How to use the Bluetooth (BT) iCO
Ensure Bluetooth is enabled on the phone. The Bluetooth (BT) iCO will not be able to connect and a chance of the assessment crashing when the Bluetooth setting is disabled.
When a participant reaches the iCO Bluetooth LE type question, the following will transpire:
The Insight app screen prompts the participant to connect the BT iCO device. When this screen is displayed, the participant should press and hold the power button on the iCO device until the LED ring at the base of the device flashes blue. Once the device is properly connected, the app screen shows Begin; the phone is ready for the participant to take the breath test.
Instruct the participant to press the Begin button > the screen will prompt them to hold their breath; a countdown is displayed to the participant. Once Exhale displays on the screen, advise the participant to exhale for the full length of the countdown.
A response value of -998 appears if the iCO could not successfully be connected during the assessment.
A response value of -997 appears if the iCO was unable to capture stable readings from the breath test.
While using the iCOquit® device in an assessment with facial recognition, the participant should be informed by the research staff to hold the phone in a manner consistent with taking a selfie while completing the assessment. This will ensure the photos taken during the assessment are useful for face verification.
Branching Logic
Branching logic is added under the Assessments tab; open the desired assessment then select Edit Formula for a question which will be conditionally presented to the participant.
Fill out the desired logic in the formula editor to determine whether the question will be presented.
For example, a basic check for results between 0 through 20 carbon monoxide concentration parts per million would look like this: [iCOBT] >= 0 and [iCOBT] < 500, where iCOBT is the “Field Name” of the iCO Bluetooth LE question.
Always click the save button after changes are made to the study. All work will be lost if the save button is not pressed.
For Google Pixel Users: If there an issue with timing starting the iCO device relative to starting the iCO BlueTooth question during an Assessment and the device is not able to connect, then after the Assessment is finished, re-starting the Assessment with the iCO BlueTooth question should allow the BlueTooth iCO device to connect.
This will result in an Assessment with a recorded value of -998 when the device failed to connect, and the correct iCO value during the next Assessment.
PHONES THAT HAVE BEEN TESTED WITH BLUETOOTH iCO DEVICES
Device Make and Model | BlueTooth iCO Supported and Tested with Insight app |
|---|---|
Samsung Galaxy S5 | Yes |
Samsung On5 | Yes |
Samsung Galaxy S7 | Yes |
Samsung Galaxy S8 | Yes |
Samsung Galaxy S9 | Yes |
Samsung Galaxy J3 V | Yes |
Samsung Galaxy J3 Prime | Yes |
Samsung Galaxy Note8 | Not Supported |
Pocophone F1 | Yes |
Motorola Moto e5 Play | Not Supported |
ASUS Zenphone A 006 | Yes |
Nokia 8.3 5G | Yes |
LG Stylo 5 | Not Supported |
Google Pixel 3 | Yes - see note above |
Blu Pure View | Not Supported |
Create Study Permissions
This enables the researcher to give specific permissions to research staff.
Create User – This is only available to Insight staff. To create a new CMS (Content Management System) User, submit a ticket through Service Desk and include the individual(s) email address. The individual(s) will receive an email from “donotreply-insight@insightmhealth.com” to create their CMS (Content Management System) login credentials (username; password).
Personal emails, like Gmail or Yahoo, are not permitted.
Group Rights – This tab is used to define the rights (commonly referred to as “permissions”) of each type of Role within a study. The Researcher is responsible for assigning permissions to Role(s) within a study; therefore, Researchers have rights to view, edit, and delete all tabs within Insight. The Creating Role dropdown details the hierarchy of enabling permissions.
Go to the CMS login page “www.insightmhealth.com” and log in (username; password) > Select Study
Select the Permissions tab (at the top of the webpage)
Select Group Rights > Click
Add New Role buttonNew Role will appear > Select the Open
Folder to display a hierarchy of permissions
Edit the “New Role” title by selecting the field and inputting a desired name.
Hierarchy of Permissions:
View: Role is able to view checked tabs
Edit: Role is able to make changes for a specific permission
Delete: Role is able to delete item(s) in a study
Admin: Role is able to view, edit, and delete the permission it is enabled for
From the example below, permission “Questions” is enabled on a View level; individuals assigned this role will be able to view but not edit or delete questions in the study.
Enabling PHI (Protected Health Information) Collection is done at the study level. PHI is also on the list of permissions and must be enabled for each Role deemed necessary to have access.
A checkmark indicates the permission is enabled.

Click Save
when enabling permissions is completed
3. Study Users – Here provides a list of all staff members on a study. Those designated as researchers can add a new CMS (Content Management System) User, delete users, assign or change the role(s) of all other staff members.
A person envisioned for a Role must have CMS login credentials (username; password) to be assigned said Role; is an individal has not been created, please submit a ticket to the Service Desk.
Go to the CMS login page “www.insightmhealth.com” and log in > Select Study
Select the Permissions tab (at the top of the webpage) > Click Study Users
In the Search Username or Email field, input the individuals Insight CMS username > Select them from the search bar

Select the Role drop down > Click on the desired Role > Select
Add to Study 
If a Role is not created, follow “Creating Role” instructions before attempting to assign the role.
New User will appear at the bottom of the list with its associated Role
Go to the CMS login page “www.insightmhealth.com” and log in > Select Study
Select the Permissions tab (at the top of the webpage) > Click Study Users
Find the desired Research member from the Study User list
Find and Select the Role drop down > choose the envisioned Role
If a Role is not created, follow Creating Role instructions before attempting to assign a Role.
Select Save
The User is reassigned the new Role
Test Your Study Settings
ALWAYS test every component of your study! Ensure that your skip patterns work and your data look the way you expect them to before you start your study.
Test EVERYTHING using multiple test participants on phones before your launch your study! This includes wording of questions, answer options, skip patterns, each assessment, stage changes, notifications, review data and ensure the data appear as expected.
We suggest that you have at least 3 testers who test each of the study settings/parameters using the app. Creation of a spreadsheet with each item that should be tested may prove useful.
You may temporarily change stage durations to 1 day in order to test all study stages rapidly.
Use phone administrative features to test your study. On the phone, swipe the screen from left to right. Click Log in. Enter your researcher user name and password. Swipe from left to right again and you will have access to the admin features including:
View Assessment Schedule – Shows events that are scheduled on the study phone.
Test Assessments – Allows you to test each of the assessments that you have created for your study. Face value assessment names enable you to know which assessments have been tested and which ones still need to be tested. Verify Assessment Timeout Minutes is correct on a Study or Assessment Level.
Log Out – Logs out of the administrator features.
Version Info – Contains the version of Insight that is running on the phone AND includes the participant ID number.
Additional Tabs (Do not click) – Process Payments, Reschedule Alarms, Unit Test, Reset Insight App
Download Encrypted Study Data
This allows the researcher to click the Reports tab to download encrypted study data (e.g., EMA data, GPS data) from the study server in CSV and/or Standard Excel formats.
Below is an EMA Pivoted Report Data Dictionary:
Column Name | Description | |
|---|---|---|
| 1 | ParticipantId | Database Id of the participant in study. |
| 2 | CustomId | Id assigned to the study participant by the researchers.  |
| 3 | ParticipantStatus | Status of the participant (one of Active, Completed, Test, Archived)  |
| 4 | StageNumber | Database Id of the stage associated with the entry in the report. |
| 5 | StageName | Name given to the stage during study setup.  |
| 6 | ScheduleID | Database Id of the Schedule/Event within the stage. |
| 7 | ScheduleType | Type of schedule (one of Fixed, Random, ParticipantInitiated, FollowUp, Phone Call, Sensor Data, GPS Tracking, Call Monitoring). Please note that not all of the schedule type maybe available for a given study. |
| 8 | ScheduleName | Name of the schedule/event.  |
| 9 | ScheduledEventId | Database Id of the specific event (the schedule taking scheduled for a particular participant on a particular time). |
| 10 | FirstDate | Date when this participant started in the study (first day of the first stage). |
| 11 | LocalTimeOffsetInMinutes | Information about participant’s timezone (if the LocalOffsetInMinutes is -300 it implies that the participant is in (-300/60 = -5 Hrs from UTC). |
| 12 | ScheduledTimestamp | Date and Time at which the event was scheduled for. |
| 13 | ScheduledUTCTimestamp | Same as ScheduledTimestamp but in Coordinated Universal Time (UTC). |
| 14 | WeeksInStudy | Number of weeks in the study as of the time of the assessment. |
| 15 | ScheduledDay | Number of days in the study as of the time of the assessment. |
| 16 | ScheduledTime | Date and time at which the assessment was scheduled. |
| 17 | ScheduledTimeDecimal | Time of the day represented as decimal (14.25 hrs = 2 PM and 15 Minutes). |
| 18 | NotificationTimestamp | When was the notification sent out for the assessment. |
| 19 | NotificationUTCTimestamp | The notification in UTC time. |
| 20 | NotificationDay | Days since the participant started in the study and when the participant was notified. |
| 21 | NotificationTime | Time of notification. |
| 22 | NotificationTimeDecimal | Time in decimal format. |
| 23 | StartTimestamp | Date and Time when the assessment started. |
| 24 | StartTimeUTCTimestamp | Date and Time in UTC timezone. |
| 25 | StartDay | Number of days between when the participant started the study and when this assessment was started. |
| 26 | StartTime | Time when the assessment started. |
| 27 | StartTimeDecimal | Time in decimal format. |
| 28 | CompletedTimestamp | Date and Time when the assessment was completed. |
| 29 | CompletedUTCTimestamp | Date and Time when the assessment was completed in UTC timezone. |
| 30 | CompletedDay | Days between when the participant started the study and when the assessment was complete. |
| 31 | CompletedTime | Time of the day when the assessment was completed. |
| 32 | CompletedTimeDecimal | Time of the day when the assessment completed in represented as a decimal. |
| 33 | LastInteractionTimestamp | The last interaction of the participant with any question in the assessment in the participant’s timezone. |
| 34 | LastInteractionUTCTimestamp | The last interaction of the participant with any question in the assessment in UTC timezone. |
| 35 | LastInteractionDay | Days between when the participant started the study and when participant last interacted with the assessment. |
| 36 | LastInteractionTime | Time of day when the last interaction happened. |
| 37 | LastInteractionTimeDecimal | Time in decimal format. |
| 38 | TotalSnoozeMinutes | Total number of minutes an assessment was snoozed. |
| 39 | SnoozeCounter | Total number of times an assessment was snoozed. |
| 40 | Latitude | Latitude when the assessment was attempted by the participant. |
| 41 | Longitude | Longitude when the assessment was attempted by the participant. |
| 42 | GPSAccuracy | Estimated GPS accuracy in meters. |
Any columns that follow the GPSAccuracy column are names of questions and their responses associated with that assessment.
Data download to SPSS and SAS are coming soon!
Create and Enroll Participants
All participants need to be using the latest version of the Insight app. To manually update the app, follow the instructions below:
On the phone, find Google Play Store and select it
Look for the “Search for apps & games” search bar > Select the three horizontal lines to the left
The screen will slide to the right > Select My apps and games
Find Insight mHealth Platform > Select Update
The Insight App will update > Scroll down to “Recently Updated” > Find Insight mHealth Platform and select Open
There are two ways to create and enroll new participants. The Code Method described below should be used in most circumstances.

See Steps A through B Below

See Steps C through F Below
The Code Method involves using the Insight CMS website to create a unique participant code and that code is used when the participant downloads the Insight app from the app store.
a. Click the Participants tab.
b. Click Add New Participant on the top right of the screen.
c. In the ID field, enter a unique study identifier for this participant (numbers and letters are allowed).
d. In the INFO tab, identify this new participant as: Active (i.e., a participant that is active in the study), Completed (i.e., a participant that has completed the study), Test (i.e., a mock participant that is being used to test the study app), or Archive.
e. Place the participant into a Group by clicking one of the groups that you have created for your study.
f. In the PHI tab, enter protected health information that includes Name, Date of Birth, Address, Phone Numbers, if desired/needed, in available fields (e.g., First Name, Date of Birth, type field notes).
Studies that collect PHI like the examples above or GPS require a different contract than studies that do not collect PHI.
g. See Other Features section to learn how you can personalize app messages to a participant’s first name.
Studies that collect address and other PHI require a different contract than studies that do not collect PHI.

See Steps H through J Below
h. Click the Schedule tab to select the Participant’s Time Zone, wake time, sleep time, and preferred assessment time. These times can be used to prompt assessments (see Scheduling for Each Event Type in the Events section above).
i. Use the Time Zone dropdown to select the Time Zone for the Participant. The default value of Time Zone is the Time Zone of the machine being used to create the Participant.

Select a Time Zone from the dropdown for the Participant, as shown below.

Do not set ANY participants scheduled sleep time past 11:30 pm. Having a sleep time after 11:30 pm will interfere with the assessment schedule.
j. Click the Settings tab to add additional settings (optional):
i. Bedfont iCO – type in the 3 digit iCO pin number located on the side of the iCO device that is given to this participant.
ii. Facial Recognition –
iii. Greenphire Participant – type in the 8 digit Greenphire Master Card number on the card that is given to this participant.
iv. Rich Text Setting –
v. Pedometer Goals – Participant specific goals; if the setting is present at the question and participant level, the participant level setting will take precedence. More information about Pedometer Configuration here.
“Daily Step Goal”: Recommended value: between 7,500 and 10,000 steps
Not necessary if “Show Step Timelines” is set to false.
“Bout Duration Minutes” and “Bout Step Goal”: is used to determine the steps per minute threshold for determining if a reading is active or sedentary (Required for all charts)
Bout Duration Minutes recommended value: ~ 30 minutes
Bout Step Goal recommended value: ~ 250 steps for a 30 minute bout duration
“Daily Active Minutes Goal: Not necessary if “Show Active Minutes Gauges” is false
“Daily Active Bout Goal”: Not necessary if “Show Active Bout Gauges” is false
“Daily Sedentary Minutes Goal”: Not necessary if “Show Sedentary Minutes Gauges” is false
k. Click Create Participant.
l. This new participant has been created and is now listed at the top of the list on the Participants tab.
m. Select the new participant and note the Setup Code at the top of this screen.
n. Download “Insight mHealth Platform” from the Google Play Store. Insight will work on most Android smartphones (an Apple version of the app is coming soon). Select “Allow” for all permissions, toggle the Allow Permission button to the right (this ensures Insight will prompt surveys when scheduled), click back, click allow for the “Stop optimizing battery usage” question (this ensures that Insight will work when the phone battery is low).
o. Type the participant’s unique Setup Code into the Code field on the participant’s phone.
This code is locked after it is used. The code can be unlocked and reused when/if a participant gets a new phone. To unlock this code, click the lock icon in CMS, type Reset, click confirm reset.
NEVER use the same code on two active phones because the phone creates the survey schedule and syncs to the server. Thus, if two phones with the same setup code are active, the number of scheduled surveys will be doubled.
p. The home screen for the first stage of your study will be displayed in the app.
q. Manually sync the app with the server by swiping the phone screen from left to right and clicking Sync.
2. The Researcher Login Method can be used to enroll participants into studies. This method should be used in rare cases.
a. Download “Insight mHealth Platform” from the Google Play Store (an Apple version of the app is coming soon).
b. Click the Researcher Login button.
c. Type your Researcher Login credentials into the field.
NEVER give a research participant your login credentials because that login code can be used to access participant data in the CMS.
d. Select the appropriate study from your list of studies.
e. Select YES to confirm selected setup for selected study.
f. Click ![]() on the top right of the screen to create a new participant (you can also select a participant that has already been created – however, it is advised to use the Code Method above to accomplish this).
on the top right of the screen to create a new participant (you can also select a participant that has already been created – however, it is advised to use the Code Method above to accomplish this).
g. Select a Study Group by clicking the Study Group field.
h. Type in a new participant identifier into the Participant ID field.
i. Select Wake and Sleep times (and preferred time if this feature is being used) for each day of the week (note day of the week on the top of the phone screen).
j. Click Add Participant to create the participant on the phone and on the server.
k. The home screen for the first stage of your study will be displayed.
l. Manually sync the app with the server by swiping the phone screen from left to right and clicking Sync.
Wipe Data from Lost/Stolen Phones
We have developed a “kill switch” that deletes all data from the app when it is executed. Note: this feature requires that the phone is on and connected to a cellular network or Wi-Fi at the time the kill switch is executed.
Click Participant tab in CMS
Click the Participant ID that you would like to wipe from a phone
Click Wipe App
Type the Participant ID into the text field
Click Confirm Wipe
Participant Dashboard Settings and Features
These features allow you to add appointments to the home screen of the app, edit participants (e.g., wake & sleep times), and monitor participant use of the Insight app features. This tab enables you to display Insight app activities and interactions for each participant. Rows indicate specific events that the app has recorded (e.g., assessments, phone power offs, app syncs, event dismissed).
Activity Tab: the following details the top row of a participant’s Activity log
Date: MM/DD/YY and time (displayed in military time) of the Assessment scheduled.
Stage: where the participant is currently in the study.
Type: what type of Assessment is scheduled.
For instance, Fixed, Random, Participant Initiated, or Follow Up.
Name: what the assessment is labeled
For example, “Post-Quit Daily Evening, Morning EMA” etc.
Use assessment names that are easy to differentiate
Snoozed Minutes: the number of minutes an assessment was delayed
The participant has to actively press “Snooze” when an assessment is prompted. This will delay the assessment to a potentially better time for the participant.
Scheduled: what time an Assessment is scheduled in the CMS according to the Assessment settings.
Notified: when the phone notifies a participant of the Assessment by ringing/vibrating.
The requested notification time is typically honored by the phone operating system, but can vary depending on the priorities established by the internal operating system. Generally, this time correlates to the scheduled time but may vary by 5-10 minutes. In extreme cases, (again determined by the operating system) this may be longer.
The volume is dependent on each individuals notification settings; Insight does not regulate this. If a phone is set to silent, then no sound will be heard at the time the assessment is notifying.
Started: the time the participant begins the Assessment
Completed: the time the participant ended the Assessment
If the participant did not answer all the questions in an assessment, no time will be shown.
Responses: how many questions were answered by the participant during the Assessment.
Example of a participant’s Activity tab for the assessment ‘Post-Quit Daily Morning (QG)’

The Activity tab includes the following information/settings/options:
Start date – this is the day the app was initiated for this participant.
Last completed sync – this is the date and time of the most recent sync between the participant’s phone and the server
Modify the period of activities displayed on this page by clicking and changing the Start Date and End Date fields. Click Refresh to update the Activity screen.
Click More Filters to add or remove activities that are displayed on this page.
Click Sync to manually sync the phone using the CMS (if the phone is on and connected it will be synced to the server).
Click Ping to send a signal to the participant’s phone to see if the phone is on and connected to a WiFi or data network.
If the phone is on, connected to a WiFi or data network a green ‘Data Sync Complete’ log will appear minutes later in the participant’s Activity tab.
Click Wipe App to wipe data from lost or stolen phones.
Time Zone can be toggled to display activities using the researcher’s time zone, the participant’s local time zone, or UTC time (Coordinated Universal Time).
Event Dismissed: when an “Event alt ID ##### Dismissed” log appears before or after an assessment.
An 'Event alt ID ###' log will only appear in the Activity tab when a participant has actively dismissed an assessment; this indicates they clicked “dismiss” when an assessment(s) was notified by ringing/vibrating.
If the participant allows the assessment to ring/vibrate without any intervention, there will not be an ‘Event Alt ID ### Dismissed' entry in the Activity tab.
Event Dismissed Example

Syncing: each participant's phone will randomly sync four (4) times in a twenty-four (24) hour time frame.*
*Syncing data from the phone requires the phone to be on, connected to WiFi or a data network.
If a participant is not syncing for a day or more, it can be speculated the phone is off/shut down, in airplane mode, not connected to WiFi or a cellular service. It is recommended to reach out to the participant for clarification.
Information tab – View/edit participant information (e.g., name date of birth), and write notes about the participant.
Contact – View/edit participant contact information (e.g., address, phone number).
Appointments – Create appointment reminders for each participant. This reminder will appear at the top of the app home screen.
Click Add Appointment.
In the Date field, use the calendar to select the date of the appointment.
In the hh and mm fields, select the specific hour and minute for the appointment.
Select AM or PM
If the visit will be compensated, type the amount in the Compensation field.
If desired, type a short message in the Message field (e.g., Week 4 Follow-up Visit).
Click Add Recurring Appointment to create a recurring appointment (e.g., weekly, monthly).
Click Show Old Appointments to view appointments that have already passed.
Next Appointments will automatically populate when the date/time of the previous appointment is reached.
Stages – View a summary of activities that the participant completed in each stage of the study.
Schedule – View/edit the participant’s Wake, Sleep, and Preferred Assessment time. Note: Changes made to these settings will not go into effect until a stage change occurs or a stage is reset by clicking the Reset button. Instructions are displayed on the Troubleshooting Wiki labeled Changing Participants Sleep Schedule.
Settings – View/edit settings (e.g., iCO pin number, Greenphire credit card number).
Payments
Percent Participation – View calculated percentage of all paid assessments completed within each stage
Send Greenphire Payment – Click Send Manual Payment to automatically transfer money to the participant’s Greenphire Master Card.
Payments – View a history of all payments and status of all payments to the participant (e.g., processing, paid).
Facial Recognition – View actual pictures taken and algorithm derived facial match percentages during the facial recognition process.